Show in Contents

Add to Favorites

Home: Autodesk Maya Online Help

Keyframe brush and stroke attributes

Animating strokes

Animate the stroke path

Animate tube growth, gaps, twist, and textures
Using
the Paint Effects flow animation
feature you can animate the following:
- the
flow of gaps, twist, and/or textures
- uniform
tube growth
- the
growth simulation
- tube
death
Animate the flow of gaps, twist, and/or textures
If
tubes have gaps, twist, and/or textures applied to them, you can
animate the pattern they create “flowing” or cycling along the length
of the tubes as if the tubes were joined at the ends.
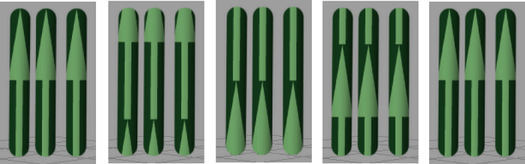
By animating the flow of gaps, you can create
effects such as rainfall. By animating the flow of twist, you can
get a spiraling effect. The following images show a texture flowing
one complete cycle from root to tip.
To
make gaps, twist, and textures flow
- Select
the stroke.
- In
the Attribute Editor, click the
brush tab.
- Set
the desired gap, twist, and/or texture settings. For details, see
Create gaps in tubes,
Set twist attributes,
and
Map textures to color and opacity, respectively.
- Expand Flow
Animation and set a Flow Speed for
the gaps, twist, or texture. Positive numbers make them flow from
tube base to tip. Negative numbers make them flow from tip to base.
The Time Clip and Stroke
Time options also animate tube growth when turned on.
For information, see
Animate uniform tube growth,
Animate the growth simulation,
and
Animate tube death.
You can use the Time setting
to animate flow over time. For more information, see
Time.
- If
you are animating gap flow, you can check that the flow is as you
want it before rendering the animation by clicking the Play
Forward button in the scene view.
- Render
the animation. See
Render a scene with Paint Effects strokes.
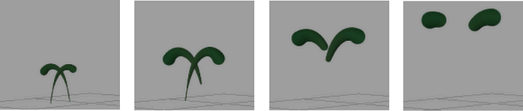
Animate uniform tube growth
You can animate the
tubes along the stroke path growing at the same time, as if they
were all “planted” simultaneously. Any gaps, twist, and/or texture applied
to the tubes will flow along the length of the tubes as the tubes
grow.
To
animate all the tubes along the stroke growing at the same time
- Select
the stroke.
- In
the Attribute Editor, click the
brush tab.
- Expand Flow
Animation and set a Flow Speed.
(If you have gaps, twist, or textures applied to the tubes, the
flow speed also defines the speed that they flow along the tube.)
- Turn
on Time Clip.
- Set
the Start Time (seconds),the time
in the animation that the tubes will first appear) and the End
Time (seconds), the time in the animation when tubes
first begin to die).
Set the End Time (seconds) to
end at the same frame your animation ends or later. This ensures
that the tubes do not die before the animation is complete. For
details on making tubes die, see
Animate tube death.
You can use the Time setting
to animate growth over time. For more information, see
Time.
NoteStart Time (seconds) and
End
Time (seconds) are measured in seconds. So if your
Time unit
is set to 24 fps, for example (
Window > Settings/Preferences > Preferences,
then click the
Settings category), and the
Start Time
(seconds) is 1, then tubes will first appear on frame
24.
If you know what frame you want tubes to appear
on, divide this frame number by the frames per second defined by
your Time unit to determine what value
to enter in the Start Time (seconds) box. For
example, if you want your tubes to appear on frame 60 and your Time unit
is set to NTSC (30 fps), divide 60 frames by 30 frames per second,
for a Start Time (seconds) of 2 seconds.
You can perform this calculation by creating
an expression in the field. Type an equals sign (=) followed by
the calculation. In the previous example, you would type:
=60.0/30
Notice that the time must have a floating point
decimal.
- In
the scene view, click the Play Forward button
to check that the growth is as you want it.
- Render
the animation. See
Render a scene with Paint Effects strokes.
NoteIf you are simultaneously animating tube
growth and texture flow (for example, the growth of a textured tree),
the texture may appear to flow faster than the tree grows. To remedy
this, select the strokes and run the script freezeBrushTexture.mel on
the command line (stored in your mayapath/Maya/Contents/scripts/paintEffects (Mac
OS X) or mayapath/scripts/paintEffects (Windows
and Linux) directory).
Animate the growth simulation
You
can animate the growth simulation. Tubes “planted” at the beginning
of the stroke start growing at the beginning of the stroke path
and continue to grow as new tubes start growing in steps along the
path. Any gaps, twist, or texture applied to the tubes will flow
along the length of the tubes as the tubes grow.
To
animate all the growth simulation
- Select
the stroke.
- In
the Attribute Editor, click the
brush tab.
- Expand Flow
Animation and set a Flow Speed.
(If you have gaps, twist, or textures applied to the tubes, the
flow speed also defines the speed that they flow along the tube.
- Turn
on Time Clip.
- Turn
on Stroke Time.
- Set
the Start Time (seconds), the time
in the animation that the tubes will first appear) and the End
Time (seconds), the time in the animation when tubes
first begin to die).
Set the End Time (seconds) to
end at the same frame your animation ends or later. This ensures
that the tubes do not die before the animation is complete. For
details on making tubes die, see
Animate tube death.
You can use the Time setting
to animate growth over time. For more information, see
Time.
NoteStart Time (seconds) and
End
Time (seconds) are measured in seconds. So if your
Time unit
is set to 24 fps, for example (
Window > Settings/Preferences > Preferences,
then click the
Settings category), and the
Start Time
(seconds) is 1, then tubes will first appear on frame
24.
If you know what frame you want tubes to appear
on, divide this frame number by the frames per second defined by
your Time unit to determine what value
to enter in the Start Time (seconds) box. For
example, if you want your tubes to appear on frame 60 and your Time unit
is set to NTSC (30 fps), divide 60 frames
by 30 frames per second, for a Start Time (seconds) of
2 seconds.
You can perform this calculation by creating
an expression in the field. Type an equals sign (=) followed by
the calculation. In the previous example, you would type:
=60.0/30
Notice that the time must have a floating point
decimal.
- In
the scene view, click the Play Forward button
to check that the growth is as you want it.
- Render
the animation. See
Render a scene with Paint Effects strokes.
NoteIf you are simultaneously animating tube
growth and texture flow (for example, the growth of a textured tree),
the texture may appear to flow faster than the tree grows. To remedy
this, select the strokes and run the script freezeBrushTexture.mel (stored
in your Maya scripts directory) on the command line.
Animate tube death
You
can animate special effects, like tubes “bursting” from the stroke
path, by setting birth and death times that define when tubes start
growing in the animation, and when they begin to disappear.
When the animation reaches the death time, segment
at the tube roots disappear (or die) while segments continue to
be added at the tube tips. When the tube reaches its life span,
the segments continue to disappear from the root to the tip until
the tube completely disappears.
Any gaps, twist, or texture applied to the tubes
will flow along the length of the tubes as the tubes grow.
To
animate tube death
- Select
the stroke.
- In
the Attribute Editor, click the
brush tab.
- Expand Flow
Animation and set a Flow Speed.
(If you have gaps, twist, or textures applied to the tubes, the
flow speed also defines the speed that they flow along the tube.
- Turn
on Time Clip.
- Turn
on Stroke Time.
- Set
the Start Time (seconds), the time
in the animation that the tubes will first appear) and the End
Time (seconds), the time in the animation when tubes
first begin to die).
You can use the Time setting
to animate tube death over time. For more information, see
Time.
NoteStart Time (seconds) and
End
Time (seconds) are measured in seconds. So if your
Time unit
is set to 24 fps, for example (
Window > Settings/Preferences > Preferences,
then click the
Settings category), and the
End Time
(seconds) is 4, then tubes start to die on frame 96.
If you know what frame you want tubes to begin
to die on, divide this frame number by the frames per second defined
by your Time unit to determine what
value to enter in the End Time (seconds) box.
For example, if you want your tubes to begin to die on frame 120
and your Time unit is set to NTSC (30
fps), divide 120 frames by 30 frames per second, for
an End Time (seconds) of 4 seconds.
You can perform this calculation by creating
an expression in the field. Type an equals sign (=) followed by
the calculation. In the previous example, you would type:
=120.0/30
Notice that the time must have a floating point
decimal.
- In
the scene view, click the Play Forward button
to check that the animation is as you want it.
- Render
the animation. See
Render a scene with Paint Effects strokes.