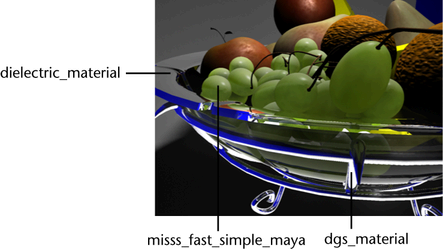
dielectric_material node
In this scene, the bowl is created using the dielectric_material shader.
This shader is commonly used for dielectric media such as glass,
water, and other liquids.
Sample
workflow for dielectric_material
- Open
the Hypershade editor. Under the Create tab,
select Create mental ray Nodes. Click
on dielectric_material under the Materials section
to create the shader.
- In
the shader’s Attribute Editor, change Index
of Refraction to 1.65. This is the index of refraction
for a typical glass material.
- Click
on the dielectric_material1SG node. In the Attribute
Editor, expand the mental ray section. Since photons
are used in this scene (for caustics and global illumination, and
so on), a photon shader needs to be added to the shader group. Under
the Custom Shaders section, click for the Photon
Shader attribute and select dielectric_material_photon (under
the Photonic Materials section).
This is the corresponding photon shader for the dielectric_material shader.
- In
the Attribute Editor, change the Index
of Refraction for the dielectric_material_photon to
also be 1.65. In this scenario, we wish to simulate both the appearance
of glass and the caustic effect of glass. Therefore, the Index
of Refraction for the dielectric_material and dielectric_material_photon shaders
are set to identical values.
dgs_material node
The stand of the bowl is created using the dgs_material
shader. This shader is commonly used to simulate glossy materials
such as metals, mirrors, glossy paint and plastic, and so on.
Sample
workflow for dgs_material
- Open
the Hypershade editor. Under the Create tab,
select Create mental ray Nodes. Click
on dgs_material under the Materials section
to create the shader.
- Click
on the dgs_material1SG node. In the Attribute Editor,
expand the mental ray section. Since photons are used in this scene
(for caustics and global illumination, and so on), a photon shader
needs to be added to the shader group. Under the custom shaders
section, click
 for the Photon Shader attribute
and select dgs_material_photon (under
the Photonic Materials section).
This is the corresponding photon shader for the dielectric_material shader.
for the Photon Shader attribute
and select dgs_material_photon (under
the Photonic Materials section).
This is the corresponding photon shader for the dielectric_material shader.
Subsurface scattering node
The grapes in this scene are created using the
subsurface scattering node. Subsurface scattering is usually used
to create materials that scatter or absorb light internally (rather
than reflect light at the surface). Using subsurface scattering,
the grapes in the scene appear translucent and glowing.
mental ray for Maya includes several subsurface
scattering nodes, for example, misss_physical, misss_fast_shader, misss_skin_specular,
and so on.
misss_physical simulates subsurface
scattering in the most realistic and physically accurate way. Alternatively,
misss_fast_* provides a reasonable simulation of subsurface scattering,
but allows for more efficient rendering and is easier to set up.
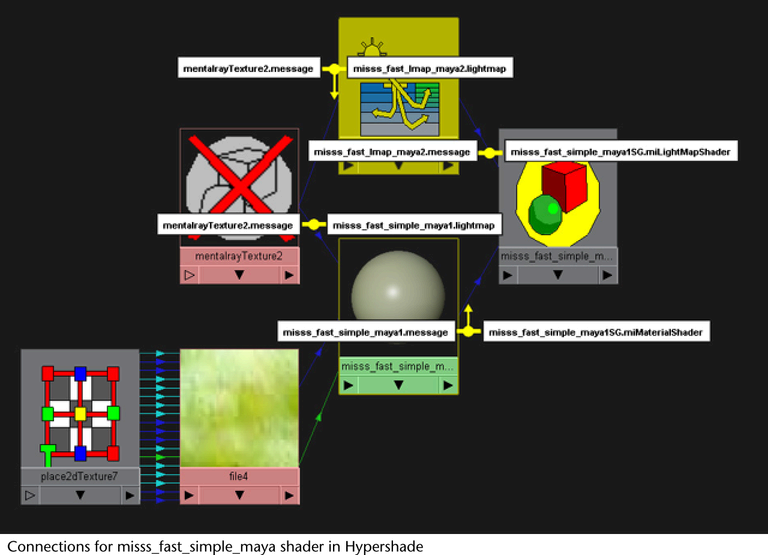
Sample
workflow for misss_fast_simple_maya shader
- Open
the Hypershade editor. Under the Create tab,
select Create mental ray Nodes. Click
on misss_fast_simple_maya under
the Materials section to create
the shader.
- Since
subsurface scattering involves the bouncing of light near the surface, a
lightmap must be attached to the shader. In the Hypershade editor,
click misss_fast_lmap_maya under
the Light Maps section to create
the lightmap shader.
- Click
on the misss_fast_lmap_maya shader
node. In the Attribute Editor, expand the Lightmap
Write section and click for the Lightmap attribute
to create a texture node.
- In
texture node’s Attribute Editor, check Writeable.
Change the Filter Size Width and Filter
Size Height to your render size. Change File
Size Depth to 32 bits. Enter a file name in the Image
Name attribute.
- Click
on the misss_fast_simple_maya material
and map the misss_fast_lmap_maya shader
to its Lightmap section.
- Increase
the number of samples in the Lightmap section
to create a smoother effect. Increasing the number of samples would
create more scattering and increase the intensity of the light gather
effect. The scene thus has more glow.
- Tweak
the values under Algorithm control for better
results.
TipBeginning in Maya 8.5, you can also get
the look of subsurface scattering in your scene by tuning the scatter
attributes available in the mental ray section of the
Anisotropic,
Blinn,
Lambert,
OceanShader,
Phong and
PhongE surface
material nodes. For more information regarding these scatter attributes,
see
Scattering and
Work with Scattering.