Show in Contents

Add to Favorites

Home: Autodesk Maya Online Help

Animating fur attributes

Animating fur attributes

Adding movement to fur

Animate fur attributes
You
can animate most fur attributes to achieve special effects. For
example, you can animate fur length so that fur appears to grow,
or you can animate fur inclination so that a character’s fur stands
on end.
Density is
one fur attribute that cannot be animated. However, animating Baldness will
give the same effect as animating Density.
Animate fur attributes by keying the changes
you make to the attributes. The following procedure describes just
one way of keyframing. For other methods, refer to
Animation in Maya in
the Animation guide.
To
key fur attributes
- Attach
a fur description to the surface. For details, see
Create fur.
- Turn
on Auto Key by clicking
 at the
bottom-right corner of the Maya main window and move to the first
frame. For other methods, refer to
Animation in Maya in
the Animation guide.
at the
bottom-right corner of the Maya main window and move to the first
frame. For other methods, refer to
Animation in Maya in
the Animation guide.
- Do
one of the following:
- Select
the fur feedback and in the INPUTS section
of the Channel Box, select the appropriate
fur description.
- Select
Fur > Edit Fur Description > FurDescriptionName to
open the Attribute Editor.
- Select
the attribute you want to animate, right-click it and select one
of the following:
- If
you are in the Channel Box, select Key
Selected.
- If
you are in the Attribute Editor, select Set
Key.
- Move
to another frame and edit the fur description attributes. For details, see
Change fur attributes.
- Repeat
step 6 as required.
- Click
the Play Forward
 button
to check that the attributes are behaving the way you want them
to.
button
to check that the attributes are behaving the way you want them
to.
- Render
the animation. See
Render an animation with fur.
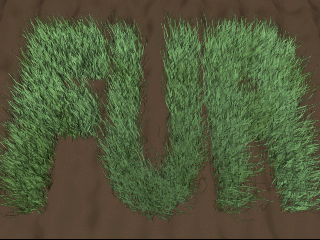
Make fur grow
The following example illustrates how you can animate
fur attributes by keyframing them. In this example, length is animated
to produce the effect of grass growing. (Notice that Maya Fur can
also be used for non-fur effects, like grass or wheat.)
To play the animation, click the link below.
growAnim.mov
To
animate grass growing
- Create
a plane and add lights to the scene.
- Add
a texture to the plane to make it look like earth.
- Attach
a fur description to the surface and name it. For details, see
Create fur.
- Set
the fur attributes in the Attribute Editor (
Fur > Edit Fur Description > FurDescriptionName).
- Map
a texture to the fur base and tip color to make it look more realistic. Try
green marble for grass. For details, see
Map fur attribute values.
- Add Scraggle.
Try a value of 0.3.
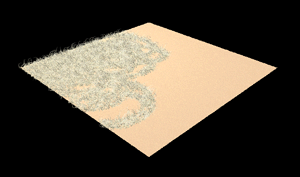
- Map
a texture or file to the Baldness attribute.
In this example, the following file texture was used:
- Bake
the Baldness attribute.
The surface remains bald (no grass will grow)
where the map is black (value of 0). For details, see
Map fur attribute values.
- Turn
on Auto Key by clicking at the
bottom-right corner of the Maya main window and move to the first
frame.
- Set
the fur Length to 0.
- In
the Attribute Editor, right-click
the Length field and select Set
Key.
- Move
to the last frame and make the fur longer. Try a Length of
4.
- Click
the Play Forward button
to check that the attributes are behaving the way you want them
to.
- Render
the animation. For details, see
Render an animation with fur.
Make fur spread using animated file textures
The following example illustrates how you can animate
fur attributes by mapping animated file textures to them. In this
example, baldness is animated to produce the effect of fur sprouting
and spreading across a character, like a werewolf.
To play the animation, click the link below.
spreadFur.mov
To
paint a series of textures
- Switch
to the Paint Effects panel and select Paint
> Paint Canvas.
- Change
the size of the canvas to 256 x 256.
- Select Canvas
> Set Size.
- Set
both the X Size and Y
Size to 256 and click Set Size,
and then click Close.
- Set
the canvas color to black if you want the value of the mapped attribute to
be 0, or to white so the value is 1.
- Either
leave the canvas black for the first file texture or paint a little
bit. Then save the first texture in the sequence:
- Select Canvas
> Save As.
- Go
to the textures directory.
- Type
a filename with a frame number, such as, spreadFur.1.iff, and click Save.
- Paint
the canvas a little more and then save the next texture in the sequence.
- Repeat
step 5 until you’ve finished creating all the sequences for the
animated file texture.
To
animate fur spreading across a character like a werewolf
- Create
a plane and add lights to the scene.
- Add
a texture to the plane to make it look like skin.
- Attach
a fur description to the surface and name it. For details, see
Create fur.
- Apply
the Llama fur preset to the Fur
Description (
Fur > Edit Fur Description > FurDescriptionName).
- Click
the Presets button in the Fur
Description, select Sheep and
then select replace.
- Map
an animated file texture to the Baldness attribute:
- Right-click Baldness and
select Create New Texture. For details,
see
Apply animated file textures to objects.
- Select File from
the Create Render Node window.
- Make
sure you are at frame 1.
- In
the file node, click the folder button to browse for the following
animated file texture in the textures directory, spreadFur.1.iff, then click Open.
(This is the first texture file in the sequence.)
- Turn
on Use Image Sequence. This automatically
keys each frame with the numbered texture file on a 1 to 1 basis.
- Bake
the Baldness attribute.
- In
the Fur Description select Baldness from
the Bake Attribute drop-down list
and click Bake.
The surface remains bald where the map is black
(value of 0) and grows where the surface becomes white (value of
1). For details on painting a sequence of textures, see
To paint a series of textures.
- Click
the Play Forward button
to check that the attributes are behaving the way you want them
to.
- Render
the animation. For details, see
Render an animation with fur.