


Use the tools found above the shelf area to control the shelf sets.
Add tools to the shelf area of the Modeling control panel
Move tool icons or entire tool palettes to the shelf area of the Modeling control panel by dragging them with the middle mouse button. By selecting the tools you use most frequently, you can customize your shelf sets.
Delete tool icons or shelves on the Modeling panel using the Trash tool

Drag unwanted tool icons or shelves from the Modeling control panel with the middle mouse button and drop them over this icon.
Manage shelf sets using the Shelf Options menu
Click the Shelf Options tab in the Modeling control panel for a drop-down menu that lets you add, save, clear and replace shelf sets in the shelf area.
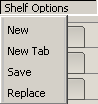
Click New in the drop-down menu. This automatically deletes the current shelf set. A window appears to let you name the new shelf.
Click New Tab in the drop-down menu. A window appears to let you name the tab. Tabs provide a convenient way to organize your shelf set, and let you compress the tools they contain to a single header.