Create one or more surfaces from a set of profile curves, along a pull direction.
Use the Multi-Surface Draft tool
Note is now the preferred tool to create Draft surfaces from free curves.
- Choose Surfaces > Draft Surfaces > Multi-Surface Draft
 ❒.
❒.
- In the control window set to , and choose a pull direction from the .
- In the section, turn off everything except , so only free curves will be selectable as input.
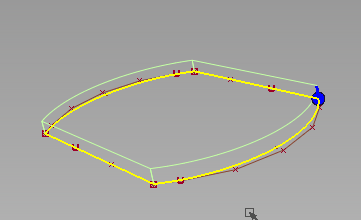
- Box-select all of your curves. The curves can be disjoint (non-touching), G0 (position continuous) or G1 (tangent continuous).
You can also pick the curves individually if you want.
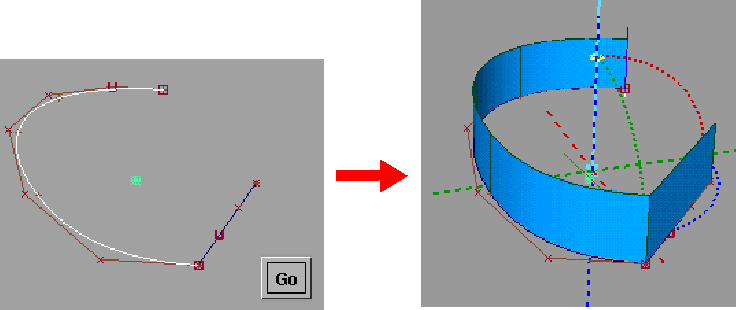
- Click the button.
The draft surfaces are built and a manipulator appears.
- Do any of the following:
- Change the pull direction by choosing a different draft vector option.
- Change the and of the surface(s) through the control window or by using the manipulator (see Set the angle or height at a point along the surface).
- Turn on and change the of the surface(s).
- Turn on to make the surface(s) extend on both sides of the curves.
- Turn on to automatically extend and/or trim the draft surface(s) at corners (where the original curves share endpoints).
- Click again to update the surface(s), or turn on .
Alternate method: Use the Draft/Flange tool
NoteThis tool is deprecated and may be going away in a future release. We recommend that you use the tool workflow described above.
Pull a surface from a set of curves
- Choose Surfaces > Draft Surfaces > Draft/Flange
 in mode.
- Click the curves, then click .
- Do any of the following:
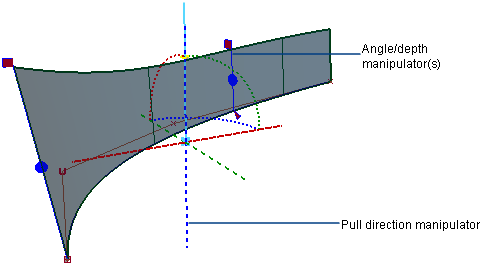
- Use the pull direction and angle/depth manipulators to adjust the draft surface.
 -click a point on one of the original curves to add another angle/depth manipulator. (Input curves must be at least tangent
continuous for this to work).
-click a point on one of the original curves to add another angle/depth manipulator. (Input curves must be at least tangent
continuous for this to work).
 -click an angle/depth manipulator to delete it.
Note
At corners (where the original curves share endpoints), the tool will extend the draft surfaces to fill any gap if necessary, then intersect and trim them, to form a sharp corner.
Set the pull direction
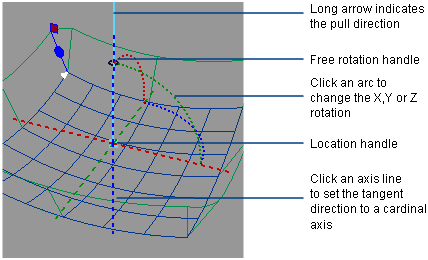
Interactively, with the manipulator
- Click an axis line to set the pull direction.
- Type “x”, “y”, or “z” to set the pull direction to an axis. Type “w” to set the pull direction to the current window’s view
axis.
- Click one of the arcs, then drag the mouse left and right to change the pull direction.
- Click the free rotation handle to rotate freely in all directions.
- Click an existing reference vector to align the manipulator with it.
- Type three numbers to set the rotation values exactly.
- Click the location handle, then drag to move the manipulator in space.
Through the Vector Options in the option box
- Select , , or to align the pull direction with that axis
- Select to align the pull direction normal to the view. Click to update the pull direction if the view has been modified.
- Select then specify the name of an existing vector or pick it in the view
- Select to create a vector object from the current pull direction
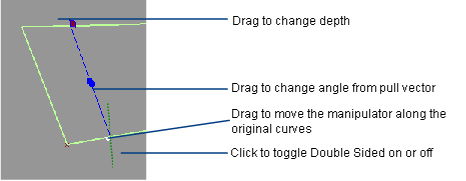
Set the angle and depth at a point along the draft surface
- Click one of the handles, then drag left or right to change the parameter, or type a number.
- Click the green dotted line to toggle on or off. This lets you build a draft surface on each side of the curve.
What if...?
The surface has problems, and shows red dotted lines?
The pull direction is too close to the tangent of the curve indicated by the red dotted line.