Lets you duplicate and place copies of a set of target objects along curves or surface locators.
You can also specify how these copies are positioned along the selected curves and points.
The destination curves can be free curves, curves on surface, isoparms, trim edges, or patch precision curves, as well as continuous sequences of curves.
 .
.
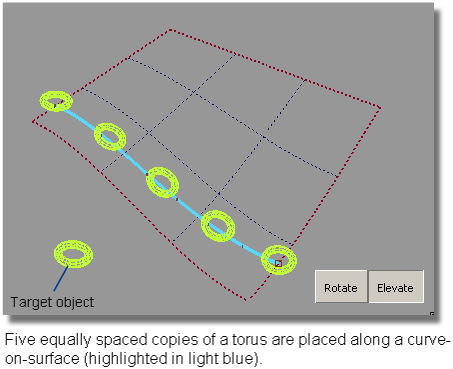
The tool places a copy of the targets on each surface locator point, and, by default, one duplicate on each curve selected. Continuous sequences of curves are treated as one destination.
The target copies are oriented so that their local Z-axis is aligned with the surface normal at the point where they are placed.


The tool preserves construction history so that modifying the target objects or destination curves (or point) will automatically update the duplicates.
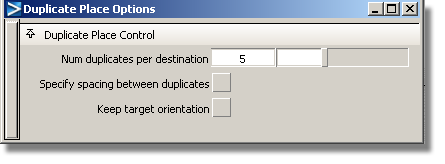
This mode is only enabled when the Specify spacing between duplicates option is turned on.
To translate, click-drag the mouse left and right, and the duplicates slide along the curve that they are placed on. You can also type the offset (in terms of fractions of the length along the curve).
This mode allows you to rotate the copies about the curve or the point. Click-drag the mouse left and right to see the effect.
This mode allows you to change the spacing between the bottom of the target copies and the curve or point that these copies are placed on. Click-drag the mouse left and right to see the effect.
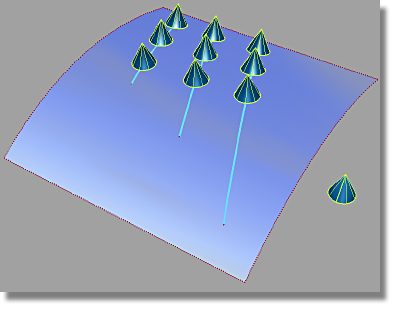
In the example below, a cone primitive, made up of two surfaces, is selected as the target. The three curves-on-surface are selected together as the destination curves for this setup. After accepting the input, the Duplicate Place tool makes three copies of the cone for each destination curve, and places them on each curve. The Specify spacing between duplicates option is turned on and a distance specified, so the nine cones are placed in a neat 3x3 arrangement.

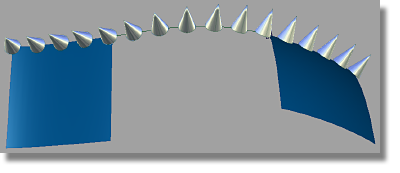
In this next example, sixteen copies of a cone are placed along a destination made up of a continuous sequence of curves — two surface boundaries and one blend curve between them.

The Duplicate Place tool is then asked to space these sixteen copies uniformly along the length of the curve sequence (by turning off the Specify spacing between duplicates).
You can see that the curve sequence is treated as one destination, and that the cones are placed on the blend curve so that they rotate in a gradual manner to match the different normals of the two surfaces.