The modeless Manage Layers dialog, available from the main toolbar, is where you create and delete layers. You can also view and edit the settings for all layers in the scene, as well as the objects associated with them. You can specify the name, visibility, renderability, color, and objects' and layers' inclusion in the radiosity solution from this dialog.
Objects are organized by layer in the dialog, in an expandable list. By clicking ‘+’ or ‘-‘, you can expand or collapse (respectively) the object list for each layer. You can also sort the layers by clicking any of the column heads.

 Another useful tool is the ability to open the Object Properties dialog and Layer Properties dialog for one or more highlighted objects or layers directly from the Manage Layers dialog by clicking the corresponding icon.
 ) and By Layer (
 ), and, in the Render, Color, and Radiosity columns, By Object. When a property is set to By Layer, the object inherits the
property setting from its associated layer.
), and, in the Render, Color, and Radiosity columns, By Object. When a property is set to By Layer, the object inherits the
property setting from its associated layer.
When you create new layers, 3ds Max names them sequentially by default: Layer01, Layer02, and so on. After creating a layer, you can rename it. 3ds Max assigns a random color to all new layers. You can accept the default settings or specify other colors.
 (Manage Layers).
 (Create New Layer).
3ds Max displays a new layer in the list with the temporary name Layer01.
(Manage Layers).
the second column next to the layer name.
To make a layer current (alternate method):
(Manage Layers).
 (Off) to turn Hide on for the highlighted layer(s).
Freezing layers is useful when you want to edit objects associated with particular layers but also want to view, without editing, objects on other layers. You can't edit or select objects on a frozen layer; however, the objects are still visible if the layer is on. You can make a frozen layer current, and you can add new objects to the frozen layer.
(Manage Layers).
(Off) to turn Freeze on for the highlighted layer(s).
You can assign a color to a layer using the Manage Layers dialog. For example, you can assign the color red to a layer named HVAC to help you identify the mechanical equipment in your scene.
(Manage Layers).
You might want to rename a layer to better define how it's used in your scene. You can rename any layer except Layer 0 at any time during a 3ds Max session.
(Manage Layers).
You can delete an empty layer at any time during a 3ds Max session. However, you can't delete the current layer, Layer 0, or a layer that contains objects.
(Manage Layers).
 (Delete Empty Layer).
To open the Object Properties dialog for an object selection:
(Manage Layers).
Object Properties icon next to any of the highlighted entries to open the Object Properties dialog for the highlighted objects.
To open the Layer Properties dialog for a layer selection:
(Manage Layers).
Layer Properties icon of any of the highlighted layers (each layer’s icon is immediately to the left of the layer name in
the list). This opens the Layer Properties dialog for the highlighted layers.
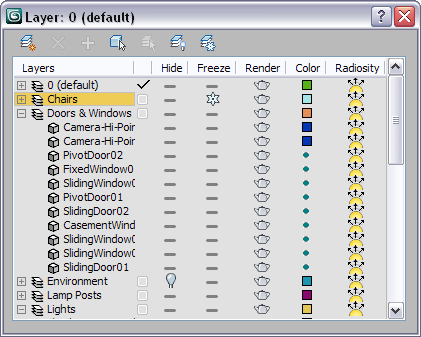
The title bar displays the word “Layer” followed by the name of the active Layer. For example, if Layer02 is the active layer, the title bar will read Layer: Layer02.
Displays layers, their associated objects, and their properties. To expand or collapse the object list for each layer, click ‘+’ or ‘-’, respectively. To modify a property, click its icon. To select all layers quickly, right-click and choose Highlight All Layers. To open the Object/Layer Properties dialog, click the icon next to the object or layer.
Each property has a unique icon to indicate that it is enabled, while all properties share the same icon for the off () and By Layer () states.
Displays the names of the layers and objects. To highlight a layer, click its name, or to rename a layer, click its name twice.
Clicking the object icon opens the Object Properties dialog for all highlighted objects.
Current Layer Toggle Hide
Hide Freeze
 Render
When on, objects appear in the rendered scene. Non-rendering objects don't cast shadows or affect the visual component of the rendered scene. Like dummy objects, non-rendering objects can manipulate other objects in the scene.
Shape objects have the Render option turned on by default. In addition, they have a Renderable check box in their creation parameters. When both check boxes are on, the shape is renderable. If either check boxes are off, the shape isn’t renderable. If you apply a modifier that converts the shape into a mesh object, such as a Lathe or Extrude modifier, the shape automatically becomes renderable regardless of the state of its local Renderable check box.
For shapes, the Renderable toggle in the Object Properties dialog affects the main object, so it also affects all instances of and references to the shape.
Changes the color associated with the highlighted layers. You can select another color by clicking the color swatch to display either the Object Color dialog (for objects), or the Layer Color dialog (for layers).
You can set an object’s color independently, or turn on ByLayer in the Object Color dialog to use the associated layer’s color.
 Radiosity
When on, objects are included in the radiosity solution. Objects not included in the radiosity solution do not contribute to indirect illumination. If these objects are lights, only their direct contribution will be used for rendering.
Manage Layers Dialog Right-Click Menu
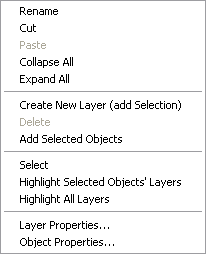
A standard pop-up menu opens over the Manage Layers dialog by right-clicking anywhere on the dialog. The menu contains a variety of layer-management and focus operations.
Some of the operations involve highlighted items or selected objects in your scene. Right-clicking an item in the list highlights that entry and removes any existing highlighting, unless you Ctrl+right-click, in which case existing highlighting is preserved.
Opens the Layer Properties dialog for the currently highlighted layers.
Opens the Object Properties dialog for the currently highlighted objects.


 check box appears, indicating that the layer is current.
 (Hide/Unhide All Layers) on the Manage Layers dialog toolbar.
 (Freeze/Unfreeze All Layers) on the Manage Layers dialog toolbar.
 Add Selected Objects to Highlighted Layer
 Select Highlighted Objects and Layers
 Highlight Selected Objects' Layers