Command entry:
Main toolbar


(Render Setup)
Render Setup dialog
Render Elements panel
Render Elements Rollout
Selected Element Parameters group
Browse ([...]) button
Command entry:Rendering menu
Render Setup
Render Setup dialog
Render Elements panel
Render Elements Rollout
Selected Element Parameters group
Browse ([...]) button
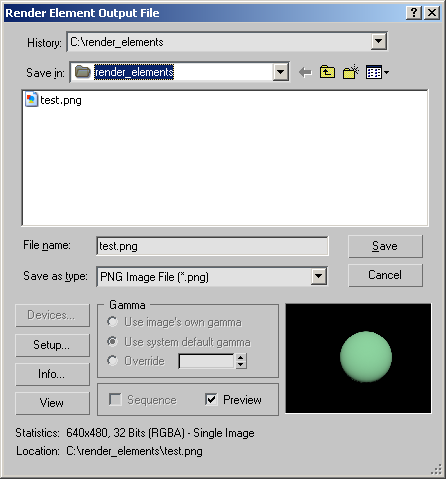
The Render Element Output File dialog lets you assign a name to a file that saves one element of the rendering. You can also
determine the type of file to render, and set up options such as compression, color depth, and quality, depending on the file
type.
Procedures
To specify the render element output file and its settings:
- Choose Rendering Render Setup, and then, on the Render Elements rollout, in the Selected Element Parameters group, click the Browse ([...])
button.
The Render Element Output File dialog opens.
- In the File Name field, enter the name for the file to be rendered.
- Navigate the Save In field to choose the directory where you want the rendered file to be saved.
- In the Save As Type field, choose the type of file you want to render.
- Click Save to open the Setup dialog for the specified output file type.
Thereafter, the Setup button becomes available on the Render Element Output File dialog; you can click this to change the
settings.
- Change any settings as necessary, and then click OK to close the Render Element Output File dialog. Alternatively, clicking
Cancel returns you to the Render Element Output File dialog.
- Click Render to render and save the file.
Interface
- History
-
Displays a list of the most recent directories searched. Whenever an image is selected, the path used is added to the top
of the history list as the most recently used path.
The history information is saved in the 3dsmax.ini file.
- Save In
-
Opens a drop-down list to browse other directories or drives.
 Up One Level
-
Moves to the next-highest level in the directory structure.
 Create New Folder
-
Lets you create a new folder while in this dialog.
 View Menu
-
Provides several options for how information is displayed in the list window:
- Thumbnails: Displays the contents of a directory as thumbnails, without the details.
- Tiles: Displays the contents of a directory as large icons, without the details. If you widen the dialog, these tile across the
width.
- Small Icons: Displays the contents of a directory as small icons, tiled across the width, without the details.
- List: Displays the contents of a directory without the details.
- Details: Displays the contents of a directory with full details such as size and date.
- List of files
-
Lists the contents of the directory, in the format specified by the View menu.
TipWhen the active display format is Details, the contents of the directory are displayed with Name, Size, Type, Date Modified,
and Attributes. You can sort the list according to a column's contents by clicking that column's label.
- File Name
-
Displays the file name of the file selected in the list.
- Save as File Type
-
Displays all the file types that can be saved. This serves as a filter for the list.
NoteThe choice in this field determines the file type saved, regardless of the extension entered in the File Name field.
- Save
-
Sets the file information for saving upon rendering. Closes the dialog if you haven't changed the output file type.
If you've changed the file type, clicking Save opens the Setup dialog for the specified file type. Change the settings as
necessary, and then click OK to close both the Setup and the Output dialogs, or click Cancel to return to the Output dialog.
- Cancel
-
Cancels the selection and closes the dialog.
- Devices
-
Lets you choose the hardware output device, for example, a digital video recorder. To use this function, the device, its driver,
and its 3ds Max plug-in must all be installed on your system.
- Setup
-
Click to open a dialog with controls for the output file type. These vary with each different file format.
NoteThe Setup button becomes available after you specify a file name or type. If you first choose a type from the Save As Type
drop-down list, click anywhere on the dialog to activate Setup. If you first enter a file name and extension (such as test.png), press Tab to activate Setup. Also, clicking Setup uses the filename extension, even if it doesn't agree with the Save As Type setting.
- Info
-
Displays expanded information about a highlighted file such as frame rate, compression quality, file size, and resolution.
The information available depends on the file type.
- View
-
Displays the file at full resolution. If the file is a movie, Windows Media Player opens to play the file.
- Sequence
-
This is not available in the Render Element Output File dialog.
NoteTo render a sequence of still images, choose the Active Time Segment or define a range of frames on the Common Parameters
rollout of the Render Setup dialog. If you are rendering to a still-image file type, 3ds Max appends a four-digit frame number to the file name name, incremented with each frame.
- Preview
-
When on, enables display of the image as a thumbnail in the Image Window.
- Image Window
-
Displays a thumbnail of the selected file, when Preview is turned on.
Gamma group
To set up gamma options for the output file, Enable Gamma Correction must be on in the Gamma panel of the Preferences dialog (Customize Preferences Gamma). Otherwise, the Gamma controls are unavailable in the Render Output File dialog.
Statistics/Location
- Statistics
-
Displays the resolution, color depth, file type, and number of frames of the highlighted file.
- Location
-
Displays the full path and name of the highlighted file.