Rendering Effects enable you to add post-production effects without having to render the scene to see the results. Through the Effects panel on the Environment and Effects dialog, you can add various effects and view them prior to final rendering of an image or animation.
Rendering Effects let you work interactively. As you adjust an effect's parameters, the Rendered Frame Window is updated with the final output image of both the scene geometry and the applied effects. You can also choose to continually work with an effect and then update the effect manually.
Rendering Effects and 32–bit Floating-Point Output
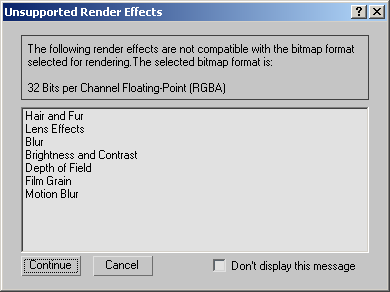
Most rendering effects in 3ds Max are not compatible with 32-bit floating-point output, such as that provided optionally by the mental ray renderer (see Frame Buffer Type). If you render using one or more unsupported effects, the following dialog appears:

You can choose to continue rendering without the unsupported effects, or cancel the render.
The only supported effects are File Output and Color Balance; the rest (shown in the dialog above) are unsupported.
Effects displays the Effects panel on the Environment And Effects dialog, which lets you set parameters for post-rendering effects.
The Effects rollout, on the Effects panel, lets you assign and manage rendering effects.
The Merge button on the Effects panel lets you merge effects from other 3ds Max (.max) scene files.
To render hair, the scene must contain a Hair And Fur render effect. The render effect is automatically added to the scene the first time you apply the Hair And Fur modifier to an object, or 3ds Max adds one (with default values) at render time if an active Hair And Fur modifier is applied to an object.
Lens Effects create real-life effects commonly associated with a camera. Lens effects include Glow, Ring, Ray, Auto Secondary, Manual Secondary, Star, and Streak.
The Blur effect allows you to blur your image in three different methods: Uniform, Directional, and Radial. Blur works on individual pixels according to selections made in the Pixel Selections panel. You can blur an entire image, non-background scene elements, by luminance value, or by using a map mask. Blur can give your animation added realism by rendering the illusion of object or camera movement.
Brightness And Contrast allows you to adjust the contrast and brightness of an image. This can be used to match rendered scene objects with background images or animations.
The Color Balance Effect allows you to manipulate additive/subtractive color tinting through independent control of RGB channels.
File Output allows you to take a “snapshot” of a rendering before some or all of the other Render Effects are applied, depending on the placement of File Output in the Render Effects stack. You can save different channels such as Luminance, Depth, or Alpha to a separate file while rendering an animation.
Film Grain is used to recreate the look of film grain in your rendered scene. Film Grain also allows you to match film grain from source material used as a background, such as an AVI, to the rendered scene created in 3ds Max. When applied, Film Grain automatically randomizes to create the look of moving frames.
Motion Blur applies an image motion blur to your rendered scene by blurring moving objects or the entire scene. Motion blur can enhance the realism of a rendered animation by simulating the way a real-world camera works. A camera has a shutter speed, and if significant movement of objects in the scene, or of the camera itself, occurs during the time the shutter is open, the image on film is blurred.
The Depth-of-Field effect simulates the natural blurring of foreground and background scene elements when viewed through a camera lens. Depth of Field works by separating the scene in Z order into foreground, background, and in-focus images. The foreground and background images are then blurred according to the values set in the Depth of Field effect parameters and the final image is composited from the processed originals.