The Ripple modifier produces a concentric rippling effect in an object's geometry. You can use either of two different ripple effects or a combination of both. Ripple uses a standard gizmo and center, which you can transform to increase the number of ripple variations.
The Ripple space warp has similar features. It is useful for applying effects to a large number of objects.

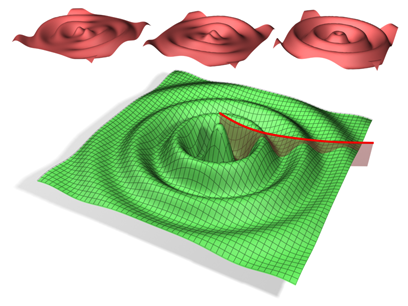
An object with the Ripple modifier applied.
Top (from left to right): Amplitude 1 only, Amplitude 2 only and both amplitudes.
Bottom: Both amplitudes with the Decay effect.
Example: To use the Ripple modifier:
The Plane object is useful as the basis for the surface of a body of water in which ripples form.
 Modify panel, click the Modifier List, and choose Object-Space Modifiers
  Ripple.
A large ripple forms in the Plane object.
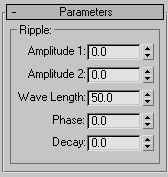
You can change the horizontal scale by adjusting the wave length.
The smaller waves become more apparent. The Ripple modifier needs a relatively high number of subdivisions in the geometry it's applied to in order to work properly.
You can use the Amplitude 2 parameter to add complexity to the wave forms created by Ripple.
As you drag, a new set of wave forms are combined with the existing ones. The farther you drag, the more dominant the second set becomes. Using a negative value for Amplitude 2 (or a positive one if Amplitude 1 is negative) produces more of an interference effect between the two sets of waves.
Increasing the Phase value moves the waves inward, and decreasing it moves the outward. To animate the waves, create keyframes for the Phase value.
To simulate an object dropping in liquid, use the Decay setting.
The farther you drag, the more the wave sizes decrease with the distance from the center of the effect. This is the effect you get when an object perturbs the water surface, and the waves lose energy as they move away from the point of impact.

At this sub-object level, you can translate and animate the center of the ripple effect, and thus the shape and positions of the ripples.
For more information on the stack display, see Modifier Stack.

Limits the effect of the wave generated from its center.
The default value of 0.0 means that the wave will generate infinitely from its center. Increasing the Decay value causes the wave amplitudes to decrease with distance from the center, thus limiting the distance over which the waves are generated.