 Command entry:Views menu
  Viewport Configuration
  Viewport Configuration dialog
  Lighting And Shadows tab
 Command entry:Click or right-click the General viewport label (“[ + ]”) .
  General viewport label menu
  Configure
  Viewport Configuration dialog
  Lighting And Shadows tab
 Command entry:Click or right-click the Shading viewport label.
  Shading viewport label menu
  Lighting and Shadows
  Configure
  Lighting and Shadows tab
For legacy drivers (Direct3D, OpenGL, and so on), the Lighting And Shadows tab sets preferences for lighting and shadow display in shaded viewports. See Previewing Shadows and Other Lighting in Viewports.

Viewport Lighting Options (Viewport Shading) group
Illuminate Scene With subgroup
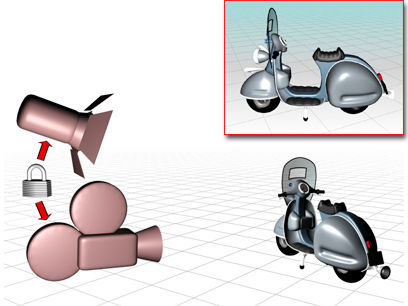
Sometimes the lighting you create in the scene can make objects difficult to see in the viewport. The default lighting displays the objects with even illumination. You can use either one or two lights. By default, 3ds Max uses one default light.

A single default light is linked to the camera and moves when you change your viewport point of view.

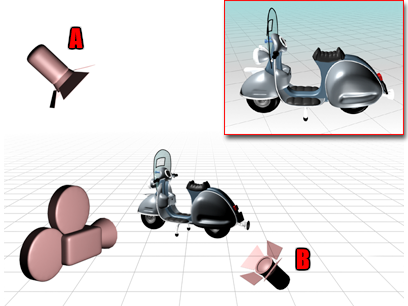
Two default lights are placed opposite to each other.
The key light, A, is in front of the object, on the upper-left side, while the fill light, B, is behind on the lower-right side.
These options set the scope of the settings in the main Viewport Lighting Options group.
These options are available only when Enable Hardware Shading is on in the Viewport Lighting Options group.
When on, previews the effect of ambient occlusion in the viewport. Default=off.
You need to be using the Best (SM3.0) option to preview ambient occlusion.

Top: Viewport ambient occlusion off
Bottom: Viewport ambient occlusion on, using default settings. Note the realistic shadowing in the corners and around the teapot.
When on, previews shadows in viewports. (See Previewing Shadows and Other Lighting in Viewports.) Default=off.

Top: Viewport shadows with hard edges
Bottom: Viewport shadows with soft edges
These options are available only when Enable Hardware Shading is on in the Viewport Lighting Options group.
When on, displays the viewport using the active exposure control. Default=off.
You need to be using the Best (SM3.0) option to preview exposure control.

Top: Viewport without exposure control
Center: Viewport with exposure control
Bottom: Rendered output (without final gathering)