This topic describes the Wall options on the Modify panel.
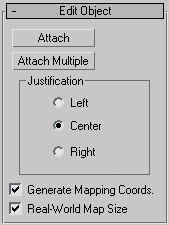
This rollout appears when you select a wall object at the object level; other rollouts, discussed below appear at the different sub-object levels.
Attaches other walls in a viewport to the selected wall. Click this button to open the Attach Multiple dialog, which lists all the other wall objects in the scene. Select the walls you want to attach from the list and click the Attach button. 3ds Max applies the material of the selected wall to the walls being attached.
See Justification.
Assigns mapping coordinates to the wall. Default=on.
Controls the scaling method used for texture mapped materials that are applied to the object. The scaling values are controlled by the Use Real-World Scale settings found in the applied material's Coordinates rollout. Default=off.
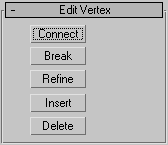
Appears at the Vertex sub-object level. Each wall segment has two vertices; one in each bottom corner. In wireframe views, wall vertices appear as + symbols. Connected segments in the same wall object each share a vertex. Moving a wall vertex has the effect of scaling attached segments as well as rotating them about their other vertices. You cannot rotate or scale wall vertices.
This rollout appears when you select a wall object and then access Segment sub-object level.
Each wall segment is defined by, and effectively connects, two wall vertices. Moving a segment is the same as moving its two vertices in tandem. It has the effect of scaling adjacent wall segments as well as rotating them about their other vertices. You can scale a wall segment horizontally only (any Scale function does this). You cannot rotate a segment.
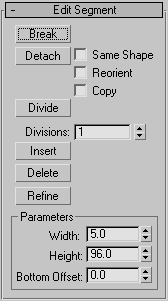
Detaches the wall segment, copies the object’s Local coordinate system, and places the segment so that its object Local coordinate system is coincident with the World space origin. If you also turn on Copy, 3ds Max detaches a copy of the segment and leaves the original segments in place.
Provides the same function as the Insert button in Vertex sub-object selection. Inserts one or more vertices, creating additional segments. When you move the cursor over the a valid Insert point, the mouse icon changes to an Insert icon. Right click to stop inserting new vertices and segments.
Provides the same function as the Refine button at the Vertex sub-object level. Adds a vertex to the position along a wall segment you select. When you move the cursor over a valid Refine point, the mouse icon changes to a Refine icon.
This rollout appears when you select a wall object and then access Profile sub-object level.
The term "profile" refers to the outline of a wall segment's top and bottom edges. When in Profile sub-object mode, the selected wall object's inner horizontal edges appear dark orange. Click any of these edges to select the corresponding segment, highlight it in red, and place a temporary active grid in the plane of the segment. At that point, you can insert and delete vertices along the horizontal edges, move an inserted vertex along the grid to change the profile, create gables, and change the grid properties.
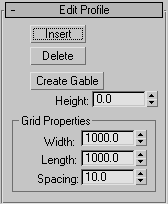
Inserts a vertex so that you can adjust the profile of the selected wall segment.
Use this option to adjust the profile of walls under gables or to align walls to a slope. When you move the cursor over the selected segment, the mouse icon changes to an Insert icon. Click to insert a new profile point, then drag and release to position and place it. You can add new profile points to both the top and the bottom of the wall, but you cannot position profile points below the original top edge or above the original bottom edge.


 Modify panel