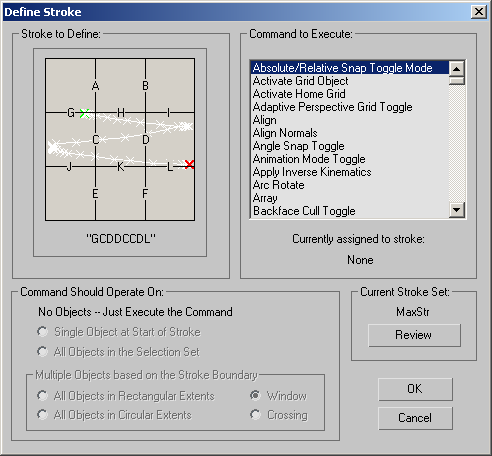
 Command entry:Hold down Ctrl and the middle mouse button and drag in a viewport to create the shape of an unused stroke.
  Define Strokes dialog
You define a stroke by creating the stroke in a viewport, then choosing the command that the stroke defines. The next time you perform the stroke, the command will be executed. You can define strokes to work in conjunction with the Shift key, the Alt key, or both Shift and Alt.
You can define strokes with either the left or middle mouse button. If you want to use your middle mouse button to define
and use strokes, you must first turn on Customize menu  Preferences
  Preference Settings dialog
  Viewports tab
 Mouse Control group
  Stroke. To define and use strokes with the left mouse button, choose Utilities panel
  Utilities rollout
  More button
  Utilities dialog
  Strokes
 Draw Strokes, then draw the strokes.
In the Define Stroke dialog, you can see how the strokes are analyzed by examining the grid under Stroke to Define. When you complete the drawing of a stroke, a nine-square grid is centered around the stroke and fit to its extents. The inner segments of the grid are assigned unique letters. Where the stroke crosses a segment, the letter associated with that segment is added to the stroke name. Thus, the direction and the shape of the stroke matter, but the size of the stroke has no effect.
The stroke is always centered within the grid. If you draw a stroke vertically from top to bottom, the stroke is named HK because it crossed the segments labeled H and K, in that order. Had you drawn the stroke from bottom to top, it would have been named KH.
The Command Should Operate On group of options is important. If the command applies to selections, leave this option set to Single Object at Start of Stroke, or change it to All Objects in the Selection Set. However, if the command doesn't apply to selections, such as Orbit or Activate Grid Object, change it to No Objects Just Execute the Command.
To define a stroke using the Ctrl key:
To define a stroke by example:

Displays the name of the stroke and displays the stroke you just drew as a series of white Xs connected by white lines. A green X represents the start of the stroke and a red X represents the end. The labeled grid shows you how it recognizes the stroke. Where the stroke crosses the labeled segments in the grid, a letter is added to the name of the stroke.
Lists all commands to which you can assign a stroke. Select a command and click OK to assign the stroke displayed in the grid to the selected command. Depending on the type of command you choose in this list, various options become available in the Command Should Operate On group.
Command Should Operate On group
Provides a number of options that specify which objects (if any) are affected by the command. These options are enabled or disabled depending on the type of command you've selected in the list window.
Multiple Objects Based On The Stroke Boundary group
Choosing one of the options in this group lets you use the stroke itself to select multiple objects and then apply the command.
Displays the name of the current stroke set, so you can review the strokes defined in that set. You can create and save a number of different stroke sets. See Stroke Preferences.
Click to display the Review Strokes dialog, in which you can choose from a list of defined strokes and then see the stroke itself. You cannot edit strokes this way. To view, change, and delete strokes, draw the Review Strokes stroke (by default, a horizontal line from left to right).