When you import an SAT file or convert an object in 3ds Max to Body Object format and then select it, the first rollout on the Modify panel is Editable Body Object. These controls allow you to perform available operations at the various sub-object levels, including flipping faces, welding and exploding (un-welding) edges, and more.
When you work with Body Objects (also Join Bodies and Body Cutter objects) in 3ds Max, you’ll find four sub-object levels available on the modifier stack: Operand, Edge, Face, and Element.

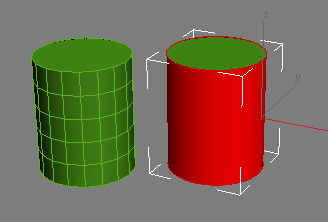
Because Body Objects are not meshes but instead are defined procedurally, their structure differs from that of objects typically found in 3ds Max. For example, the entire circumference of a round object such as a sphere or cylinder can comprise a single face, as shown in the following illustration:

Left: Mesh cylinder has many faces.
Right: Body Object cylinder has only three faces: The top, bottom, and one side.
Following are descriptions of the different sub-object levels:
An operand is a component of an compound object created with Join Bodies or Body Cutter. You can transform Body Object sub-objects only at the Operand level.
The Operand level is available for all Body Objects, but is applicable only to Join Bodies and Body Cutter (that is, Boolean-type) objects. After combining objects using either of these object types, you can access the Operand sub-object level to move the sub-objects around, for example, to cut one shape out of another.
It is not possible to transform Edge, Face, or Element sub-objects at all. However, other operations are available at these levels, as detailed following:
At the Edge level, you can combine edges by welding them.
For best rendering results, it’s generally desirable to avoid unwelded, or “open” edges. You can see the number of open edges in the numeric display at the bottom of the Editable Body Object rollout. Also, open edges are drawn in blue in the viewports, as shown in the following image:

Edges are drawn in four different colors in the viewports to show their state:
1. Orange: Non-manifold edge (connected to more than two faces)
2. Blue: Open (unwelded) edge
3. White: Welded edge
4. Red: Selected edge
Incidentally, the orange non-manifold edge in the preceding illustration was obtained by joining two spheres using the Intersect + Merge Faces operation.
At the Edge sub-object level, you can weld specific pairs of edges by selecting them both (region selection is useful here) and then using Weld Selected on the Editable Body Object rollout. Or you can simply use Weld All to weld all open edges.
 Curve Display group
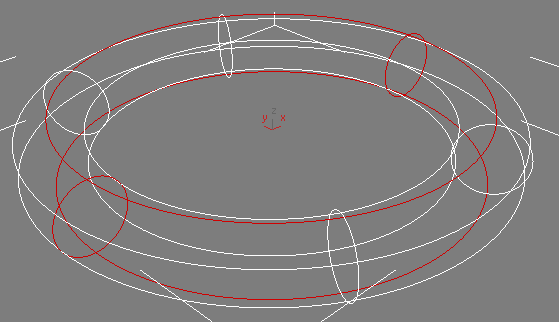
  Lines U/V settings, and cannot be selected. To see edges that can be selected, access the Edge sub-object level and press Ctrl+A (Select All).
Torus converted to Body Object format, displayed as Curves, with Lines U and V both set to 2. The geometry edges are red (selected), while the display-only curves are white.
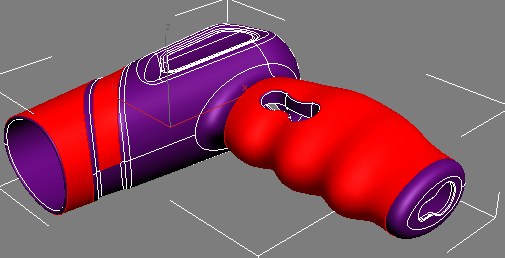
A face in a Body Object is the part of a surface surrounded by one or more edges. Unlike faces in mesh objects, a face in a Body Object is not necessarily planar. At the Face level, you can use all commands on the Editable Body Object rollout; a selection is necessary for the “Selected” commands.

Hair dryer (from Autodesk Inventor) with some faces selected
An element of a Body Object is similar to an element of a mesh object: a collection of contiguous faces, physically isolated from the rest of the faces. Most typically, multiple elements are created when combining objects with the Attach command. Selecting an element is the same as selecting all of the faces in the element.
Following is a list of 3ds Max modifiers supported by the Body Object format. This means that you can apply and adjust any of these modifiers and then export the Body Object as regular solid geometry while maintaining full compatibility with the SAT file format. All other modifiers automatically convert Body Objects to mesh format.
 Max Edge Len. % value to 2.0 or 3.0. When you have the desired results, turn off or delete the Mesh Select modifier before exporting the
SAT file.

The Body Object has no sub-object history and can be edited in much the same way an Editable Mesh can be edited. Imported SAT files produce Body Objects. When you convert a 3ds Max or other Body Object into an Body Object, you lose the construction history for that object.
Buttons for accessing the Edge, Face, and Element sub-object levels of the Body Object. The Operand level is available only from the modifier stack.
For details about Body Object sub-object levels, see Body Object Sub-Objects.
Opens the Face Flipping/Visibility rollout with options for selecting duplicate faces, flipping faces, and setting face visibility.
Opens the Welding rollout with advanced options.
The bottom part of the rollout displays information about the selected object. When joining faces or welding, use these values to determine the results of your operations.
The Welding rollout lets you specify how to to sew or stitch edges together. Welding is cumulative in that after you weld the result is kept and used again after you adjust the parameters. In general, start with a Tolerance Scale value of 1.0 (the default) and increase it.
Use these controls for controlling the facing direction of faces in a Body Object. The Body Editable Object rollout Face Flip button toggles the Face Flipping/Visibility rollout, and you can also close the rollout by clicking Apply.