CAT's IK is customizable to the extent that you can use all regular 3ds Max constraints, and even write scripts to control a limb. Following are descriptions of two leg setups that you might find useful: Knee LookAt and Orientation Constrained.
An effective method when applying IK to legs is to have the knee look at a target. With CAT you can accomplish this by using an extra bone as the target object.
 Select the thigh bone (upper leg).
 Modify panel.
The extra bone is created at the end of the bone on which it is created.
 Move the bone out in front of the knee.
 Link the extra bone as a child of the pelvis.
The knee LookAt should control the leg; if it remains linked to the leg it will follow the leg, not the other way around.
 Select the thigh bone again.
 Motion panel, add an Absolute layer, and then add a relative layer (Adjustment Local or Adjustment World).

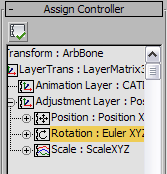
 (Assign Controller) and assign a LookAt contraint.
 IK/FK=1.0)
This is useful because you can get a much better idea of what is going on.
 World and assign the FootPlatform as the Upnode.
When you want a leg to inherit motion from both its parent (the pelvis) and the FootPlatform, use an orientation-constrained setup.
To set up an orientation-constrained leg:
 Select the upper leg bone.
 Motion panel, add an Absolute layer and activate Animation mode.
 (Assign Controller) and assign an Orientation constraint.
Now when you rotate theFootPlatform the whole leg will rotate with it.
To blend the leg rotation between the FootPlatform and the pelvis:
To save your IK constraint settings, set up the configuration in a layer and then save the layer as a clip file with no keyframes on it. When you want to add a new Absolute layer with the same configuration simply load in the layer.