Controls on the Copy/Paste rollout let you copy posture, pose, or track information from one part of a biped to another, or from one biped to a different one.
You can copy three categories of information:
Copy collections are designed to make it easier to manage copied posture, pose, and track information by grouping it together. This improves the way copied animation data is organized when it is transferred between files within a session:
In character studio, you can save multiple copy/paste buffers for each of the three modes: Posture, Pose, and Track. These are available from the Copied Postures/Poses/Tracks drop-down list; the active buffer that the Paste buttons use is the one whose name is visible in the field at the top of the list. A thumbnail view gives a preview of what the active buffer has saved.
Buffers are saved with your MAX scene file, and also remain available in your 3ds Max session, even if you reset.
The default name of a buffer depends on which mode you are in. In the Posture and Pose modes, the name of the buffer consists of abbreviated names of the body parts you selected, followed by a sequence number. For example, RArmRFing1 is the first buffer for the posture or tracks of the biped's right arm and finger. In Pose mode, the name of the buffer is always “Pose,” followed by a sequence number. For example, Pose03.
To give a buffer a custom name, make it active, highlight its name in the field at the top of the buffer list, and then enter a new name.
For hands-on experience using the Copy/Paste rollout, see the lesson called “Creating a Simple Freeform Animation” found in the tutorial entitled Animating with Freeform.
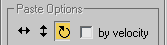
For each mode, there are two paste options: Paste, and Paste Opposite. These are useful in different situations:
Example: To load multiple collections between files within a single session:
 load some animation onto it.
 Copy/Paste rollout, click
  (Create Collection) and name the collection Upper.
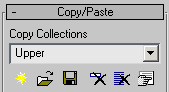
 Select all of the biped's links from the spine up and, after making sure you're in Posture mode, click
  (Copy Posture). Repeat this step for every 10 frames of your animation.
 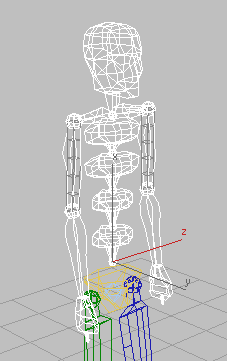 Create a new collection and name it Lower.
Select all of the biped's links from the pelvis down and copy a posture at every 10 frames.
Create a new collection and name it Lower.
Select all of the biped's links from the pelvis down and copy a posture at every 10 frames.
 save it. Then, choose the Lower collection and save it as well.
 Save your scene and then reset 3ds Max (
 Application menu Reset).
load the Upper collection.
the biped's upper body and
Application menu Reset).
load the Upper collection.
the biped's upper body and  paste the corresponding posture from the Copied Postures drop-down list.
  Set a key for each pasted posture.
  Load the Lower collection and repeat the last step with the biped's lower body selected, setting a key for each posture.
 Delete the Lower collection.
 (Max Load Preferences) and in the dialog, make sure both options are turned on. Close the dialog and load the saved 3ds Max file.
Notice that the Copy Collections drop-down list now contains three collections: two Upper collections (one from the current file and one from the incoming) and one Lower collection from the incoming file.
To capture different snapshots:
 (Capture Snapshot From Viewport).
 Orbit your current viewport to different user views and copy a biped posture.
Notice that your snapshot matches the viewport angle.

 (Capture Snapshot Automatically) and copy a posture again.
 (No Snapshot) and copy another posture.
Example: To maintain copied COM data when pasting poses:
create a new collection. Name the collection Poses.
 (Copy Pose) 0. Then go to frame 30.
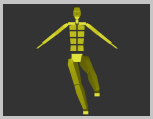
The biped with offset position and orientation


 all three Paste buttons.
 (Paste Pose). The biped resets back to its original position and orientation since its copied COM data is maintained.
  Undo this step.
 (Paste Rotation) but keep the other two buttons enabled.
(Paste Pose). The biped resets back to its original position but remains rotated. This is due to the fact that the copied
COM orientation is not maintained on paste. Undo the step.
(Paste Rotation) but keep the other two buttons enabled.
(Paste Pose). The biped resets back to its original position but remains rotated. This is due to the fact that the copied
COM orientation is not maintained on paste. Undo the step.
 (Paste Horizontal) and
  (Paste Vertical) but enable (Paste Rotation) once again. Click (Paste Pose).
This time, the biped's position is maintained but not its orientation.
Paste Rotation is the only enabled button
Example: To maintain COM offsets with By Velocity:
(Body Horizontal).
set a key. Then make sure Pose mode is active, and copy your biped's pose.
 move the Body COM 50 units in the Y axis. Set a new key.
(Paste Horizontal) but leave By Velocity turned off.
paste your biped's pose.
move the Body COM 50 units in the Y axis. Set a new key.
(Paste Horizontal) but leave By Velocity turned off.
paste your biped's pose.
The biped jumps to the center of your scene. Undo this step.
try pasting your pose again. Notice how the biped's COM position is now offsetted by another 50 units in Y.
Example: To set TCB/IK Values when pasting postures:
create a new collection. Name it Hands.
biped's right hand, and on the Key Info rollout, set a key.
set another key. 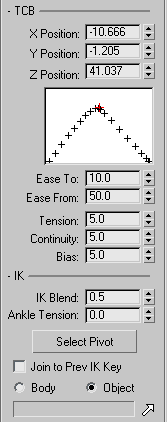 (Copy Posture).
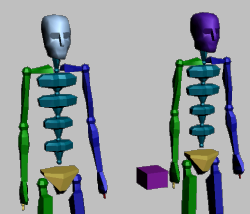
The original biped (left) and the new biped with box (right)
 (Select IK Object) and then colicking the box in a viewport. Make sure the Body [Body Space] option is chosen.
Arms. Then turn on
(Select IK Object) and then colicking the box in a viewport. Make sure the Body [Body Space] option is chosen.
Arms. Then turn on  (Auto Key).
 (Paste Posture).
The hand assumes the copied posture and the key's TCB and IK values are set to default. Keys are also set for the whole arm.
Arms.
paste the posture.
The copied value information is transferred to this new key. The key values are now 10 and 50 for the Ease To/Ease From, 5 for the TCB, and 0.5 for the IK Blend. The box is still the IK Object and Object Space remains chosen. Also notice that the hand is the only keyed limb.
paste the posture again.
This new key averages up the values based on the previous and next keys, setting Ease To/Ease From to 5 and 25, TCB to 15, and IK Blend to 0.25. Also, Body Space is selected from the previous key.
 Create Collections Load Collections Save Collections Delete Collection
 Delete All Collection Max Load Preferences Delete Selected Delete All
Copied Postures/Poses/Tracks group
The name of this group indicates the active mode (see preceding).
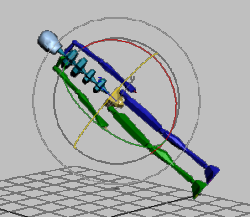
For Posture and Track mode, displays a schematic view of the parts of the biped in the active copy buffer. For Pose mode, displays a schematic view of the entire biped. This can help you preview the effect of pasting the active buffer.

Thumbnail showing a copied left arm posture
Thumbnail showing a copied pose
 Capture Snapshot from Viewport Capture Snapshot Automatically No Snapshot
 Show/Hide Snapshot
Copying a posture, pose, or track with the COM selected copies all three COM tracks. When pasting the copied data you can choose the COM tracks to paste.
Paste Horizontal/Vertical/Rotation buttonsWhen on, the corresponding COM data are applied when you perform a paste operation. You can use any combination of these options.
Choosing to paste COM data maintains the world-space position and orientation of the copied COM onto the current data tracks. Otherwise, the COM's current positions and orientation are maintained when the copied data tracks are pasted. See Example: To maintain copied COM data when pasting poses:
When on, determines the values of the active COM tracks based on the previous trajectory of the COM through the scene. This option is only enabled when the Paste Horizontal/Vertical/Rotation buttons are active. See Example: To maintain COM offsets with By Velocity:
Active only in Auto Key mode.


 Motion panel
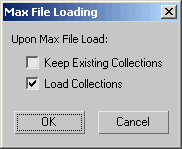


 Paste Posture Opposite
 Paste Pose Opposite
 Copy Track
 Paste Track
 Paste Track Opposite