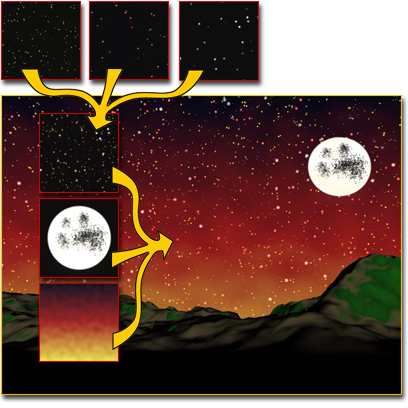
The Composite map type is made up of other maps, which you layer atop each other using the alpha channel and other methods. For this type of map, you can use overlay images that already contain an alpha channel, or employ built-in masking tools for overlaying only certain parts of a map.

Composite map combines stars, moon, and a glow into the sky.
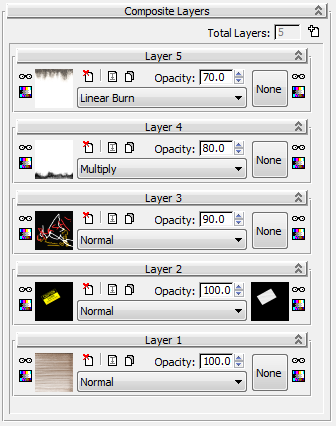
The controls for a Composite map include the list of the maps it combines along with a blend mode, opacity setting, and mask for each.
Viewports can display the multiple maps in a composite map. For multiple map display, the display driver must be OpenGL or Direct3D. The software display driver does not support multiple map display.
Alternatively, use the Slate Material Editor to wire a map to the Layer or Layer (Mask) component you want to assign.
To change the number of map layers:
 (Add A New Layer).
 (Delete This Layer) button.
To change the order of layers:
After you move a layer, the layers are renumbered to remain in order. For example, if there are four layers, and you move Layer 4 above Layer 1, Layer 4 becomes Layer 2, Layer 2 becomes Layer 3, and Layer 3 becomes Layer 4.

The Composite map uses a separate rollout for each layer’s controls, with as many rollouts as there are layers. Each layer rollout is titled with the optional name first, followed by “Layer” and then the layer number.
The layers are applied in order of increasing number; the layering in the material reflects the order of layers in the interface. Layer 1 is lowest; layer 2 is immediately above layer 1, and so on.
The map composites layers in the same order. Layer 2 modifies the output of Layer 1; Layer 3 modifies the output of Layer 2, and so on.
 Hide this layer
 Color Correct This Texture
Applies a Color Correction map to the map and opens the Color Correction map interface. You can use its controls to modify the map colors.
To return to the Composite map interface, click  (Go To Parent) on the Material Editor toolbar.
After the Color Correction map is assigned, you can return to it from the Composite map interface by clicking this button again.
 Delete this layer
 Rename this layer
Opens a small dialog for naming or renaming the layer.
By default, each layer is named “Layer #” where # is the layer number. If you name a layer, the text you enter precedes this default name; for example, “Decal Layer 3.” The space between the custom name and the default name is inserted automatically. If you’ve already named a layer, that name appears in the renaming dialog when you open it.
 Duplicate this layer
To assign a mask map to the layer, click this button and then use the Material/Map Browser. The mask works the same as the Mask map: Black areas are transparent; white areas are opaque; and gray areas allow degrees of transparency. So, for example, if the layer is to be a decal, the decal image area would be white and the rest of the image map would be black, so underlying layers can show through.
After a mask map is assigned, the button image is a thumbnail of the map, and clicking it takes you to the parameters for the map.
 Hide the mask of this layer
 Color Correct This Mask
Applies a Color Correction map to the mask map and opens the Color Correction map interface. You can use its controls to modify the map colors.
To return to the Composite map interface, click  (Go To Parent) on the Material Editor toolbar.
After the Color Correction map is assigned, you can return to it from the Composite map interface by clicking this button again.
Use the drop-down list to choose how the layer pixels interact with those in underlying layers. In the following descriptions, A refers to the current (front) layer and B refers to the result or output of underlying layers.