Command entry:
Select a mesh, patch, spline or NURBS object.


Modify panel
Modifier List
Edit Normals
Command entry:Select a mesh, patch, spline, or NURBS object.
Modifiers menu
Mesh Editing
Edit Normals
The Edit Normals modifier gives you explicit and procedural, interactive control over each of an object's vertex normals. It is meant to be used primarily with mesh objects destined for output to game engines and other 3D rendering engines that
support specified normals. The results are visible in the viewports and in rendered images.
The orientation of a vertex normal affects how neighboring surfaces reflect light. By default, normals are set so that reflection
of light in 3ds Max follows the rules of real-world physics: The angle of reflection equals the angle of incidence. But by reorienting vertex
normals, you can set the angle of reflection to be anything you want. The Edit Normals modifier lets you specify vertex normals'
directions, combine and separate them, change the type, and copy and paste values among normals.
WarningDon't apply an Edit Normals modifier to the low-res object used in
normal bump projection. Normal bump projection relies on the low-res object having standard normals, and altering them causes normal bump maps to
have unpredictable results.
Types of Normals
Three types of normals are available with the Edit Normals modifier:
- Unspecified: These are the normals that the modifier derives from smoothing groups and initially assigns to the modified mesh vertices.
3ds Max calculates the direction of an unspecified normal based on the average facing of all polygons to which it belongs that are
in its smoothing group.
By default, each vertex has as many normals as the number of unique smoothing groups used by surrounding polygons. For example,
each side of a box uses a different smoothing group by default, so each vertex at which three sides meet (typically a corner)
has three different normals: one perpendicular to each of the three sides. On the other hand, a sphere uses a single smoothing
group, so each of its vertices has one normal, perpendicular to the average facing of the polygons that share it. By default,
unspecified normals are displayed as blue.
- Specified: These are normals that are intended for use by particular corners of particular faces, without regard to smoothing groups.
For instance, you might create a box, apply Edit Normals, select a group of normals at a particular vertex, and click Unify.
Now those three faces are told specifically to use that one unified normal, and they ignore their smoothing groups at that
vertex. But specified normals are not set to explicit values; they ignore smoothing groups, but they're still based on the face normals of the faces that use them. Specified normals
are displayed as cyan.
- Explicit: These are normals that are set to particular values. For instance, if you use the Move or Rotate command to change a normal
from its default value, it has to be made explicit, so it won't be recomputed based on the face normals. Explicit normals
are green by default.
Note Explicit normals are also considered to be specified.
NoteA selected normal is always
red. When not selected, its color indicates as type, as noted above. You can find the
customizable color entries for these normal types in the Elements
Geometry list. The three entry names are:
- Normals - Explicit
- Normals - Specified
- Normals - Unspecified
Usage Examples
Following are two instances in which a 3D artist creating content for output to a game engine might find practical use for
the Edit Normals modifier:
- An artist is working on a knight with a chrome shield. The chrome shield has a DirectX cube map shader on it so that the artist can see the reflections in the viewport. The artist would like to make the reflections in the shield
look "dented" by fights in battle. The artist applies the Edit Normals modifier to the shield object. He then adjusts several
of the normals slightly, viewing the results in real time, thanks to the pixel shader. He then exports the character with
a custom export tool designed to handle normal information.
- A game artist is working on an object that will explode in the game. To do this, the game engine requires the object to be
split into multiple objects: the broken pieces that will result from the explosion. When the object is broken apart in 3ds Max (using Slice), the normals are pointing in different directions; this makes it easy to see the seams between the broken pieces.
To fix this, the artist selects all the pieces of the breaking object and applies the Edit Normal modifier to all of them
at once. She then selects the normals across the seam and unifies them so they are pointing in the same direction. The artist
then exports to the game engine.
Usage Notes
Please observe the following notes and precautions when using the Edit Normals modifier:
- Edit Normals supports both poly objects (polygon-based) and mesh objects (triangle-based). If you apply Edit Normals to a
poly object, the result is a poly object. If you apply Edit normals to any other object type, the result is a mesh object.
- Edit Normals also supports embedding of edited-normal data when collapsing the stack, and when converting from poly object
to mesh object, but not when converting from a mesh object to any other object type. If you apply Edit Normals to a primitive
object, adjust the normals, and then collapse the stack (or convert to Editable Mesh), 3ds Max embeds any changes to the normals in the mesh object, including selection status. Primitive objects are mesh-based, so if
you convert the same object to Editable Poly, the edited normals are lost. On the other hand, if you convert a primitive object
to Editable Poly, apply Edit Normals, adjust the normals, and then collapse the stack, resulting in a poly object, the normals
are retained. You can subsequently regain access to embedded, edited normals in a collapsed object by applying another Edit
Normals modifier.
- Any modifiers that change topology will remove changes applied to the normals with the Edit Normals modifier. These include
MeshSmooth, Tessellate, Slice, Mirror, Symmetry, Face Extrude, and Vertex Weld. Oddly enough, it also means that the Normal
modifier (used to flip face orientations) will not support the edited normals. Since Turn To Poly can be used to modify face
topology, it also strips off the edited normals.
- All compound objects strip off the edited normals from their operands.
- The good news: All deformation and map modifiers preserve the normals. For instance, if you apply a Bend, the normals should
be bent along with the geometry. Map modifiers, such as Unwrap UVW, won't affect the normals at all.
- However, a few geometric modifiers do not fully support the new normals. They won't strip them away, but neither will they
correctly deform any explicit normals. Modifiers in this category include Push and Relax.
- The Smooth modifier correctly modifies any non-specified normals, while leaving the specified and explicit normals alone.
- Like Mesh Select and Poly Select, Edit Normals “inherits” attributes from below it in the stack. For example, if you create
a box, apply an Edit Normals modifier, change some normals, and then apply a second Edit Normals modifier, the top Edit Normals
"inherit" the user-specified normals from the pipeline, just as Mesh Select adopts the current selection when you apply it.
But the top Edit Normals modifier ignores any subsequent changes to the original Edit Normals modifier, just as Mesh Select
ignores any changes made to the selection below it in the stack after it is applied.
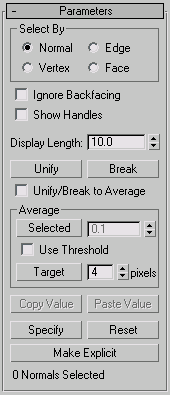
Interface
The Edit Normals modifier is useful mainly at the sub-object level, Normal, so this level is active by default as soon as
you apply the modifier to an object. At this point, you can see the normals as lines emanating from the mesh vertices, select
and transform them, copy and paste them, and change their settings on the Modify panel.
You can transform normals only by moving and rotating them, not by scaling them. However, moving a normal effectively rotates
it, so in most cases you'll have better control by using the Rotate tool.
The following command reference includes keyboard shortcuts, which are available when the Keyboard Shortcut Override Toggle (on the toolbar) is on. In addition, you can use Ctrl+0 (zero) to access the object level of the modifier.
- Select By group
-
Lets you specify how to select normals in the viewport:
- Normal (Ctrl+1): Click a normal to select it.
- Vertex (Ctrl+2): Click a mesh vertex to select all of its normals.
- Edge (Ctrl+3): Click a mesh edge to select the normals associated with the neighboring polygons.
- Face (Ctrl+4): Click a mesh face (or polygon) to select the associated normals.
Of course, with all of these methods, you can also use region selection to select multiple normals at once.
- Ignore Backfacing
-
When on, selection of sub-objects affects only those facing you. When off (the default), you can select any sub-object(s)
under the mouse cursor, regardless of their visibility or facing. If there are more than one sub-object under the cursor,
repeated clicking cycles through them. Likewise, with Ignore Backfacing off, region selection includes all sub-objects, regardless
of the direction they face.
- Show Handles
-
Enables the display of handles, which are small squares at the end of each normal. Turn this on to make it easier to select
normals.
- Display Length
-
Specifies the length of each normal. This is for display purposes only; the length has no effect on the normal's functionality.
- Unify (U)
-
Combines all selected normals at each vertex into a single specified normal . By default, with Unify/Break To Average off, Unify sets the direction for each unified normal to be perpendicular to the
averaged surface at that point. With Unify/Break To Average on, Unify sets the direction be the average of the combined normals
at each location.
- Break (B)
-
Separates all selected, unified normals into their original components. With Unify/Break To Average off, Break orients each
separated normal perpendicular to its respective face, thus splaying out the normals at each vertex if the connected faces
are at different angles (as with a sphere). With Unify/Break To Average on, each separated normal uses the orientation of
the original normal.
Break converts any selected normals to specified normals.
- Unify/Break to Average
-
Determines normal orientation as the result of a Unify or Break operation. See the descriptions above for details. Default=off.
Average group
These controls give you different methods of averaging vertex normals; that is, setting them all to the same absolute angle,
which is the average of their combined angles.
- Selected
-
Sets selected normals to the same absolute angle: the average angle of all of them. If Use Threshold is on, averages only
normals whose distance from each other is less than that specified in the Average Threshold spinner (to the button's right).
- Use Threshold
-
Activates the Average Threshold setting, and causes the Selected to average only normals whose distance from each other is
less than the specified value.
- Target
-
Enters an interactive mode in which you specify pairs of normals to average. Click Target, and then select a normal. When
the mouse cursor is over a normal, it changes to a + symbol. After clicking the first normal, a rubber-band dashed line connects
the normal to the mouse cursor. Click a second normal to average the angles of the two normals.
The Pixels spinner next to the Target button sets the maximum distance in screen pixels between the mouse cursor and the target
normal.
_____
- Copy Value (Ctrl+C)
-
Copies the selected normal's orientation to the copy buffer. Available only when a single normal is selected.
Use Copy Value and Paste Value to apply a normal's orientation to one or more others within the same Edit Normals modifier.
You cannot copy normals between modifiers.
- Paste Value (Ctrl+V)
-
Applies the paste buffer contents to the current selection. Available only after Copy Value has been used to place a normal's
orientation in the copy, and one or more target normals are selected.
- Specify (S)
-
- Reset (R)
-
Causes all selected normals to revert to unspecified status, and returns them to their initial, calculated positions. Also breaks apart unified normals.
- Make Explicit (E)
-
- [Selection Display]
-
When one normal is selected, shows its ID number. When 0 or more than one normal is selected, shows the number of normals
selected.