To trim a surface is to use a curve on the surface to cut away part of the surface, or to cut a hole in the surface.
Before you trim a surface, you must create a curve on that surface. These are the kinds of curves that can trim surfaces:
Once you've created the curve, you trim the surface by turning on Trim in the curve sub-object's parameters. A Flip Trim control inverts the trim direction.
The direction of the curve determines the initial direction of the trim. For example, a closed curve on surface created in a clockwise direction trims inward, creating a hole in the surface; while a closed curve on surface created in a counterclockwise direction trims outward, creating a curve-shaped portion of the surface.
When a surface is trimmed, its untrimmed version is still present in the 3ds Max scene. You can select it for the purposes of editing it, or replacing it as a parent to a dependent sub-object. For details, see Sub-Object Selection.
Example: To cut a hole in a CV surface:
 (Normal Projected Curve), then in the Top viewport click first the CV curve, then the surface.
This creates a projection of the CV curve that lies on the surface, and can trim it.
A hole appears in the surface. Depending on the orientation of the Normal Projected curve, you might see everything but the hole.
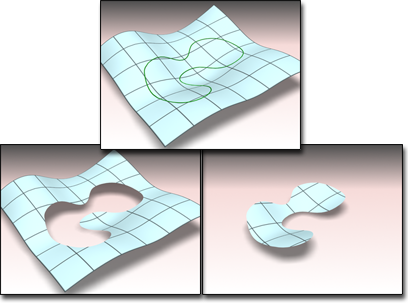
Above: CV curve on surface
Below left: Using the curve to trim the surface
Below right: Using Flip Trim to change the trimming direction
To select an untrimmed surface:


