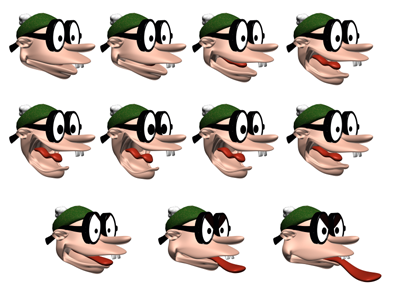
Morphing is an animation technique similar to tweening in 2D animation. A Morph object combines two or more objects by interpolating the vertices of the first object to match the vertex positions of another object. When this interpolation occurs over time, a morphing animation results.

Seed or base object, and the target objects at specific frames

The resulting animation
The original object is known as the seed or base object. The object into which the seed object morphs is known as the target object.
You can morph one seed into multiple targets; the seed object's form changes successively to match the forms of the target objects as the animation plays.
Before you can create a morph, the seed and target objects must meet these conditions:
If these conditions don't apply, the Morph button is unavailable.
You can use any kind of object as a morph target, including an animated object or another morph object, as long as the target is a mesh that has the same number of vertices as the seed object.
Creating a morph involves the following steps:
 Create panel
  Geometry
  Compound Objects
  Morph.
Make sure that the objects you want to use as the seed and targets have the same number of vertices.
You should also turn off Adaptive and Optimize for other shape-based objects that you want to use with Morph, such as those with Extrude or Lathe modifiers.
Morph Object and Morpher Modifier
There are two ways to set up morphing animations: the Morph compound object and the Morpher modifier.
The Morpher modifier is more flexible because you can add it multiple times at any place in an object's modifier stack display. This flexibility lets you animate the base object or the morph targets before reaching the Morpher modifier, for example with a noise modifier. The Morpher modifier works hand in hand with the Morpher material. The Morpher modifier is the ideal way to morph characters.
The Barycentric Morph controller can be simpler to use in Track View. The Track View display for Compound Morph has only one animation track regardless of the number of targets. Each key on the track represents a morph result based on a percentage of all the targets. For basic morphing needs, Compound Morph may be preferable to the Morpher modifier.
Lastly, you can add the Morpher modifier to the stack of a Compound Morph object.
Example: To create a basic morph:
 Create panel, with
  (Geometry) active, turn on Patch Grids. On the Object Type rollout, click Quad Patch.
 Selection rollout, go to the Vertex sub-object level.
 Create panel, with
  (Geometry) active, choose Compound Objects from the drop-down list. On the Object Type rollout, click Morph.
Morph displays above the Editable Patch in the modifier stack.
To select the targets for a morph:
 Create panel, with
  (Geometry) active, choose Compound Objects from the drop-down list. On the Object Type rollout, click Morph.
The name of the seed object is displayed at the top of the Morph Targets list on the Current Targets rollout.
As you select each target, its name is added to the Morph Targets list. If an object can't be a target (for example, if it has a different number of vertices than the morph seed), you can't select it.
If you select a target object while you are not at frame 0, creating the target also creates a morph key. You can create additional morph keys from targets you've already selected, as described in the following procedure.
To create morph keys from existing targets:
The Create Morph Key button is available only when a target object name is selected.

When you pick target objects, you designate each target as a Reference, Move (the object itself), Copy, or Instance. Base your selection on how you want to use the scene geometry after you create the morph.
Lets you specify how the target is transferred to the compound object. It can be transferred either as a reference, a copy, an instance, or it can be moved, in which case the original shape is not left behind.
You can use an animated object or another morph as the target of a morph.