 Command entry:
Select a Crowd object.


Modify panel

Global Clip Controllers rollout

New

Choose a GlobalClip object.

Select the object in the list.

Edit

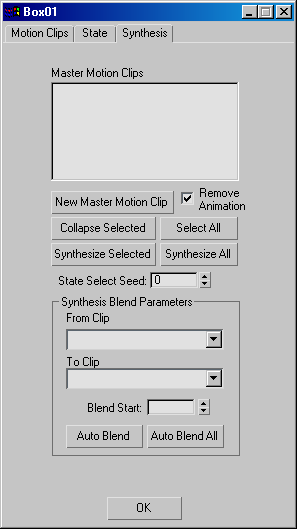
Synthesis dialog

Synthesis panel
 Command entry:
Open Track View

Hierarchy

Global Tracks

Block Control

Global Clip Properties (right-click)

Synthesis dialog

Synthesis panel
Controls in the Synthesis panel are for adding objects to be synthesized, selecting blend transition points, and performing
the synthesis. When you synthesize, different sequences of motion clips are applied to each specified object based on the
behavioral motion of its delegate.
Interface
- Master Motion Clips list
-
Displays the objects to which the synthesized motion will be applied.
You can highlight any of these by clicking them, and select multiple items with Ctrl+click and Shift+click. Highlight all objects with the Select All button.
- New Master Motion Clip
-
Displays the Select Object To Copy dialog. Use this to specify the objects to which the synthesized motion will be applied.
These objects must all be structurally identical to the Global Object. In effect, they should be clones.
- Remove Animation
-
Strips the animation from the clones.
After making clones of the original animated object, you can strip the animation from the clones. During synthesis, motion
is applied based on which state is active.
- Collapse Selected
-
Collapses motion clips to keys on the highlighted objects.
This deletes the Master Motion Clip for that object. You can then edit keys and make changes to the animation manually in
the scene.
- Synthesize Selected
-
Analyzes the motion of the delegates linked to the highlighted objects in the Master Motion Clips list, determines which state
definitions fit that motion throughout the animation, and applies the corresponding motion clips.
- Select All
-
Selects all of the objects in the Master Motion Clips list.
- Synthesize All
-
Analyzes the motion of the delegates linked to all objects in the Master Motion Clips list, determines which state definitions
fit that motion throughout the animation, and applies the corresponding motion clips.
A progress bar displays during synthesis. When synthesis is completed, the Synthesis dialog reappears, and you can view the
calculated minimum, maximum, and average values of delegate motion for the different state properties in the ClipState dialog.
You can use these values to fine-tune the state properties.
- State Select Seed
-
Sets a seed value for random state selection.
During synthesis, it's possible that several states qualify for activation at the same time, in which case one state is chosen
at random. The seed is used to modify the random value selected when determining which state to select.
Synthesis Blend Parameters group
During synthesis, clips aren't sequenced from end to end; instead, they partially overlap, with key blending or averaging
occuring during the overlap intervals. This allows for smooth transitions between clips. During the blending or overlap period,
weighting gradually shifts between the “from” and “to” clips, so the former's keys predominate at the beginning of the blend,
and the latter's at the end.
You can specify explicitly how blending occurs between clips, or you can let character studio calculate blending parameters
automatically. To specify blending, use the drop-down lists to choose a pair of clips to blend between, and then set Blend
Start to the frame in the “from” clip at which blending should begin. Alternatively, use Auto Blend or Auto Blend All to have
character studio determine the best blend points.
If you use Auto Blend, you can then see the calculated blend start point for each pair of clips by choosing the clips from
the drop-down lists.
- From Clip list
-
Lets you select the starting clip to blend; the clip to blend from.
- To Clip list
-
Lets you select the ending clip to blend; the clip to blend to.
- Blend Start
-
Displays the frame in the From clip at which the transition is to begin, whether the default, calculated, or set manually,
and lets you change the start frame.
- Auto Blend
-
Automatically sets the Blend Start frame for the current From and To clips.
- Auto Blend All
-
Automatically sets the Blend Start frames for all possible pairs of clips.
- OK
-
Accepts changes and closes the dialog.
