Parameter Collector lets you sort and present animatable parameters so that you can access and key selected parameter sets with a click or two. It takes the form of a resizable dialog that regenerates dynamically as parameters change. The dialog supports drag-and-drop rollout reordering. Collections are saved with their scenes and can be merged into other scenes.
One of Parameter Collector's most powerful features is the ability to change all parameters in a collection simultaneously, in an absolute or relative mode. For example, if you're animating a character's hand, you can use Parameter Collector to easily make all the fingers curl up together to form a fist.
Example: To use Parameter Collector:
This exercise demonstrates some basic Parameter Collector functions.
In general, start with a scene containing one or more objects whose parameters you'll collect. Ideally, they should be animated, but it's not absolutely necessary.
 (Add To New Rollout).
The Track View Pick dialog opens. This lets you specify parameters to collect.
 Sphere01 Transform: Position/Rotation/Scale Position: Position XYZ.
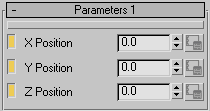
A new rollout named Parameters 1 appears, containing the X Position parameter.
 (Add To Selected Rollout), and then use the same method to add the Y Position and Z Position parameters: Highlight both parameters
on the Track View Pick dialog and then click Add To Selected Rollout to add both at once to the Parameters 1 rollout.
(Add To Selected Rollout), and then use the same method to add the Y Position and Z Position parameters: Highlight both parameters
on the Track View Pick dialog and then click Add To Selected Rollout to add both at once to the Parameters 1 rollout.
As you change each parameter value, the sphere moves in real time in the viewports.
 (Multiple Edits).
All three change by the same amount, so that the sphere moves diagonally in the scene.
 (Absolute/Relative) to turn on Relative mode.
All the values display 0.0, as with Offset mode on the status bar coordinate display.
The three change in unison, and then reset back to 0.0 when you release the mouse button. This has added the value you set to each of the three positions, as you'll see in the next step.
The values are all set to 30.65, reflecting the relative change that you made.
The Y Position parameter is now selected, and the other two are deselected.
 (Move Parameters Up).
The Y Position parameter now sits above the X Position parameter.
 (Move Parameters Down).
The Y Position returns to its position below the X Position parameter.
Edit Notes.
The Notes dialog opens. Here you can change the parameter name, set a URL or file location with further information about the parameter, and enter comments.
The new name replaces the old one on the rollout. You can see the original name by hovering the mouse cursor over the parameter name; it appears on a tooltip.
To conclude this exercise, you'll use Parameter Collector to set and edit animation keyframes.
 (Auto Key).
Because you're at frame 0, no key is set. This is the same way Auto Key works normally.
The menu shows that a key exists at frame 20 only for Y Position. Normally, 3ds Max would create keys for all three axes, even if you moved the sphere only on one axis.
Parameter Collector can set keys for unselected objects as well.
 (Key Selected).
 (Properties), to the right of the Sphere Y Loc. parameter.
This opens a Key Info dialog for the parameter, with the ability to edit the key time and value as well as interpolation with other keys. The dialog is also available from the track bar right-click menu, but it's much easier to access the data for a specific key from Parameter Collector.
Parameter Collector takes the form of a dialog with a menu bar, a toolbar, and rollouts that you create and modify using the dialog tools. You can resize the dialog horizontally and vertically; expanding it lets you see all rollouts simultaneously.
The menu bar provides a range of functions for using Parameter Collector. See Parameter Collector Menu Bar for details. Also, you can open the Spinner Right-Click menu by right-clicking a numeric field in Parameter Collector.
The Parameter Collector toolbar provides button access to the most commonly used functions.
 New Collection
 Duplicate Collection
 Delete Collection Multiple Edits Absolute/Relative
Works the same way as the Absolute/Offset mode toggle on the Coordinate Display. When Absolute is chosen, modifying a value changes it to the exact amount you specify. When Relative is chosen, the displayed value is 0, and modifying the parameter adds the specified change to the original value. The actual value appears only in Absolute mode.
This applies to numeric values only; any changes to other values, such as color, are always absolute.
Key Selected Reset Selected Move Parameters Down Move Parameters Up Add to Selected Rollout Add to New Rollout
 Delete Selected
 Delete All
Rollouts work the same way in Parameter Collector as they do on the command panel. You can expand and collapse a rollout by clicking its title bar, and move it to another location by dragging the title bar. You can resize the dialog to be able to see all rollouts at once.
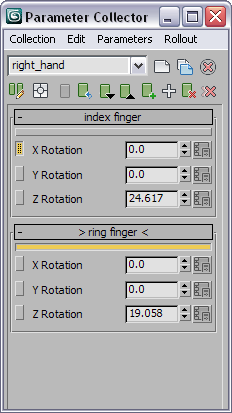
Only one rollout can be selected at a time. You select a rollout by clicking the horizontal bar beneath the title; when selected, this bar is orange-yellow in color, and angle brackets surround the rollout title (for example, “> Hand Parameters <”).
The interface for each parameter on a rollout is as follows:
By default, the parameter has the same name as is shown in Track View, but you can change it with the Edit menu Edit Notes command. You can see the default name for a parameter as well as the object it controls, if any, by hovering the
mouse over the parameter name; the information appears on a tooltip.
Shows the current value of the parameter. The parameter type determines how this appears: numeric field/spinner, color swatch, etc. You can edit the value the same way as on the command panel or a dialog.
If a key exists for the value at the current frame, the spinner or swatch appears with red brackets at the corners.
[Properties]Opens a Key Info dialog for the parameter. Available only if the parameter has an animation controller.
Use the Key Info dialog to edit an animation key's value, time, and interpolation methods.
The Parameter Collector dialog menu bar provides access to a number of important commands. Some of these commands are replicated on the dialog toolbar; others, such as the Select tools, are available only from the menus. Also, you can open the Spinner Right-Click menu by right-clicking a numeric field in Parameter Collector.
The Notes dialog lets you enter a name, URL, and comments for one or more selected parameters in Parameter Collector.


