The Shadow Map Parameters rollout is displayed when you have chosen shadow mapping as the shadow-generation technique for a light. You select this in the General Parameters rollout.
Both the scanline renderer and the mental ray renderer support Shadow Map shadows.

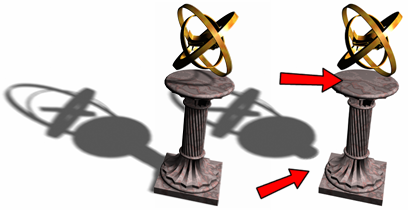
Shadow bias moves the shadow toward or away from the shadow-casting object (or objects).

Left: Default shadows
Right: Increasing the Bias value separates the shadow from the object.
If the Bias value is too low, shadows can "leak" through places they shouldn't, produce moire patterns or making out-of-place dark areas on meshes. If Bias is too high, shadows can "detach" from an object. If the Bias value is too extreme in either direction, shadows might not be rendered at all.
This value depends on whether Absolute Map Bias is on or off:

Left: Too small a Bias value causes shadow “leaks.”
Right: Increasing the Bias value fixes the problem.
The sample range determines how much area within the shadow is averaged. This affects how soft the edge of the shadow is. Range=0.01 to 50.0.

Increasing the Sample Range blends the shadow edges and creates a smooth effect, hiding the granularity of the map.
When on, the bias for the shadow map is not normalized, but is instead based on a fixed scale expressed in 3ds Max units. This value does not change during an animation. You must choose the value, based on the size of the scene extents.
When off, the bias is computed relative to the rest of the scene, and then normalized to 1.0. This provides a common starting bias value in scenes of any size. If the scene extents change, this internal normalization can vary from frame to frame. Default=off.
When on, backfaces are not ignored when calculating shadows. Objects seen from the inside are not lit by lights from the outside. When off, backfaces are ignored, which can cause outside lights to illuminate object interiors. Default=on.

The faces inside the sliced sphere do not cast shadows if 2-Sided Shadows is not selected.