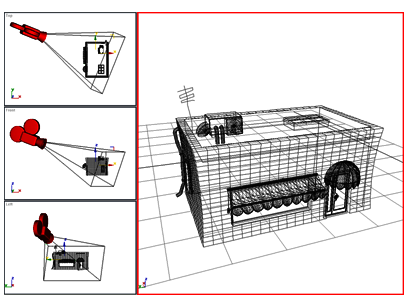
Each viewport can be set to display either of two types of views: axonometric or perspective.

Axonometric view of a scene

Perspective view of the same model
Perspective views most closely resemble human vision, where objects appear to recede into the distance, creating a sense of depth and space. Axonometric views provide an undistorted view of the scene for accurate scaling and placement. A common workflow is to use axonometric views to create the scene, then use a perspective view to render the final output.
There are two types of axonometric views you can use in viewports: head-on and rotated.
An orthographic view is often a head-on view of the scene, such as the view shown in the Top, Front, and Left viewports. You can set a viewport to a specific orthographic view using the Point-Of-View (POV) viewport label menu, keyboard shortcuts, or the ViewCube. For example, to set an active viewport to Left view, press L.
You can also rotate an orthographic view to see the scene from an angle while retaining parallel projection. However, when viewing the scene from an angle, it’s often more helpful to use a perspective view.
A perspective viewport, labeled Perspective, is one of the startup viewports in 3ds Max. You can change any active viewport to this "eye-like" point of view by pressing P.
Once you create a camera object in your scene, you can change the active viewport to a camera view by pressing C and then selecting from a list of cameras in your scene. You can also create a camera view directly from a perspective viewport, using the Create Camera from View command.
A camera viewport tracks the view through the lens of the selected camera. As you move the camera (or target) in another viewport, you see the scene move accordingly. This is the advantage of the Camera view over the Perspective view, which can't be animated over time.
If you turn on Orthographic Projection on a camera’s Parameters rollout, that camera produces an axonometric view. See Cameras.

The viewport on the right is seen through a camera in the scene.
Two and Three-Point Perspective and the Camera Correction Modifier
By default, camera views use three-point perspective, in which vertical lines appear to converge with height (in traditional photography this is known as keystoning). The Camera Correction modifier applies two-point perspective to a camera view. In two-point perspective, vertical lines remain vertical. A similar effect can be attained by putting a Skew modifier on a camera.
Light view works much like a targeted camera view. You first create a spotlight or directional light and then set the active viewport to that spotlight. The easiest way is to press the keyboard shortcut $. See Lights.

The viewport on the right looks through the lens of a spotlight in the scene.