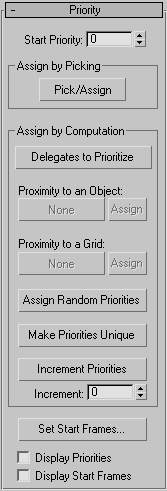
The Crowd system uses the Priority rollout settings when solving a simulation involving bipeds associated with delegates.
The Priority parameter is a positive integer assigned by the user to a delegate. When priorities are used, the Crowd simulation computes one biped at a time, based on its priority setting from lowest to highest; that is, a lower Priority setting means a higher priority. If the priorities of two biped/delegates are the same, the computation order of those two biped/delegates is randomly determined.
This topic describes the six different ways of setting a delegate's priority, and how priorities might be put to use in different situations.
If you have a large crowd all going in one direction, you would typically want the delegates in front to solve first. In that case, using Proximity To An Object or Proximity To A Grid would be useful in setting priorities.
In a case where you start with a circle of bipeds, and you want them all to wander and mingle, you might not care about the bipeds' priorities. You could let them all have the same priority and let the system decide which goes first. However, it might be better to assign random priorities or make priorities unique, so that you are guaranteed the same order each time, and you can read the priority numbers to know what will happen next. This also lets you change the order if you need to.
Suppose you have two groups of bipeds, all of which are assigned random priorities. If you wanted to keep the priority relationships within each group, but make one group start after or before the other, you could use Increment Priorities to increment or decrement all the priorities in one group.
If none of the algorithms applies to your situation, you need some way to set the priorities by hand. It's useful to be able to set them visually. That's what the Assign By Picking method is for.

Lets you assign successively higher Priority values to any number of delegates by selecting each in turn in the viewport. The first delegate you select is assigned the Start Priority value. The Priority value assigned to each succeeding delegate you select is incremented by one.
To stop assigning priorities, right-click in a viewport or click the Pick/Assign button again.
Delegate priorities appear in viewports as black numerals attached to each delegate; they're usually most easily seen in Wireframe views.
This group provides five different methods for assigning priorities to delegates, plus a button for selecting delegates to be affected by these methods.
Lets you use the Select dialog to specify delegates to be affected by subsequent use of other controls within this group. Select the delegates with the Select dialog, and then click Select to exit the dialog. This selection applies only to Proximity assignments (that is, Proximity To An Object and Proximity To A Grid).
Lets you assign priorities based on delegates' distance from a specific object. To specify the object, click the None button, and then select the object on which priorities are to be based. Lastly, click the Assign button to compute and assign priorities. The delegate closest to the object is assigned the Start Priority value, and each successively farther delegate is assigned the next highest priority.
For any delegates that are equidistant from the object, character studio assigns priorities randomly.
Lets you assign priorities based on delegates' distance from an infinite plane defined by a specific grid object. To specify the grid object, click the None button, and then select the grid object on which priorities are to be based. Lastly, click the Assign button to compute and assign priorities. The delegate closest to the grid object is assigned the Start Priority value, and each successively farther delegate is assigned the next highest priority.
For any delegates that are equidistant from the plane, character studio assigns priorities randomly.
Opens the Set Start Frames dialog, for setting start frames based on assigned priorities.
Enables the display of assigned start frame values as black numerals attached to the delegates. Default=off.
When both Display Priorities and Display Start Frames are on, the two values are displayed side by side, separated by a slash symbol (/). The priority appears to the left of the slash and the start frame appears to the right.
When you include bipeds in a crowd simulation using a shared motion flow, you usually don't want them all walking in lockstep formation. You can avoid this by setting different start frames to vary the animation frame at which each biped starts moving using its initial motion clip. In most cases, you would set start frames in the same order as priority, so you don't get bipeds with earlier start frames stuck behind bipeds with later start frames. The Set Start Frames dialog lets you automatically assign start frames to delegates in the same order as priority.