The Mesh Select modifier lets you pass a sub-object selection up the stack to subsequent modifiers. It provides a superset of the selection functions available in the Edit Mesh modifier. You can select vertices, edges, faces, polygons or elements, and you can change the selection from sub-object level to object level.
For more information on the stack display, see Modifier Stack.
Using XForm Modifiers to Animate a Mesh Selection
When you apply a Mesh Select modifier, there are no animation controllers assigned to the sub-object selection. This means that the selection has no way to "carry" the transform information needed for animation.
To animate a sub-object selection using Mesh Select, apply either an XForm or Linked XForm modifier to the selection. These modifiers provide the necessary controllers for animating the effects of transforms. In a sense, they give "whole-object status" to the sub-object selection.
Animates transforms directly on a sub-object selection. Creates a gizmo and center for the sub-object selection. You can animate both, with the center acting as a pivot point for the selection.
Lets you choose another object to control the animation. The sub-object selection is linked to the "control object." When you transform the control object, the sub-object selection follows accordingly.
To use the Mesh Select modifier:
 Select the mesh object.
 Select vertices, edges, faces, polygons or elements.
 Show End Result
Normally, if you apply a modifier such as Twist to an editable-mesh object and then return to the Editable Mesh stack entry, you cannot see the effect of the modifier on the object's geometry. But if you turn on Show End Result, you can see the final object as a white mesh, and the original editable mesh as an orange mesh.
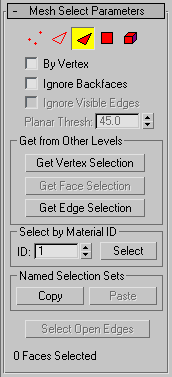
Mesh Select Parameters rollout

Provides buttons for turning different sub-object modes on and off, working with named selections and handles, display settings, and information about selected entities.
The icons at the top of the Selection rollout let you specify the method of sub-object selection.
Clicking a button here is the same as selecting a sub-object level in the modifier stack. Click the button again to turn it off and return to the object selection level.
 Vertex
 Edge
Edge Face
Face Polygon
 Element
Selects only those sub-objects whose normals make them visible in the viewport. When turned off (the default), selection includes all sub-objects, regardless of the direction of their normals.
When turned off (the default), and you click a face, the selection won't go beyond the visible edges no matter what the setting of the Planar Thresh spinner. When turned on, face selection ignores the visible edges, using the Planar Thresh setting as a guide. Enabled when the Polygon face selection method is chosen.
Generally, if you want to select a "facet" (a coplanar collection of faces), you set the Planar Threshold to 1.0. On the other hand, if you're trying to select a curved surface, increase the value depending on the amount of curvature.
These functions are primarily for copying named selection sets of sub-objects between similar objects, and between comparable modifiers and editable objects. For example, you can apply a mesh select modifier to a sphere, create a named selection set of edges, and then copy the selection to a different sphere that's been converted to an editable mesh object. You can even copy the selection set to a different type of object, because the selection is identified by the entities' ID numbers.
The standard procedure is to create a selection set, name it, and then use Copy to duplicate it into the copy buffer. Next, select a different object and/or modifier, go to the same sub-object level as you were in when you copied the set, and click Paste.
At the bottom of the Mesh Select Parameters rollout is a text display giving you information about the current selection. If 0 or more than one sub-object is selected, the text gives the number and type selected. If one sub-object is selected, the text gives the ID number and type of the selected item.
These controls let you set a gradual falloff of influence between selected and unselected vertices. See Soft Selection Rollout (Edit/Editable Mesh).