In this lesson, you will create the basic geometry of the model, then use 3ds Max Design modifiers to give the object a distinctive shape.
 (Open File), navigate to the \scenes\modeling\highrise folder, and open building1_start.max.
A daylight system has already been set up, so you can start building your model right away.
 Create panel, click
  (Geometry), then in the Object Type rollout, click Box.
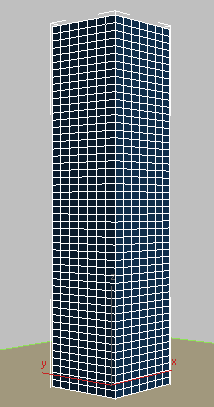
Do not worry about dragging the box to an exact width, depth, or height. You will set these parameters in the next step.
 Modify panel
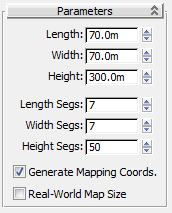
  Parameters rollout, set the parameters of the box as follows:

This name change is appropriate, since you will later be applying a glazing material to this object.
Object-Space Modifiers section, choose Taper.

The negative Amount value tapers the building inwards at the top. The negative Curve value pulls the sides of the building in, as shown in the next illustration.
 Object-Space Modifiers section, choose Twist.
Twist group, set Angle to 90.0 and Bias to 45.0.
Object-Space Modifiers section, choose Twist.
Twist group, set Angle to 90.0 and Bias to 45.0. 
The 90-degree Twist value creates a quarter turn of the building. The Bias value of 45 causes the twist to start part-way up the side of the building, rather than immediately at its base.
 Dimensions group, click Set Number Of Points.

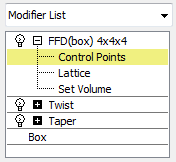
 plus-sign icon to expand the FFD(Box) modifier hierarchy. Click to choose Control Points.
This lets you select and manipulate the lattice control points you defined in the previous step.
 dragging a box to select the top row of control points, then holding down Ctrl and dragging another box to select the fourth row of control points.
 (Select And Move), then drag right slightly, as shown in the next illustration.
Now you are ready to create the mullions.