In this lesson, you'll
open a partially-completed scene of a battlefield and learn how
to adjust the view and navigate the viewports.
Set up the lesson:
- On the Quick Access toolbar, click
 (Open File).
- In the \scenes\startup folder,
highlight battlefield_start.max,
then click Open.
NoteIf a dialog asks
whether you want to use the scene’s Gamma And LUT settings, accept
the scene Gamma settings, and click OK. If a dialog asks whether
to use the scene’s units, accept the scene units, and click OK.
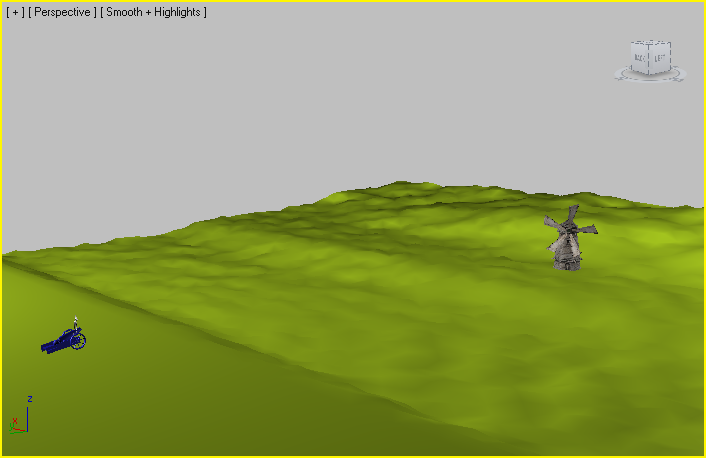
The Perspective viewport should be active, indicated
by a yellow border. If no border is visible, click anywhere within
the viewport to activate it.
Navigating the scene:
Depending on how your
system is currently being used, you might have up to two navigation
tools displayed in the viewport. The ViewCube™ displays
in the top right corner and the SteeringWheels™ 3D navigation
controls display in the lower left.
- You will first take a look at the ViewCube.
If the SteeringWheels is visible, hide it by clicking the X at the
top right of the corner of the wheel.
NoteIf this is the first
time you are using SteeringWheels, you will need to click on its
icon to activate it.
- In the Views menu
 Viewport Configuration ViewCube panel Display Options group, turn on Show The
ViewCube if it is not already on.
Viewport Configuration ViewCube panel Display Options group, turn on Show The
ViewCube if it is not already on.
In the When Clicking
On The ViewCube group, make sure Fit-To-View On View Change and
Keep Scene Upright are on, and click OK.
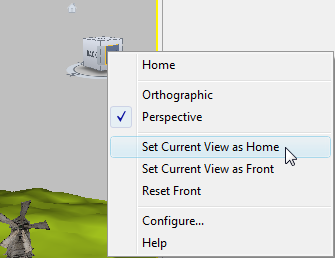
- In the Perspective viewport, right-click
the ViewCube and choose Set Current View As Home.
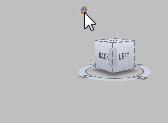
- Click the Left face of the ViewCube to
view the scene from the left.
As you can see, the ViewCube
lets you view the scene from alternative viewpoints with a simple
click of a mouse.
Notice how the viewport
zooms in to a default scene magnification as it switches to the
left perspective. The change in zoom factor is not something we
want in this tutorial however, so you’ll change it.
- Right-click the ViewCube and choose Configure
from the menu.
The ViewCube tab is automatically
selected.
- In the When Clicking On The ViewCube
group, turn off Fit-To-View On View Change and click OK.
It is important to keep
this setting off if you want to maintain the same zoom factor when
switching between viewpoints.
- In the Perspective viewport, click the
Home icon to the upper left of the ViewCube.
The Perspective viewport
returns to its initial viewpoint.
NoteYou can reset the
Home viewpoint to the current view at any time by right-clicking
the ViewCube and choosing Set Current View As Home.
- Click
 (Zoom) in the viewport navigation
controls at the lower-right corner of the 3ds Max window.
(Zoom) in the viewport navigation
controls at the lower-right corner of the 3ds Max window.
To show that this control is now active, the
button is highlighted.
- With the mouse, drag downward in the
Perspective viewport.
Your view zooms out so you can see the scene
from a distance.
NoteYou can also zoom
in or out by rotating the mouse wheel forward or backward.
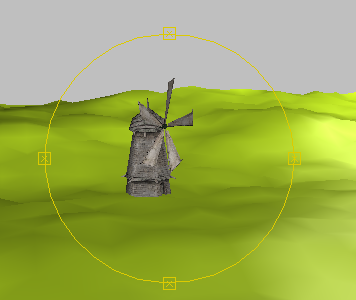
- In the viewport navigation controls click
 (Orbit), which is below
and to the right of the Zoom button. The button highlights when
active.
(Orbit), which is below
and to the right of the Zoom button. The button highlights when
active.
A yellow navigation circle
appears in the viewport.
- Position the cursor inside the yellow
circle. Click and hold the left mouse button and move the mouse. This
action is called dragging.
The point of view orbits around the scene.
TipAvoid dragging outside
the yellow navigation circle, unless you want to roll the entire
viewport.
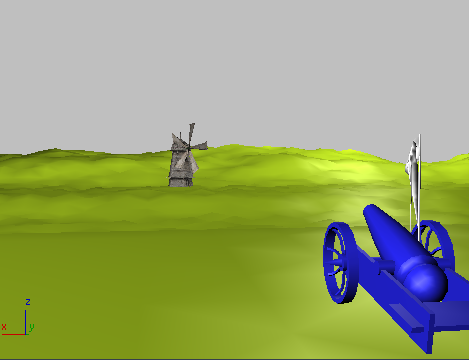
- Use a combination of the Orbit and mouse
wheel to zoom in on the windmill.
- Orbit your view by dragging to the left
or right until you can see the cannon in the opposite direction.
- Right-click the viewport to exit Orbit
mode.
- Click
 (Pan) in the viewport navigation
controls and move the mouse in the viewport.
(Pan) in the viewport navigation
controls and move the mouse in the viewport.
The viewport view now follows the movement of
your mouse.
NoteYou can also start a pan operation by holding
down the mouse button or wheel as you pan.
- Return the viewport to its original orientation
by clicking the Home icon.
- Press Shift+W to
display the SteeringWheels controls, if they are not already visible.
NoteIn this instruction, “Shift+W”
is outlined with a rectangle to indicate that you must press this
key combination on the computer keyboard. We use this style consistently
in the help and tutorials for both single key presses and key combinations,
so that it's always clear when an instruction involves using the
physical keyboard as opposed to using the mouse with the software
interface on the screen.
The SteeringWheels controls
offer an alternative way to navigate a scene.
- Click and drag each of the Zoom, Pan
and Orbit controls in turn, and experiment with how they can be
used to navigate the scene.
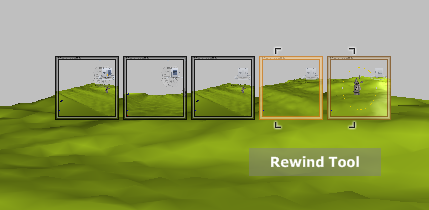
- When you’re done, click the Rewind button
and drag to the left.
The Rewind tool passes
over a strip of thumbnails, each of which represents a previously
selected navigation point. Release the mouse on any thumbnail. The
viewport rewinds to that point.
- Experiment with the Center, Walk, Look.
and Up/Down controls in the center of the SteerWheels icon. When
you are done, click the arrow at the bottom right of the wheel and
from the menu, choose Go Home. This repositions the viewport view
to the Home viewpoint.
- Click the small “X” in the top right
of the wheel to hide the SteeringWheels control.
TipYou can press Shift + W to redisplay the SteeringWheels
controls.
Next, you'll create a
camera and a Camera viewport. The Camera viewport is similar to
the Perspective viewport but with different functionality. You can
animate it, and add effects to it.
Creating a camera:
- Right-click the Top viewport to activate
it.
The viewport is outlined
in yellow.
- On the
 Create panel, click
  (Cameras), then click Target.
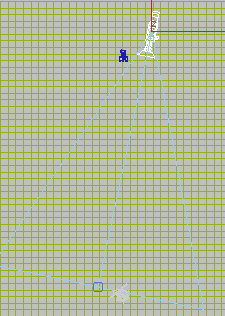
- In the Top viewport, click behind and
slightly to the right of the cannon, then drag down to a point just
left of the windmill (as shown in the following illustration). Don’t
worry about the exact camera placement yet: You will adjust this
later.
To see what the camera sees, you now need to
display one of the viewports as a Camera viewport.
- Right-click the Perspective viewport
to activate it, then press C.
Right-clicking a viewport
activates it and keeps any objects in other viewports in a selected
state (in this case, our camera object). Left-clicking a viewport
deselects previously selected objects.
- On the main toolbar, click
 (Select And Move).
A tripod of red, blue,
and green arrows appears in the Top viewport. This is the transform
gizmo. As you move your cursor over the arrows, each axis label
and arrow stem turn yellow. When one is yellow, you can click and
drag to move the object in a single direction. If you move your
cursor over the inner corners of the transform gizmo, the plane turns
yellow. This lets you move in a single plane.
- Right-click the Left viewport, click
the camera’s Y axis manipulator, and drag it slightly upward so
you can see more of the horizon in the Camera001 viewport.
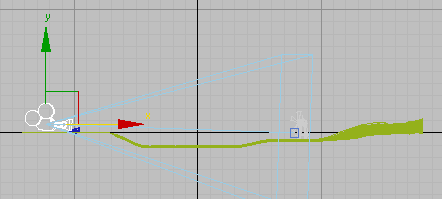
- If the cannon is not visible in the Camera001
viewport, then in the Top viewport drag the camera until the front
of the cannon comes into view in the Camera001 viewport, as shown
in the next illustration.
Next, you'll create a
rock and a tree, then add them to the scene.