Rendering multiple frames
for a complete animation can be time consuming, even on a fast machine,
because each frame is individually processed. Realistic materials,
shadow casting, and other factors can slow the process as well.
This scene is relatively simple however, so it shouldn’t take that
long to render.
Set up the scene:
- On the Quick Access toolbar, click
 (Open File) and open your
saved animation, my_battlefield attack.max. Or,
open battlefield_attack.max,
located in the \scenes\startup folder.
(Open File) and open your
saved animation, my_battlefield attack.max. Or,
open battlefield_attack.max,
located in the \scenes\startup folder.
NoteIf you saved your
completed files to a folder other than \scenes\startup,
when you open one of your files you might encounter messages about
missing files. If you run into this problem, click the Browse button
on the Missing External Files dialog. This opens the Configure External
File Paths dialog. Click the Add button. Use the Choose New External
Files Path dialog to navigate to the folder where you loaded the
original file, and then click Use Path. Click OK, and then click
Continue.
Render your animation:
To complete this tutorial,
render the animation you made earlier. The rendering time is probably
under 15 minutes, depending on the speed of your machine.
- On the main toolbar, click
 (Render Setup).
3ds Max opens the
Render Setup dialog.
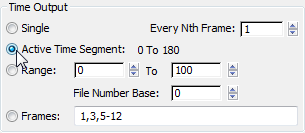
- In the Time Output group, choose Active
Time Segment. (If you left the setting at Single, just the currently
displayed frame would render.)
TipIf your computer is fast, you may skip the
next step.
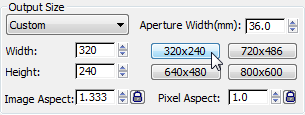
- In the Output Size group, change the
default (640 x 480) to 320 x 240.
This smaller size has only one-quarter the area
of the default, making it much faster to render.
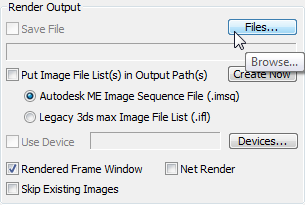
- In the Render Output group, click the
Files button. (You might have to scroll down in order to see this
control.)
- On the Render Output File dialog, name
your animation mybattlefield_attack.avi. Click
Save to save the animation to the default folder (usually \renderoutput).
WarningYou must either add
the extension .avi in the file name, or else
select AVI as the file type. If you don't tell the program what
type of animation format to save in, the rendering won't work.
- On the AVI File Compression Setup dialog,
do the following:
- If necessary, change the compressor to
Cinepak Codec. There are many different codecs to choose from. Cinepak
generally gives satisfactory results and is commonly installed on
Windows machines, meaning your compressed AVI file can be read by
wide audience.
- Set Quality to high, between 90 and 100.
- When you’re finished, click OK.
On the Render Setup dialog, Save File is now
on and the output field shows the location of mybattlefield_attack.avi.
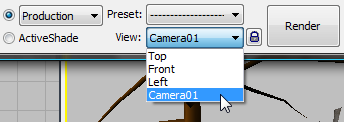
- At the bottom of the Render Setup dialog
 View list, choose Camera01.
Always check to be sure you’re rendering the
right viewport.
Tip In most cases, you will render the camera
viewport.
- Click Render to begin the rendering process.
Watch a few frames to make sure that the rendering
gets off to a good start. The Time Remaining estimate gives you
an idea of how long the rendering will take.
Play the rendered animation:
- When your animation is finished rendering,
choose Rendering menu View
Image File.
By default, the View
File dialog opens in the \renderoutput subfolder.
- Highlight mybattlefield_attack.avi and
click Open to display the Media Player.
- In the Media Player, play your animation.
Summary
You have learned how
to find your way around the 3ds Max user interface while creating
an animated scene. You now know how to navigate the viewports, create
simple objects using primitives, and assign materials to them. You've
also learned how to move objects as well as animate and render your
animation.