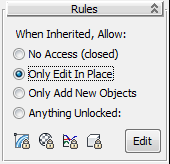
Besides No Access, the container provides three other rules that allow various levels of access to other users. In this procedure you’ll look at Only Edit In Place.
On the Manage Container
rollout, a  icon appears next to the
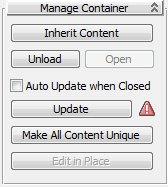
Update button. This indicates that an update is needed to keep in
sync with the source container; the one created by the originator.
icon appears next to the
Update button. This indicates that an update is needed to keep in
sync with the source container; the one created by the originator.
The container looks the
same, but now the  icon appears next to the
Update button, indicating that the container definition is current.
Also, while the Open button is still unavailable, the Edit In Place
button is available.
icon appears next to the
Update button, indicating that the container definition is current.
Also, while the Open button is still unavailable, the Edit In Place
button is available.
The inherited container opens in Edit In Place mode. Edit In Place is a mode that you enter and exit by clicking this toggle button.
The Open button is available, but when you try to use it you get a message that the container’s definition is currently being edited by you in another instance of 3ds Max.
This demonstrates two important Container features:
This exits Edit In Place mode, saving any changes to the container contents and unlocking the container file.
The wine glass changes position, reflecting the edit from Session 2.
icon is again visible next
to the Update button, even though the container definition hasn’t
changed.
The Update function doesn’t look at the container definition; it simply compares the date and time stamp on the file with the version you inherited, and if it’s newer, advises you to update.
Say the originator is now happy with the wine glass’s position and doesn’t want it change any more. The ability to lock specific parameters of a container definition is an important Container feature.
 top-left
quadrant, choose Lock.
top-left
quadrant, choose Lock.
The Transform entry and all its children (branches and leaves) now show “(Locked)” after their names in the Track View hierarchy.
![]()
 Exit Track View and then
close the container.
Exit Track View and then
close the container.
The Transform track is no longer locked, but its child tracks still are. Lock affects child tracks, but Unlock affects only highlighted tracks.
![]()
This unlocks the Transform track as well as all of its child tracks. Now you can transform the wine glass if you want.
As you’ve seen, you can lock specific tracks for objects in a container, but if you use the Only Edit In Place rule, the inheritor can easily defeat your locks. If you use a different rule, however, the inheritor must abide by your locks unless you revise them.
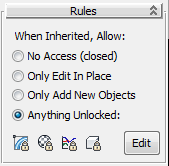
With Anything Unlocked enabled, you can use the four icon buttons at the bottom of the Rules rollout to quickly lock all modifiers, materials, transforms, and objects, and you can also use the Edit button to lock specific tracks, as before. For the sake of convenience, in this exercise you’ll just use the existing locked transform tracks for the wine glass.
This time something different happens: The container opens, and Edit In Place is unavailable.
No problem opening it this time. Edit In Place is the best rule for passing a single container back and forth between team members while preventing accidental overwriting; the remaining rules are better suited for one-way transfer of containers, as you’ll see in the following steps.
Instead of simply closing the container, 3ds Max prompts you for a file name.
This saves a local definition of the container, although it still has a connection to the source definition, as indicated by the source file name under Source Definition on the Inherited Content rollout.
Now you can see the name of the container file you saved under Saved Local Definition on the Local Content rollout.
Depending on whether the inherited container is open or closed, the Modify panel shows either the Local Content or Inherited Content rollout; never both.
Now the “(Locked)” text is in italics, indicating that you, as the inheritor of this data, cannot unlock those tracks. Try to unlock them; you can’t, even if you change the rule. You’re limited by the rules set in the container you inherited.
 (Override All Locks).
The toggle button stays highlighted to indicate that this condition is active.
The glass moves to reflect its new position from the source container.
The overridden transforms are inherited in Session 2, but the overrides themselves are not. Thus, using the Anything Unlocked rule, the originator of the container can keep a firm grasp on which changes the inheritor can make, but can override her own rules at will.
 (Add Selected To Container).
Use the Select dialog that opens to highlight the container and
then click the Add button.
(Add Selected To Container).
Use the Select dialog that opens to highlight the container and
then click the Add button.
The new object from Session 2 doesn’t appear. Source containers set to Anything Unlocked (or Only Add New Objects) move data in one direction only: from the originator to the inheritor. If you like, add an object in Session 1, close the container, and then update in Session 2; the object is added to that container, even though it has a local definition. In a sense, the container in Session 2 is a hybrid of of a source and local container.


 (Filter - Selected Objects
Toggle) is on in Track View, you can find the object faster in the
list by selecting it.
(Filter - Selected Objects
Toggle) is on in Track View, you can find the object faster in the
list by selecting it.