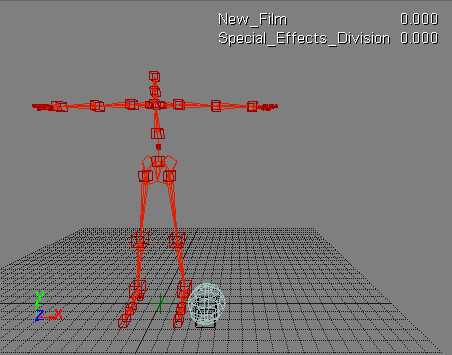
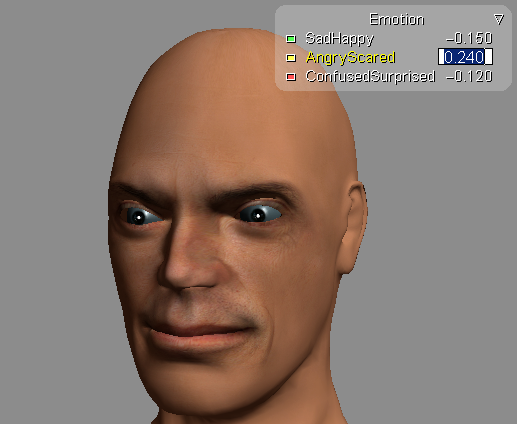
You can display and edit parameter values directly in a 3D view. This is sometimes called a heads-up display or HUD.
You do this by creating a custom parameter set whose name starts with the text DisplayInfo. You can simply display information, for example, about your company or a particular scene shot, or you can mark parameters and change their values. A single object can have more than one property whose name begins with DisplayInfo.
Create a custom parameter set and make sure that the Name starts with the text DisplayInfo. You can enter anything after that; for example, you could enter DisplayInfo_Company or DisplayInfo_MyFilm.
Create custom parameters or proxy parameters for the information that you want to display in a 3D view. See Creating Custom Parameters and Creating Proxy Parameters.
Click the eye icon in a 3D view and choose Visibility Options.
On the Stats page in the Camera Visibility property editor, select Show Custom "DisplayInfo" Parameters.
Select Use Proxy Parameter Names to display the name of the proxy parameter as it appears in the DisplayInfo set, not the name of the parameter to which the proxy parameter refers. For example a proxy parameter created for a null's Scale X parameter would be named null Scaling X in the set, but the parameter to which it refers is called sclx.
Select one or more objects with a DisplayInfo custom parameter set. If nothing is selected, the DisplayInfo set of the scene root is displayed (if it has one).

You can easily modify the parameters displayed in the 3D views. There is a preference that controls the interaction:
If on-screen editing is disabled, you can still mark the parameters and modify them using the virtual slider.
If on-screen editing is enabled, you can modify the values as well as animate them directly in the display.
Press F4 to activate the virtual slider tool (see Entering Values Using Virtual Sliders [Commands and Tools]).
Click a parameter name to mark it (assuming it is markable) or press Shift+click to mark multiple parameters.
Press Ctrl+click to toggle the marked parameters (this works the same as marking parameters in the marked parameter list).
Drag the mouse back and forth using the following as a guide. You can scrub horizontally using the entire screen width:
Middle-click and drag to the right to increase values, and to the left to decrease values. The default increments are proportional to the range of the parameter's slider in its property editor.
Press the Ctrl key to make coarse adjustments (10 times the default increment).
Press the Shift key to make fine adjustments (1/10th the default increment).
Press the Ctrl+Shift keys to make ultra-fine adjustments (1/100th the default increment).
Press Alt to extend beyond the range of the parameter's slider in its property editor (if the slider range is smaller than its total range).
Press the Up and Down arrow keys to increment or decrement the values by 1 unit. Hold the Ctrl key while pressing the arrow keys to increment or decrement by 10, or hold the Shift key to increment or decrement by 0.1.
If on-screen editing is enabled, the parameters appear in a transparent box in the view. The title of the parameter set is shown at the top (without the "DisplayInfo_" prefix). Each parameter has animation controls that allow you to set keys.

You can do any of the following:
Click and drag on a parameter name to modify the value. You don't need to explicitly activate the virtual slider tool.
Drag to the left to decrease the value, and drag to the right to increase it.
Press Alt to extend beyond the range of the parameter's slider in its property editor (if the slider range is smaller than its total range).
If the parameter that you click on is not marked, it becomes marked. If it is already marked, then all marked parameters are modified as you drag.
Double-click on a numeric value to edit it using the keyboard. The current value is highlighted, so you can type in a new value. Only the parameter you click on is affected even if multiple parameters are marked.
Double-click on a Boolean value to toggle it. Only the parameter you click on is affected even if multiple parameters are marked.
Click on an animation icon to set or remove a key for the corresponding parameter.
Right-click on an animation icon to open the animation context menu for the corresponding parameter.
Click the triangle in the top right corner to expand or collapse the parameter set.
The color of the animation icon indicates the following information:
Red: There is a key for the current value at the current frame.
Yellow: The parameter is animated by an fcurve, and the current value has been modified but not keyed.
Green: The parameter is animated by an fcurve, and the current value is the interpolated result between keys.
Blue: The parameter is animated by something other than an fcurve (expression, constraint, mixer, etc.).
The animation icon color always reflects the state of the current animation layer. There is no indication of whether there is animation on any other layer. For information on animation layers in general, see Animation Layers [Animation].
 Except where otherwise noted, this work is licensed under a Creative Commons Attribution-NonCommercial-ShareAlike 3.0 Unported License