Transparency maps make an object's surface transparent or opaque, according to an image map. This is useful for "cutting holes" in otherwise solid surfaces without modifying the surfaces' geometry. The alpha channel or RGB intensity of the picture file is used and a factor is applied to map a pattern of varying degrees of transparency on the object's material.
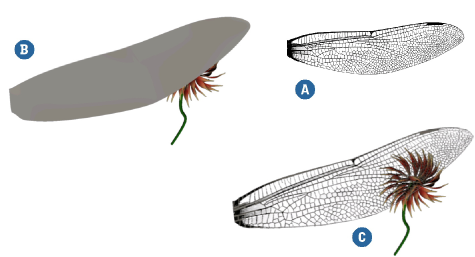
| A |
Texture used. |
| B |
Wing model. |
| C |
Once the wing texture is applied as a transparency map, you can see through the wing (right) without having to model hundreds of tiny holes to see through. |
You can create a transparency map by connecting a texture to a surface shader's transparency parameter.
Select the object to which you want to apply a transparency map.
Make sure your object has a surface shader applied to it. If it doesn't, you can quickly apply one by choosing Get  Material Phong.
Open the surface shader's property editor by choosing Modify Shader from the Render toolbar. Lock the property editor open by clicking the lock icon in its title bar.
On the Transparency/Reflection tab, click the connection icon  to the right of the Transparency color sliders. From the menu, select a texture shader.
Once selected, the texture is connected to the Transparency color parameter of the surface shader and the render region displays a transparency map on the selected object.
The texture shader's property editor opens. Define a texture projection for it from the Texture tab.
Close the texture's property editor. From the Transparency/Reflection tab of the surface shader's property editor, adjust the following options as necessary:
Select the Use Alpha option to use only the texture's alpha channel to control the transparency.
Select Invert to invert the transparency map.
This is useful when you are using a black-and-white image or an image's alpha channel (matte) to control transparency. In a typical matte, the black areas are transparent and the white areas are opaque. For surface shaders, on the other hand, the reverse is true: black areas are opaque and white areas are transparent. Inverting the transparency gives you the correct transparency defined by the matte.
Use the Scale value to adjust the overall intensity of the transparency.
If you don't see the effect, try increasing the Ray Depth values in the render region setup (Render Regions All Options or Active Viewport Options) or the render options (Render Render Options).
 Except where otherwise noted, this work is licensed under a Creative Commons Attribution-NonCommercial-ShareAlike 3.0 Unported License


