Clip effects are basic effects that you can apply to your image clips directly from any tab of the Image Clip property editor. You can color correct, blur, crop, scale, flip image clips, as well as convert RGBA images to grayscale, and change their bit depth.
Though useful, clip effects are subject to certain limitations. Keep the following information in mind when you use them:
You can only apply clip effects to an image if its image management mode is set to Load in Memory (see Image Clip Memory Management).
Applying clip effects to an image creates temporary copies of that image as the effects are applied.
These copies are flushed once they're no longer needed, but while in use they can slow down performance with large images because of the increased memory requirements.
By default, clip effects are deactivated. That's because the default image management mode is Use from Disk, but clip effects require that it be set to Load in Memory.
From any tab of the Image Clip property editor, click the Disable Effects button to deactivate clip effects. The clip's management mode is automatically set to Use from Disk.
For more information on how to use the clip effects, refer to Image Clip Property Editor [Properties Reference].
One of the more commonly used clip effects is the Crop effect. You can crop an image clip using the settings in its property editor, or you can crop it interactively using the crop tool in the image window.
From the General tab or the Transform tab, click the Enable Effects button to activate the clip effects.
Again, on either tab, adjust the Crop settings. Each slider crops the image from a given side so, for example, increasing the X min setting crops the image from the left, while reducing the X Max value crops it from the right.
From the General tab or the Transform tab, click the Enable Effects button to activate the clip effects.
Right click the image on the General tab, the Adjust tab or the Transform tab and choose Crop Tool from the menu (or press B). The cropping guide appears.
Drag any handle to crop the image accordingly.
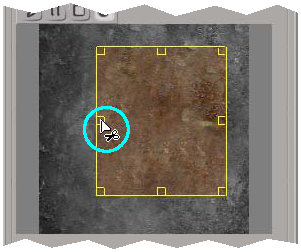
When you've cropped all you want to crop, press Esc to deactivate the crop tool.
At any time, you can reverse the cropping by right-clicking the image and choosing Uncrop from the menu.
You can change the resolution of some or all of the image clips in your scene. Here's how.
Edit the image clip whose resolution you wish to change to open its property editor.
To change both the OGL display resolution and the rendered resolution, set the Rescale options from the Transform tab:
Type: Specifies the scaling applied to the image clip, either as a pixel value, a proportion of the original image size, or a custom value.
Resolution X,Y: If Type is set to Custom, these values specify the image clip's resolution in X and Y.
To change the OGL display resolution only, adjust the OpenGL Texture Settings  Maximum Width or Height parameter from the Texturing tab.
From an explorer, open the Images property editor. You can access this property editor from the Clips > Images node in the Sources/Clips (O key), Images, or Application scopes.
From the Scaling options in the property editor, adjust the following properties:
Type: Specifies the scaling applied to the image clip, either as a pixel value, as a proportion of the original image size, or as a custom value. Specify None to use the scaling defined for individual clips.
Resolution X,Y: If Type is set to Custom, these values specify the image clip's resolution in X and Y.
 Except where otherwise noted, this work is licensed under a Creative Commons Attribution-NonCommercial-ShareAlike 3.0 Unported License


