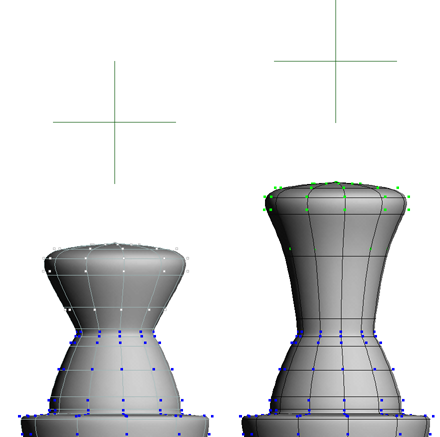
You can assign the center of a cluster to a deformer like a null or other object. The cluster is constrained to the center and you can deform the object by moving the center. You can animate the deformation by animating the center. This is especially effective if you use a weight map to create a falloff that modulates the amplitude of the deformation.
You can create a null and assign it as the center when you create a cluster or you can create a cluster and assign a center later.

Cluster center: transform the null to transform the cluster.
You can automatically create a cluster, create a null for its center, and a cluster center operator all at once with the Edit  Create Cluster with Center command.
However if you want to use an existing cluster or a deformer other than a null, you must use the procedure described in Assigning a Cluster to a Center Deformer Manually.
Select some components (points, polygons, or edges) on an object.
Choose Edit  Create Cluster with Center from the Edit panel. Several things happen:
A cluster is created with a default name based on the type of component, for example, "Point".
A null is created at the geometric center of the cluster, with a default name based on the object and component type, for example, "sphere_Point_ClsCtr". The null is a child of the object and is automatically selected.
A property editor opens, allowing you to change the parameters of the Cluster Center operator and the cluster.
Modify the scaling, rotation, and translation of the null to affect the cluster. You can animate the null's transformations to change the shape of the object over time.
If you don't want to create a new cluster, or if you don't want to use a null as the cluster center deformer, then you must assign the cluster to a deformer manually.
Create an object to act as the cluster center deformer. You can use any type of object; you are not restricted to nulls.
Scale, rotate, and translate the cluster center deformer into the desired "neutral" pose. In this pose, the deformer will have no effect on the cluster.
You can use the Transform  Align Objects command to align the deformer with elements in the scene, such as the cluster you want to affect.
In this case, make sure to select the cluster or components first and set Move to All Objects Except the First. For more information about the Align Objects command in general, see Aligning Objects [Working in 3D Space].
If the deformer is a geometric object with points, you can freeze its transformations using Transform  Freeze All Transforms before applying the cluster center deformation.
This can be useful because it "zeroes out" the deformer's transformations in the neutral pose.
Select some components (points, edges, or polygons) or a cluster on the object you want to deform. If components are selected, a cluster will be created automatically.
Choose Deform  Cluster Center from the Model or Animate toolbar.
Pick the deformer. The Cluster Center property editor opens and the deformer is automatically selected.
Modify the scaling, rotation, and translation of the deformer to affect the cluster. You can animate the deformer's transformations to change the shape of the object over time.
Because Cluster Center is a deformation rather than a constraint, you cannot use CnsComp (Constraint Compensation) to offset the deformer from the cluster. However, you can use the Scaling, Rotation, and Translation parameters in the Cluster Center property editor to define the offset you need.
In addition, when you assign a cluster center to a cluster manually, any existing offset between the deformer and the cluster is maintained — in other words, the cluster does not snap to the deformer when you apply the deformation.
 Except where otherwise noted, this work is licensed under a Creative Commons Attribution-NonCommercial-ShareAlike 3.0 Unported License