| Information | Parameters | Entry Functions | Matrices
Although you can author effects files using any number of third-party programs, you can just as easily code and prototype .cgfx and .fx files directly within Softimage using the RTShaderWizard available from the shader code editor.
The wizard doesn't generate code that can be immediately used as is, you still have to provide the implementation for the vertex and/or fragment functions, as well as any techniques for drawing the effect. However, a significant portion of the shader code structure can be put in place quickly when you use the realtime shader wizard.
To display the realtime shader wizard:
Choose View  Rendering/Texturing Shader Code Editor from the main menu.
The realtime shader wizard opens, where you can set the parameters for your effects file.
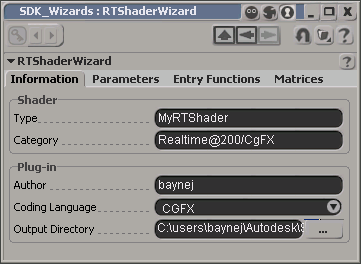
| Name |
Specifies the name of the shader. This is the name used to save the effects file on-disk, as the display name of the shader in the preset manager and the Nodes menu, and as the default name of the shader node in the render tree. You can change the name of the actual shader node in the render tree, but this will not affect the name of the shader as registered in the system. |
| Category |
Specifies the category and subcategory where your shader is displayed in the preset manager and the Nodes menu. You can define your own category and subcategory by entering text for each separated by a forward slash. Realtime@200/CgFX and Realtime @200/HLSL are the default category and subcategory settings for all Softimage-provided CgFX and HLSL shaders. You can choose to display your custom shaders in the default categories if you wish. If you do not specify a category, the effects shader will appear in the default Realtime category in the preset manager. For more information, see Categorizing Effects Shaders in the Preset Manager. |
| Author |
Enter any name you wish. This string is appended to the boilerplate comments generated at the beginning of every effects file created by the realtime shader wizard. // MyCgFXToon // Initial code generated by Softimage Realtime Shader Wizard // Executed Tue Dec 1 01:32:47 EST 2009 by baynej |
| Coding Language |
Select CgFX to generate and save a *.cgfx file or HLSL to generate and save a *.fx file. |
| Ouput Directory |
Saves your effects file to the specified output directory. You should store your effects files in your user, workgroup, or factory locations under the Application/cgfx or Application/hlsl folders. Textures should be placed in Application/fxtextures. For more information, see Loading Existing Effects Files in the Preset Manager. |
These options allow you to build "tweakable" parameter declarations. These values can be modified with user interface controls that are automatically generated in the property editor of the resulting effects shader. For more information, see Creating User Interfaces for Effects Parameters.
Parameter declarations are of the general form:
type name <annotation_list> = value ;| Name |
Declares the name of the variable. |
| Type |
Sets the data type for the variable. Each data type displays the necessary controls for you to enter values. These same controls are automatically generated and displayed in the property editor of the resulting effects shader.
In all cases, textures must be located in your user, workgroup, or factory locations under the Application/fxtextures folder. See Texture Clip Control for On-Disk Images. |
| UI Name |
Specifies a label for the user interface control displayed in the property editor of the resulting effects shader. |
| UI Min |
Sets a minimum value for the parameter range. Only available with int and float data types. |
| UI Max |
Sets a maximum value for the parameter range. Only available with int and float data types. |
| Default Value |
Sets an initial value for the parameter. |
| Add |
Commits the UI parameter declaration to the parameters list. The entries in this list are used to generate the code. |
| Remove Selected |
Deletes the selected UI parameter declaration from the parameters list. |
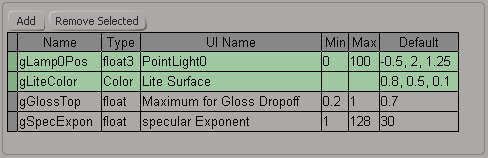 Each row in the grid represents a UI parameter declaration. To select a row, click the empty cell at the beginning of the row. Selected rows are highlighted in green. You can also do any of the following when selecting rows:
To edit the value in a cell, click inside the cell (with the exception of the empty cell at the beginning of a row). |
|
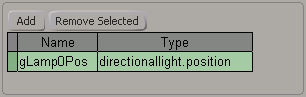
These options allow you to build semantic parameter declarations for when you need to specify semantics for binding to Softimage objects.
Vertex shaders are executed for every vertex of the shaded object. They take input parameters, process them, and generate output data to be sent to a pixel shader.
| Function Name |
Indicates the function entry point for the vertex shader. This is the function that is called for each vertex in the current primitive when this shader is active. It can be used for computations that are performed per vertex, such as transformation from world space into clip space, or for per-vertex lighting. |
| Profile |
Select a vertex program profile. A compilation profile specifies whether certain optional language features are supported. |
| Input Data |
Specify the hardware semantics to be used for the vertex input data. A vertex attribute control is automatically created in the effects shader's property editor for each vertex shader variable that is bound to semantics such as COLOR[n], TEXCOORD[n], TANGENT, and BINORMAL. For more information, see Creating User Interfaces for Vertex Shader Inputs. |
| Output Data |
Specify the hardware semantics to be used for the vertex output data. |
Pixel shaders (also known as fragment shaders) are executed for every pixel generated of the object. They take input parameters from vertex shaders, process them, and generate output data to be sent to the blending core of the GPU before going to the frame buffer.
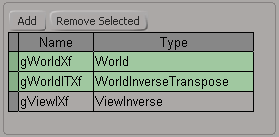
These options allow you to build matrix transform declarations. Once bound, these parameters are "untweakable".
 Except where otherwise noted, this work is licensed under a Creative Commons Attribution-NonCommercial-ShareAlike 3.0 Unported License