


These are the basic steps for setting up realtime CgFX or HLSL shader effects in the render tree.
Set any viewport to the Realtime Shaders  OpenGL or the Realtime Shaders DirectX9 display mode.
Texture coordinates: Create texture coordinates by choosing Get Property Texture Projection [type of projection].
Normals: Create normal maps which are special texture maps that encode the normal (surface direction) per pixel on a geometry. When generating a normal map for use with realtime shaders, you should create the normal map in tangent space (relative to UV basis). You can use RenderMap, RenderVertex, or Ultimapper to create normal maps in Softimage.
Tangents and Binormals: Tangents and binormals are necessary for accurate normal mapping and other effects.
You can generate tangents or binormals for the selected object by choosing Get Property Tangent or Get Property Binormal. See Applying Tangent and Binormal Properties [Texturing].
You can also have Softimage automatically create tangents and binormals on-the-fly. This can give faster playback and interaction in Realtime Shader display modes than using the operator-based Tangent and Binormal properties. To use the automatic tangents and binormals, just don't specify a Tangent or Binormal property as the vertex attribute input in the effects shader's property editor. See Automatic Tangents and Binormals [Texturing].
If you already have normal and tangent data, it is not optimal to have Softimage generate the binormals. Instead, you should calculate the binormals on-the-fly in the vertex shader.
With the object still selected, open the render tree (press 7).
From the preset manager, drag an effects shader into the render tree workspace.
Note that the CgFX and HLSL shaders provided with Softimage are displayed in the Realtime CgFX and Realtime HLSL categories.
Connect the realtime shader node's output to the Material node's RealTime input.
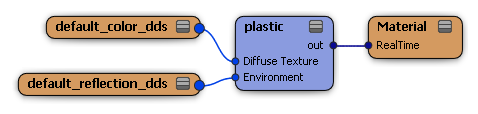
If the effects file is valid, the effect is now displayed in any 3D view set to an appropriate realtime display mode.
Double-click the shader node to open its property editor. When a .cgfx or .fx file is parsed and successfully compiled, the following things happen:
Effects parameters dynamically generate user interfaces that you can use to tune your tweakable effects parameters and select from the techniques defined within the code. See Creating User Interfaces for Effects Parameters.
Vertex shader variables bound to specific input semantics dynamically generate a user interface. You can use the vertex attribute control to customize the per-vertex attributes that are passed to the effect. See Creating User Interfaces for Vertex Shader Inputs.
 Except where otherwise noted, this work is licensed under a Creative Commons Attribution-NonCommercial-ShareAlike 3.0 Unported License