Working in the Render Tree Workspace


This section describes the different ways in which you can navigate in the render tree workspace, rearrange nodes, snap nodes to a grid, frame nodes, and update or clear the workspace.

TipYou can access many common render tree commands by right-clicking in the render tree workspace.

Navigating in the Render Tree

The render tree uses the same navigation controls as other views in Softimage:

  • Use the Z or S key to pan and zoom.

  • Use Shift+Z for rectangle-zoom.

  • Scroll the mouse wheel to zoom, if it is enabled in your preferences.

  • Press F to frame selected nodes, or A to frame all.

In addition, you can quickly pan by clicking and dragging on the background of the view with the middle mouse button, and use the Bird's Eye View to quickly move to a specific part of the tree.

Panning and Zooming

  • Press the Z key to activate the Pan and Zoom tool.

    • Click and drag to pan.

    • Press and hold the middle mouse button to zoom in on the pointer's location.

    • Press and hold the right mouse button to zoom out from the pointer's location.

  • Press the S key to activate the Navigation tool:

    • Click and drag to pan.

    • Middle-click and drag to the left to zoom in, or to the right to zoom out.

    These tools are also available from the Tools menu in the render tree toolbar.

Using Rectangular Zoom

Press Shift+Z to activate the Rectangular Zoom tool. This tool is also available from the Tools menu.

  • To zoom in, click and drag along a diagonal to define a rectangle. The selected area becomes framed in the view.

  • To zoom out, right-click and drag along a diagonal. The view zooms so that the current view fits in the selected area.

Zooming with the Mouse Wheel

By default, you can zoom using the mouse wheel:

  • Scroll forward to zoom in and backward to zoom out.

  • Press Ctrl to zoom quickly, Shift to zoom slowly, and Ctrl+Shift to zoom even more slowly.

If you like, you can disable the mouse wheel zoom or restrict it to the Navigation tool so that you can use the mouse wheel with other tools. See Mouse Wheel in Camera Preferences.

Using the Bird's Eye View

The bird's-eye view is a miniature "map" of your ICE tree in the upper-right corner of the render tree workspace. You can use it to quickly move to parts of a render tree that are too large to display in the available work area.

To toggle this view on or off, choose Show Bird's Eye View.

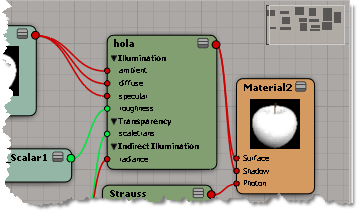
Use the bird's eye view to quickly move about your tree. The extent of the current display is shown as a white outline. Small gray rectangles correspond to the shader nodes in the render tree.

  • Click anywhere in the bird's eye view to jump to the corresponding area of the tree.

  • Click and drag in the bird's eye view to scroll.

TipGroup Comment nodes can have colored backgrounds that show up in the bird's eye view. This makes it easy to identify specific sections of your tree. See Documenting Trees: Groups and Comments.

Framing Nodes in the Render Tree

You can frame the entire render tree, a selected node, or a selected branch.

To frame the entire render tree

  • Do one of the following:

    • Press A.

    or

    • Choose Tools Frame All from the render tree command bar.

    or

    • Right-click an empty area of the render tree workspace and choose Tools Frame All from the menu.

    This zooms out of the work area until every node is visible in the workspace.

To frame part of a render tree

  1. Select some nodes or branches.

  2. Do one of the following:

    • Press F.

    or

    • Choose Tools Frame Selection from the render tree command bar.

    or

    • Right-click an empty area of the render tree workspace and choose Tools Frame Selection from the menu.

Tools

Rearranging Nodes in the Workspace

As you work with a render tree and move nodes around, you'll probably want to clean up the workspace from time to time. You can position each node individually, or you can simply use the rearrange command. Rearrange places every node in an orderly and logical manner without any overlapping.

To automatically arrange nodes

  1. Select the nodes to rearrange, or deselect all nodes if you want to arrange the entire tree.

  2. Press Ctrl+R, or choose Tools Rearrange.

    Alternatively, you can right-click an empty area of the render tree workspace and choose Rearrange from the menu.

    • If nothing was selected, all of the nodes in the render tree workspace are rearranged.

    • If a branch of the render tree was selected, only that branch is rearranged.

Snapping Nodes to a Grid

When working with a large and complex render tree, it may not take too long for nodes to start overlapping and cluttering the workspace. You can rearrange the nodes by having them snap to the grid that covers the render tree work area.

To snap selected nodes to the grid

  1. Select the nodes to snap.

  2. Choose Tools Snap to Grid.

To snap all nodes to the grid

  1. Right-click an empty area of the render tree workspace to open a contextual menu, or click Tools in the render tree command bar to open the Tools menu.

  2. From either menu, choose one of the following:

    • Snap to Grid causes the nodes to align themselves with the grid that covers the whole render tree workspace.

    • Enable Grid Snapping causes nodes to snap to the grid whenever you move them. When this option is off, you can move the nodes however and wherever you like.

    NoteIf you have edited or moved nodes in the render tree, their positions may not necessarily be the same when re-opening the render tree view.

Deleting Unconnected Nodes

By default, all unconnected shader nodes are always left in the render tree for an object. This is often useful for keeping shaders around when you're trying out different shader connections.

However, if you want to clean up the render tree workspace, you can delete all shader nodes that are not currently connected to the Material node.

To remove all unconnected nodes in the render tree:
  • Choose the User Tools Delete Unconnected Nodes command from the render tree's command bar.

  • Select the Automatically Delete Unused Nodes on Refresh option in the Render Tree Preferences to automatically delete unconnected nodes when you close the render tree or refresh the workspace.

Creative Commons License Except where otherwise noted, this work is licensed under a Creative Commons Attribution-NonCommercial-ShareAlike 3.0 Unported License