Aliasing refers to artifacts that occur in a rendered 3D image when the scene has not been sampled enough to accurately represent it in pixels. Because it depends more on contrast and image detail than image size, it can occur at any resolution. One of the most common aliasing artifacts is "jaggies" — or jagged edges — on rendered objects (shown below), especially where the edges are curved or diagonal.
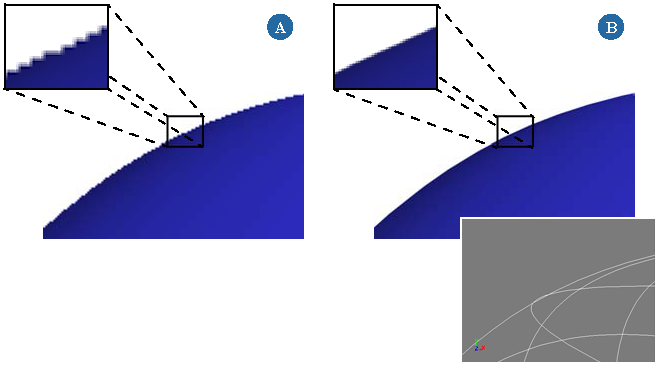
These images were rendered from the same model (right). The first image (A) is rendered with no antialiasing. Notice the jagged edges (aliasing) along the sphere's surface. The second image (B) uses antialiasing to achieve a smoother-looking curve without changing the sphere's geometry.
Another common aliasing artifact is "popping," which occurs when an object — or part of one — is small enough to intermittently fall between sampling rays. As a result, it "pops" in and out of view as it moves across the scene. Moiré patterns, which create a shimmering effect in distant regions of high-detail textures or surfaces, are another common artifact.
Fortunately, aliasing can be visually curbed by antialiasing. Antialiasing is a method of smoothing out rough or jagged edges of images, and other aliasing artifacts, to produce a more polished look. It uses a mathematical process that subsamples each pixel, then averages the values of neighboring samples to get the final pixel color. Further sampling occurs when the difference between samples exceeds a defined threshold. As a result of these calculations, antialiasing can increase rendering time dramatically.
The options for controlling aliasing depend on whether Unified Sampling is enabled.
The Render Manager > mental ray (Global Renderer)
The Render Manager > (expand a pass) > mental ray
Set the current pass and choose Render > Render > Renderer Options from the Render toolbar.
Tab: Rendering [Properties Reference]
Options: Sampling/Aliasing
Unified sampling provides simple and consistent controls for all rendering algorithms. Quality is the main parameter for controlling how many samples get taken for each pixel. It is a relative measurement — the higher the error in an area, the more samples get taken. Typical values are between 0 and 1, although higher values can be used.
The number of samples taken for any pixel is always between Minimum and Maximum. The exact value within this range is determined mainly by Quality. High values for Maximum allow for oversampling, while low values may prevent the Quality setting from being reached. Setting Minimum to a value below 1 allows for undersampling.
You can also set Cutoff to stop taking more samples if the difference between sample levels is smaller than the cutoff value, even when the number of samples set by Quality or Maximum hasn't been reached yet. This can be useful for increasing performance in dark, flat areas while not affecting quality in bright, detailed areas.
When Unified Sampling is off, the older sampling methods are used for the different algorithms. Use the Aliasing (Raytracing & Scanline Only) and Sampling Contrast settings to control the result.
The Render Manager > mental ray (Global Renderer)
The Render Manager > (expand a pass) > mental ray
Set the current pass and choose Render > Render > Renderer Options from the Render toolbar.
Tab: Rendering [Properties Reference]
The Aliasing parameters describe the number of samples taken to compare surrounding color values that are averaged to define the color of a pixel.
The main sampling controls are the Min Level and Max Level sliders. These options determine the minimum and maximum sample rate. Each pixel is sampled at least 2^min x 2^min times and at most 2^max x 2^max times (2^n in each direction).
If the Min Level is zero, each pixel is sampled at least once. Positive values increase the sample rate and negative values reduce the sample rate to less than one initial sample per pixel (known as infrasampling). For example, if the Min Level is set to one, each pixel is sampled at least four times, if the Min Level is -1, at least one sample is taken for every four pixels (a 2-by-2 pixel square).
It is recommended to set Max Level values larger than or equal to Min Level + 2; the difference should not be higher than 3. This limitation is meant to limit the amount of memory required and thus optimize performance.
Typical values for Min Level and Max Level are -2/0 for low-quality preview rendering, -1/1 for medium-quality rendering, and 0/2 or 1/3 for high-quality renders.
Use the Min and Max Level options only to set a hard sampling limit. These options offer simple control over rendering quality. For finer control over quality, use Sampling Contrast which deals more gracefully with high-contrast cases where the Min and Max Level technique can leave behind aliasing due to the hard cutoff.
For more information, see Antialiasing, Sampling, and Filtering Tips & Tricks.
The Render Manager > mental ray (Global Renderer)
The Render Manager > (expand a pass) > mental ray
Set the current pass and choose Render > Render > Renderer Options from the Render toolbar.
Tab: Rendering [Properties Reference]
Options: Rasterizer
The Sampling Contrastsliders help you control adaptive sampling. This is the primary means of image quality control. If the difference between neighboring samples is greater than the sampling contrast value, another level of sampling occurs.
The smaller the value for each color (R, G, B), the greater the amount of sampling that must be done to close the contrast gap between the rendered image and the sampling contrast settings, and the smoother the antialiasing.
This can lead to higher render times, so use the following guidelines to refine your sampling contrast settings:
Lower the sampling contrast values if aliasing artifacts appear in areas of low contrast, but not high contrast.
Raise the sampling contrast values if no aliasing artifacts appear. This reduces the overall number of samples and reduces render times.
For more information, see Antialiasing, Sampling, and Filtering Tips & Tricks.
 Except where otherwise noted, this work is licensed under a Creative Commons Attribution-NonCommercial-ShareAlike 3.0 Unported License


