Texture | Texture Coord(inates) | Shape and Rotation | Texture Coord(inates) | Strand | Render Tree Usage
Category: Particle
Shader Family: Texture
Color and Scalar
The Particle Density shader defines each particle within the volume so that the point cloud doesn't look like a single volumetric
mass. It reads the particle data and outputs density and color of the particles. It has controls for rotation, shape, and
color of the particles, as well as rendering strands (trails) that follow the particle.
For general information about ICE particle shaders, see ICE Particle Shading.
Texture
The Per Particle parameters on this tab (Density, Shape, Color) are used only per particle, as their name would suggest.
Using input texture shaders, you can access the texture coordinates of the particle. The texture stays with the particles
so it moves and rotates as the particles do. If multiple particles intersect, the texture is blended in the intersecting area.
Because the texture is used per particle, a complex texture can slow down the rendering quite a bit.
For the inputs which have the note "init only (no tex coord)", the parameter is fixed for the whole particle (like rotation).
It is used once for each particle so you don't have texture coordinates which change across the particles.
Per Particle: Density
Texture
|
|
Textures the density of the whole particle. The inner and outer area of the particle are affected equally.
|
|
|
Scales the intensity of the Input shader's values.
|
|
|
The shader that is plugged in to define the texture. This is often the Fractal Scalar or Cell Scalar shader.
|
Shape
|
|
The texture first affects the edge of the particle, carving parts of it away. If the input texture is 0.0, the whole particle
is gone; if the input is 1.0, then nothing is carved away.
|
|
|
Scales the intensity of the Input shader's values.
|
|
|
The shader that is plugged in to define the particle shape. This is often the Fractal Scalar or Cell Scalar shader.
|
Density Texture versus Density Shape
The image below shows the difference between the texturing and the shaping of a particle.
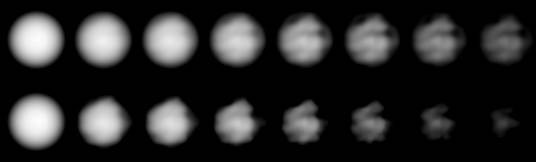
|
| The top row has a fractal shader applied as the Density Texture. The bottom row has the same texture applied as the Density Shape. Their Intensity values increase from left to right. While the overall shape of the textured (top) particle is still visible, you can see that the shaped (bottom) particle becomes
carved away.
|
Per Particle: Color
|
|
Overrides the color of the particle using the input shader's color.
|
Per Cloud or Gradient: Color/Density
-
If you plug in the Particle Gradient shader as an input, you have to select the inputs for its Per Cloud and Per Particle
settings (see Particle Gradient).
-
If you plug in a texture shader as an input, it uses the texture coordinates of the whole point cloud. The particles "swim"
through the texture: the texture does not stick to the particles.
|
|
Use the color and/or density per cloud/gradient inputs from the Particle Gradient or a texture shader.
|
|
|
Changes the color of the whole cloud. With the Intensity slider, you can scale the mix amount of the color.
|
|
|
Changes the density for the whole cloud. The cloud density is multiplied with the input density (same as Density Texture).
With the Intensity slider, you can scale the amount of the density change. You can use the same Particle Gradient or texture shader that you used for the color input.
|
|
|
You can decide which channel of the input shader you want to use for the density: the Alpha channel or the Green channel.
For example, if you have the Particle Gradient shader plugged in, you can use the RGBA gradient's Alpha channel values to
affect the density.
|
Per Cloud or Gradient: Limit Density Inside
|
|
Sets the maximum allowed density for the particle cloud (reduce this value for steam or thin smoke). If the value is high,
the point cloud shrinks if you reduce the density.
In the real world, steam particles are evenly spread in space; however, in 3D, you often have a higher density of particles
in the inner parts of the volume and less density in the outer region. If you now reduce the density, the particle cloud seems
to shrink because you don't see the outer region, but the inner region still has enough density to be visible.
With this parameter, you can limit the density in the inner part of the cloud. If you now reduce the density of the whole
volume, your cloud does not appear to shrink.
|
Texture Coord(inates)
Texture Coordinates
|
|
Scales the texture coordinate along with the particle size. The bigger the particle, the bigger the texture.
|
|
|
Rotates the texture coordinate along with the particle.
|
|
|
Each particle gets unique texture coordinates. If this option is off, each particle has the same texture coordinates.
|
|
|
The shader samples the input shader's textures multiple times to give you the impression of motion blur.
|
|
|
If multiple particles are overlapping, the shader calculates an averaged curved motion direction.
|
|
|
Length of the motion blur.
|
|
|
Controls the amount of texture samples used for the motion blur.
|
Shape and Rotation
Falloff
|
|
Type of the metaball falloff: Linear or Cubic. Cubic is better for dense volumes, and Linear is better for thin volumes.
|
|
|
Bias (gamma) of the falloff. Higher values change the falloff that the density reduces later. The particles grow a bit.
|
|
|
Density usually increases from the edge to the center of the particle. With this option on, the density increases from the
edge to halfway to the center, then it decreases again to the center, thus rendering a hole inside the particle.
|
|
|
If you select Bubble Density, you can set the falloff starting point. If you increase this value, then the hole inside the
particle from the Bubble Density increases.
|
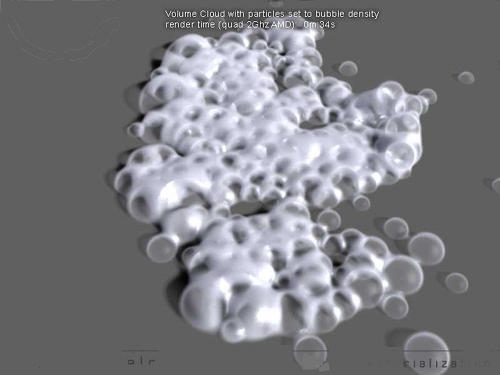
Particle shape set with Bubble Density and Falloff.
Shape
|
|
If you increase this value, the whole particle cloud shrinks and the particles melt together (like metaballs). The metaball
look is more evident if you have dense volumes.
|
|
|
Determines how the ellipse is shaped: along the different axes and planes of the particle or the cloud.
|
|
|
Uses elliptical shapes for the metaballs instead of spheres. The higher the value, the more elliptical the shape.
|
Rotation
|
|
The roll is like a rotation around the particle's Z axis. The particles will have a random rotation between the Min and Max
values (for the current frame, random based on the particle ID). To get the typical back-rolling of clouds, decrease the Roll
value.
|
|
|
The screw is like a rotation around the particle's Y (up) axis. The particles will have a random rotation between the Min
and Max values (for the current frame, random based on the particle ID).
|
Alignment
|
|
All alignments use an up vector. The particle's Z axis will point upward (this is usually the Y axis).
-
The particle Y axis points in the direction of the movement.
-
If you have a bulge in a cloud, the particles rotate away from the center of the bulge. You must set the Neighborhood Distance
below.
-
All particles will look at the point set by the Alignment Point values (below).
|
|
|
If you select Cloud-like Alignment as the Type, you must set this parameter, which is the distance from an outer particle
to the rest of the bulge.
|
|
|
If you select Direct to/Look at Point as the Type, you must set or pick the point at which the particles will point. The particle
Y axis points to the Alignment Point coordinates.
|
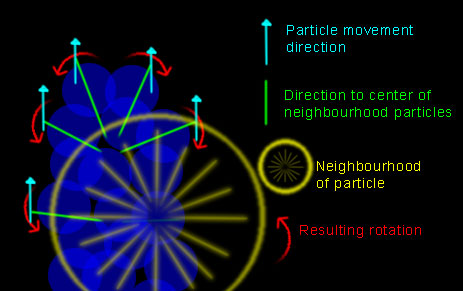
The shader searches for all particles inside the Neighborhood Distance value and gets the center of these particles. Then
it calculates the Roll axis based on the direction to the neighborhood's center and the direction of the movement.
Misc
Exclude Particles
|
|
Determines if a particle is visible in a render or if it is ignored. This is useful if you mix multiple Particle Density shaders.
|
Pick Particle Data from Other Object
You can pick the data from a different point cloud to get the particles of that cloud into this shader.
|
|
Select this option to use the particle data from a source point cloud.
|
|
|
Converts the local coordinates from the other point cloud to the local coordinates of the current point cloud.
|
|
|
Pick the source point cloud to be used for the particle data.
|
Flow Texture
The shader tries to create texture coordinates which continue globally over the whole cloud from one particle to the next,
but are also somehow stuck to the particles. This texture is experimental.
To create the texture coordinates, you need a lot of overlapping particles. Separate single particles can have completely
different texture coordinates from multiple overlapping particles.
Tips:
-
Using the Rotate with Particle option for the Texture Coordinates has a big effect.
-
Try setting the Alignment Type to Align on Velocity.
-
If you want to use a texture for the flow density, plug it into the flow Color first (and increase the volume density). Tune
it until you get the result you want.
-
Try the Slices Mode on the Preview page in the Particle Volume Cloud shader to preview the texture.
|
|
Select this to enable the flow texture.
|
|
|
Color (per Cloud or Gradient) of the flow texture.
|
|
|
Density (per Cloud or Gradient) for the flow texture.
|
|
|
How the flow texture is applied: Texture or Shape based. This is the same as the Density Texture/Shape parameters on the Texture
page.
|
Density Falloff with Size
|
|
If you scale a particle, the density value remains the same. However, in the real world, if you have an amount of smoke, and
the smoke spreads/disperses, the density of the smoke is reduced at some point.
This parameter mimics the real-life effect: the bigger the particle, the less density it has. See below for a visual explanation.
|
|
|
The particle becomes more transparent as the size increases, but doesn't fade away.
The particle fades away more quickly at the edges as it becomes less dense.
|
|
|
The minimum point size of the particles at which they have full density. All particles that are smaller than or equal to this
size are not influenced by the density falloff.
|
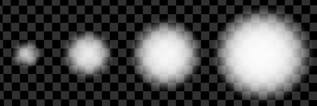 Reduce Density for Bigger Particles is off. A typical particle animation with increasing size over time. At birth you can see the background through the particle, with
increasing size you can't see the background any more. It looks as if the density increases.
|
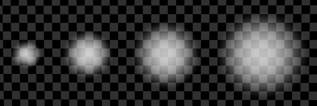 Reduce Density for Bigger Particles is on. Type is Keep: The size of the particle increases, but you still see the background as much as you could see it before.
|
 Reduce Density for Bigger Particles is on. Type is Fade-out: The bigger the particle, the less dense the particle gets. This mimics the real world: the more the smoke disperses, the more
it fades away.
|
Size
|
|
Each particle checks for the five closest particles and reduces its size depending on the distance to them. The closer the
particle to its neighbors, the smaller it gets.
You must set your particle size to the maximum size you want to have. This option does not increase the particle size, it
only reduces it.
Note that this option can have an effect on the render time because the search radius for particles is defined by the biggest
radius, but most of your particles will be much smaller.
Tip: Use this in combination with the option to get a more evenly thick volume.
|
|
|
Multiplies the distance to the neighboring particles by this value.
|
Strand
These parameters are for rendering particle strands (trails) that follow behind a particle. If you have not generated particle
strands, you won't see any results using these options (the shader uses the particles' Strand attributes).
For information on particle strands, see ICE Particle Strands.
Per Particle: Strand Rendering
|
|
If you created particle strands, you can control the scale falloff for the head (the end that is attached to the particle)
and tail (the trailing end) of the strand.
The length is measured relative to the maximum strand length.
-
Scale at End
-
Length Head
-
Length Tail
This means: A value of 0.5 creates a falloff from one end to the middle of the strand; a value of 1 creates a falloff from
one end of the strand to the other.
If Length Head and Length Tail are both 0.5, then it creates a falloff from the middle to both ends.
|
|
|
If you have created particle strands, you can control the density falloff for the head (the end that is attached to the particle)
and tail (the trailing end) of the strand.
The length is measured relative to the maximum strand length.
-
Density at End
-
Length Head
-
Length Tail
This means: A value of 0.5 creates a falloff from one end to the middle of the strand; a value of 1 creates a falloff from
one end of the strand to the other.
If Length Head and Length Tail are both 0.5, then it creates a falloff from the middle to both ends.
|
Render Tree Usage
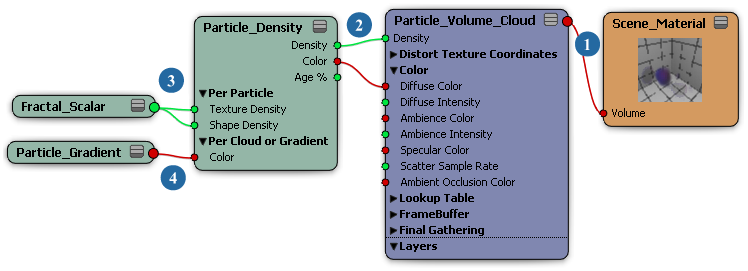
Plug the Particle Density shader's Density output into the Density port of the Particle Volume Cloud shader to define the
particle shape. You can also define the color in this shader and then plug its Color output into one or more of the Particle
Volume Cloud's Color ports, such as Diffuse Color.
|
|
Plug the Volume output from the Particle Volume Cloud shader into the Volume port of the Material node.
|
|
|
Plug the Particle Density shader into the Density port. This shader defines each particle within the volume so that the point
cloud doesn't look like a single volumetric mass.
|
|
|
You can then plug the Fractal Scalar or Cell Scalar shader into the Particle Density shader to add noise to the density. For
more realistic or complicated smoke effects, you may want to use two Fractal Scalar shaders, or a combination or Fractal and
Cell Scalar shaders.
|
|
|
You can plug the Particle Gradient shader into the Particle Density shader to use a gradient on the global color and/or global
density.
If you use this shader to define the color, you must plug the Particle Density's Color output into one or more of the Particle
Volume Cloud's Color ports, such as Diffuse Color.
|
 Except where otherwise noted, this work is licensed under a Creative Commons Attribution-NonCommercial-ShareAlike 3.0 Unported License


