Referenced models are models that have been created in Softimage and exported from it, but which are not actually incorporated within your scene file. As the name implies, they are referenced from elsewhere — somewhere on your hard disk or the network. Changes made to the exported model are reflected in your scene the next time you open the scene or update the reference.
For example, let's say that you're modeling a car that will be used in various scenes, but the animator needs to start animating with the car on another computer before you can finish the details. You export the car as porsche.emdl, which the animator can import into her scene while you continue your work. When you're done modeling the car, you can re-export the model. Now when the animator reloads her scene or updates the referenced model, all the changes you made are automatically reflected in the car in her scene and the animation that she applied to it is preserved.
Referenced models also let you work at different levels of detail. You can have a low-resolution model for fast interaction while animating, a medium-resolution model for more accurate previewing, and a high-resolution model for the final results.
A referenced model consists of one or more references to external files. In addition to .emdl files, you can importdotXSI (.xsi) andCollada (.dae or .xml) files as referenced models. This is useful if you maintain your assets in those formats.
A single referenced model can contain references to as many external models as you like. This allows you to define multiple resolutions for the model.
Any changes you make to the objects within a referenced model within a scene are saved in the model's delta. The same delta is shared by all resolutions, and objects and parameters in different resolutions are matched by name.
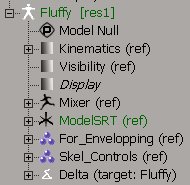
Referenced models are indicated in the explorer by a white man icon. The default name of this node depends on the name of the external file, but you can change it if you want. The name of the active resolution appears in square brackets after the model's name. The name of a delta's target model appears after the delta's name.
You can create a referenced model either by importing an existing external file, or by converting a local model "in place".
If you will be importing a .xsi file version 3.6 or earlier, you can first set the .xsi import options.
To do this, set the scope of an explorer to Application, then expand the Data folder and click the .xsi Import Options node. For information about specific options, see dotXSI Import Options Dialog Box [Properties Reference].
Choose File  Import Referenced Model from the main menu. Use the browser to locate and select the desired .emdl or .xsi file, then click OK.
Choose Create Model New Empty Referenced Model from the Model toolbar. Open its property editor (for example, using the explorer), click in the User Path column of the first resolution (by default, res1) and enter a path or click Browse Selected Path to locate the desired file.
Press Ctrl while dragging an .emdl file onto the background of a 3D view from a Softimage browser or a link on a Netview page. On Windows, you can also press Ctrl while dragging an .emdl file from a folder window.
Converting a local model is equivalent to exporting it as a .emdl file, deleting the model from the scene, and then importing the file back into the scene as a referenced model.
A single model can reference any number of external files, or "resolutions". For example, you can have low, medium, and high resolutions of the same model and switch between them as you work. Only one resolution can be active at any time.
When you change the resolution of a model, the following things happen:
The model data is updated from the corresponding external file.
The local modifications that you have chosen to save are reapplied — see Modifying and Animating Referenced Models.
Any events that have been specified are executed at the appropriate point in the update sequence — see Using Events.
If a model does not specify a file for the chosen resolution, then its resolution is not changed. As an alternative to changing the resolution, you can offload models that you don't need at the moment — see Offloading Referenced Models. If the model file cannot be found at the path specified when changing resolution, the model is automatically offloaded.
When a referenced model is offloaded, the data in the external file is not represented in the scene. This can be useful for reducing the memory requirements, speeding up interaction, and simplifying your view of the scene when you are not directly working with a model. When you need to work with the model again, you can simply change its resolution again as described in Changing Resolution. Offloaded models are represented by a white outlined man icon in the explorer. The model's root null is not shown in the 3D views.
There are some limitations on what can be done with a referenced model's elements. When a referenced model is imported, its elements are ref-locked. This means that you cannot:
Add or remove components in any clusters that pre-existed on the original model.
Add any topology modifiers to the construction stack of any object in the model.
Remove operators in an operator stack, including the geometry stack (deformations, topology modifications), envelope weight stack, or texture projection stack.
Delete an existing property, or make a shared property local.
Connect and disconnect shaders on an existing material in the model's library.
Create new shape sources, including by applying Link Deform with Orientation. Of course, you can still animate using clips of existing shape sources in the animation mixer.
Duplicate, extract curves from, or extract polygons from objects in the model.
Attach a volumic property to lights in a referenced model, that is, you cannot make lights volumic.
Rename clusters, cluster properties, or custom properties in a referenced model.
Connect or disconnect nodes in an ICE tree inside a referenced model.
When you assign objects in the scene or another model to a material in a referenced model's library, the material is duplicated in the scene's default library and the objects are assigned to the duplicate instead.
On the other hand, you can change just about anything else, including:
Modify and animate the transformations of any object in the model hierarchy, including the root.
Modify and animate any parameter in almost any existing property or operator on any object in the model hierarchy. Note that parameters show an open white lock icon to indicate they can still be modified and animated. However, if there is a user lock on an element in a model, it cannot be modified.

Expressions and constraints involving other objects are resolved by name. If you change the names of other objects in the scene, expressions and constraints are not automatically updated in the delta.
Note that changes to profile curves on pre-existing operators, such as the profile of a Taper or Bulge operator, are not stored and are lost when the model is updated.
Apply new properties, such as custom parameter sets, to any object in the model hierarchy.
Create new cluster properties, including texture UV coordinates, vertex colors, weight maps, and envelope weight properties. You can create cluster properties on new clusters, or on clusters that pre-existed in the original model.
When you freeze cluster properties that have been added to a referenced model, the operators are removed and the final values are stored in the delta.
Clusters and cluster properties added to referenced models are designed to work with a single resolution only. You can use multiple external model files as long as the geometries have the same topology, that is, the same number of components and indices in the same order, for example, if they are duplicates. If you switch to a resolution that has a different topology, the cluster properties become unconnected, but they reconnect when you switch back to a resolution with the correct topology.
Add deformation operators and ICE trees to the construction stack. This includes deformations on new and pre-existing clusters as well as deformations that are linked to other objects (lattices, waves, cluster centers, etc.).
Add operators to the stacks of cluster properties, including painting and smoothing weight maps and envelope weights, modifying texture UV coordinates, etc. Note that UV modifications are frozen when the model is offloaded (including before switching resolutions or closing the scene).
Delete any operators, clusters, properties, and cluster properties that have been added to the referenced model. Deleted items are removed from the delta.
Associate objects in the model with selective lights, or lights in the model with other objects.
Modify the properties of the sources and clips, such as images used in textures.
Add elements in the model to groups, layers, and partitions.
Softimage lets you specify what type of local changes you want to save. After a referenced model is updated, the modifications you specify are reapplied like an override. If you choose not to save a particular type of modification, the data from the external model file is used and the changes you made in the scene are lost.
The modifications are stored in the model's delta. The same delta is used for changes made in all resolutions.
Modifications are reapplied based on the names of objects within the model. This means that if you change the name of objects in the original model and re-export it, the modifications cannot be reapplied in scenes that reference the model. Likewise, the changes cannot be reapplied if objects have different names in different resolutions.
On the General tab of the Delta property editor (below the model root), select the desired items under Recorded/Applied Modifications:
Static Pos and Other Parameter Values saves any changes to unanimated parameter values, including transformations. Note that bone translations, because they are neither IK nor FK, are not recorded by the delta to avoid popping.
FCurves saves changes involving function curves, including new, modified, or deleted keys.
Expressions saves any changes involving expressions, including expressions and linked parameters that have been added, modified, or removed.
Note that expressions that involve elements inside a referenced model but are applied to elements in the scene are saved in the scene itself. They have an effect as long as there is an element with the appropriate name in the model's current resolution.
Constraints saves any constraints that have been added, modified, or removed on objects inside the model.
Note that constraints on objects outside the model to objects inside the model are always saved. These constraints are active when there is an object with the appropriate name in the model's current resolution.
Animation Mixer saves changes to the model's animation mixer, such as the placement and weighting of clips on tracks. When this option is on, you can choose the type of Mixer Modifications to save: Animation, Shapes, and Audio. Be aware that if one of these sub-options is on and the model is re-exported with new sources of the corresponding type, the new sources are not available to the referenced model.
Group Relations saves changes to group, layer, and partition memberships.
External Connections saves connections to objects in the scene and other models: envelopes, selective lights, rigid body environments, and assignments to materials in the scene library. Note that you cannot change associations of any object in a scene to lights inside a referenced model.
New Properties saves any new properties that have been added to any object in the model hierarchy, such as custom parameter sets.
Clusters saves any new clusters.
Note that you cannot modify pre-existing clusters by adding or removing components.
Cluster Properties saves any new texture UV coordinates, vertex colors, weight maps, and envelope weight properties.
Note this option does not save paint operators. To save these, use the Operators option below.
Operators saves new operators. This includes deformations and scripted operators, as well as paint operators on envelope weights, weight maps, and vertex colors.
When you update a referenced model, Softimage rereads the data in the external file, reapplies the saved local modifications from the delta, and executes any events that have been specified.
A referenced model is updated automatically in the following circumstances:
When you change the active resolution, as described in Changing Resolution.
When you specify a different model file for the active resolution.
In addition, you can update a referenced model manually.
Manually updating a referenced model is useful, for example, if another user re-exports the file and you want to use the new version right away.
Select the root of the model and choose Create Model Update Referenced Model from the Model toolbar.
Right-click the root of the model in an explorer and choose Model Update Referenced Model.
Alt+right-click (Ctrl+Alt+right-click on Linux) the root of the model in a schematic or 3D view and choose Update Referenced Model.
The delta stores the changes for all resolutions of a referenced model and any referenced models that have been parented under it. You can export, import, and apply deltas manually. You can also edit and delete deltas and items within deltas, and even change a delta's target model. Items stored in the delta are resolved by object and parameter names.
An external delta stores the changes made to a referenced model in a binary format, by default in the Deltas subdirectory of the current project.
On the Advanced tab of the Delta property editor, set Storage to External.
Any further changes you make to the model will be stored in the external delta file whenever you save the scene.
You can export an internal delta so that you can import it into another scene. If a model uses an external delta, you do not need to export it — you can simply import the external delta in another scene (however, if models in multiple scene share the same external delta, changes made in one scene will affect the others).
Importing a delta allows you to transfer changes made to a referenced model from one scene to another.
Use the browser to locate and select a delta file that has been previously exported, then click OK.
The delta is applied automatically. By default, the delta is stored internally. Changes to the delta file do not affect the model unless you change its delta to use external storage.
If the selected model already has a delta, you are asked if you want to apply the new one. If you answer Yes, the target of the existing model is unset. If you answer No, the delta is imported but it will have no target.
You can edit a model's delta directly by opening the property editor of one of the nodes stored under it in the explorer (for example, StoredPositions, StoredFCurves, or a material override) and changing values, toggling the activeness of individual items, or removing individual items. You can also delete these nodes if you do not want to keep the associated changes. After you have made changes, you may need to click Apply Delta on the Advanced tab of the Delta property editor or update the model to see the effect.
The target of a delta is the model that is affected by it. Any model can be targeted by any delta, no matter where that delta appears in the hierarchy. To change the target, simply enter another model's name in the Target parameter on the General tab of the Delta property editor. The name of a delta's target model appears after the delta's name in the explorer.
You can manage multiple deltas using the Active parameter in its property editor. If a model has no active deltas and you make a change, a new delta is created. You can
also create a new delta using Modify Model Add Empty Delta on the Model toolbar. You can control which deltas get applied to the model by toggling their Active settings on and off.
Note that after deactivating a delta, you need to update the model to remove the effect of any animation that it contains.
Events allow you to automate actions to perform at specific times during the sequence of updating a referenced model. You can specify the events to execute in the model's property editor:
RefModelModSave is executed before a model is unloaded and local modifications are saved, whenever updating the model, offloading the model, switching resolutions, or saving the scene.
BeginRefModelModLoad is executed after the model file is read but before the delta is applied.
You can select an available event installed on your system from the drop-down list. Click Edit to modify the corresponding script file in the script editor. Click Events wizard to create templates to help define new events.
You can convert a referenced model into a local model. This breaks the link to the external file, and the local model in the scene is no longer affected by any changes to the external file.
Select the referenced model and choose Modify Model Make Referenced Model Local from the Model toolbar.
If Softimage determines that the referenced model contains a material that already exists in the scene, you are asked whether you want to copy or share it. For this purpose, Softimage considers materials to be the same if they have the same name as well as the same number and kinds of shaders in the same order. It does not check parameter values for performance reasons.
Click Copy to create and apply a copy of the material to the converted model. You should always create a copy of the material if you know that there are value differences in the shader parameters.
Activate Apply to all conflicting materials to avoid a separate prompt for each material in the model.
Committing your changes to a referenced model takes the modifications stored in the delta and saves them back into the external model file. This allows you to easily make changes to a referenced model without the need to re-export it from the original scene.
Here are some tips and notes for working with referenced models in particular situations.
Deformers and envelopes can be in different models. The same is true of other types of deformer (lattices, waves) and deformees, as well as constraining and constrained objects.
There are a couple of ways to set this up:
The easiest way is to export the two models before you apply any constraints, envelopes, or other deformations between them. Import both referenced models into a scene and then apply the operators. In this way, the connections are stored in the delta and are reconnected properly whenever you load the scene.
You can also put both models inside another model and export that (see Using Nested Referenced Models). This allows you to include multiple copies of both child models in the same scene. You can also have multiple resolutions of the top model, for example, different geometries enveloped to different rigs.
If the deformation relation or constraint already existed between the original local models before they were exported, then you must import the model with the deformers or constraining objects into a new scene first. Otherwise, there is nothing to connect with when the other model is imported. The order in which models are imported is stored and reused when reopening the scene.
If you are using multiple resolutions of the geometry models, they should all be deformed to the same local deformer model before being exported. Similarly, all resolutions with constrained objects should be constrained to objects in the same local model before being exported.
If you want multiple copies of the models in the same scene, for example, two copies of the geometry each enveloped to its own copy of the rig, enter the appropriate deformer rig's name in the Models to Reconnect to of the geometry model's Model property.
If you want to modify the envelope, for example, to change the envelope weighting, first import the envelope and deformers into a new scene as local models. Then, change the weighting and re-export.
In either case, the connections may break temporarily, for example, if you offload and then reload the deformer model. In that case, simply update the other model and the connections are automatically restored.
You can nest referenced models within each other as deeply as you like (although you cannot create circular references).
You cannot add anything to a referenced model's hierarchy, so to nest referenced models you must perform the following general steps:
Create the bottom-most models, and either convert them to referenced or export them and import them into another scene.
If you want multiple resolutions, add them all before the next step. If necessary, you can add resolutions, leave the paths blank for now, and supply paths later. The new paths will be stored in the delta, and you can commit them if desired.
Repeat for multiple levels of nesting.
When models are nested, separate deltas are used for each model and all deltas are stored directly under the top-most model. If a model already has its own delta when it becomes nested, those changes are reapplied before the parent's delta when updating, but new changes are stored in the delta on the parent model.
When you import a model, its materials are added to a library called ModelName_DefaultLib_Ref. This library is locked, meaning that you cannot do any of the following:
You can assign materials from the scene to objects and clusters in a referenced model. However, when you assign objects in the scene or another model to a material in a referenced model's library, the material is duplicated in the scene's default library and the objects are assigned to the duplicate instead.
Image clips stored in the scene can be shared by objects in a referenced model. Image clips stored in a referenced model cannot be shared by objects in the scene, although they can be shared by objects in other referenced models.
When you import a referenced model, Softimage will automatically share image clips if the same clips exist in other referenced models. Two clips are considered to be the same if they share the same image source and the same parameter values, and they have no animation. Image sources are always shared.
To use object-based (non-ICE) rigid bodies in a referenced model, you must make objects into active or passive bodies before you export the model to an external file. Once the referenced model is imported into another scene, you can assign the rigid bodies to any environment you like.
When the delta contains multiple animation sources on the same parameters, the sources might not be applied in the desired order. For example, if there is fcurve animation as well as a constraint on the position, the constraint may be applied first and then the fcurve. As a result, it appears as though the constraint isn't applied even though it is stored in the delta.
In this situation, you can remove the position fcurves from the delta so they don't interfere with the constraint. Alternatively, you can put the constraint in another delta applied after the first.
By default, expressions on mixer items such as shape weight parameters are copied to the delta. While this is harmless in many situations, if you duplicate a referenced model then the duplicate's parameters are driven by the values of the original referenced model. In addition, expressions on mixer items can become broken if you rename the model.
You can prevent this from happening by locking the expressions in the original model before exporting — see Locking and Tagging Scene Elements. You should also set the delta of the referenced models to not record changes to mixer items.
 Except where otherwise noted, this work is licensed under a Creative Commons Attribution-NonCommercial-ShareAlike 3.0 Unported License


