When you create a light, it affects all visible objects in the scene by default. However, every light has a selective property that you can use to make it affect, or not affect, a designated group of objects called Associated Models. This can help reduce rendering time by limiting the number of calculations per light.
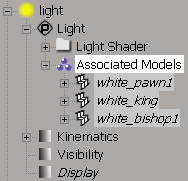
Each light in a scene has an Associated Models group, which contains a copy of all of the light's associated objects. You can find the Associated Models group under any light's Light node in the explorer.
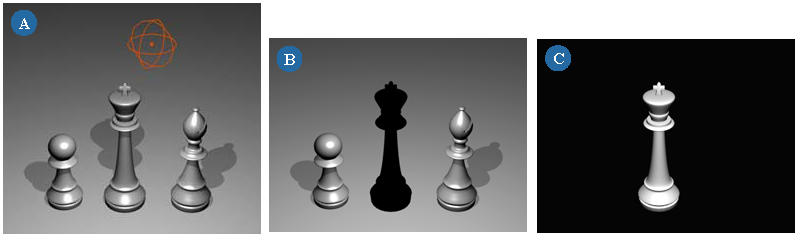
You can set a light's selective property to be Inclusive or Exclusive, depending on how you want the light to affect its associated models.
Exclusive illuminates every object except for those in the light's Associated Models group.
Inclusive illuminates every object defined in the light's Associated Models group.
Select a light and press Enter on the keyboard to open its property editor.
On the General tab, set the Selective Light property to either Inclusive or Exclusive.
Every light's selective property is set to Inclusive by default, but you can change it to exclusive, and back again, as needed.
There are two ways to associate objects with lights. You can either select objects and lights in the viewports or you can drag and drop objects in the explorer.
Associating objects with lights using the viewports is a simple matter of picking objects and lights. You can either select a light and then pick objects to place in its Associated Models group or you can select an object and then pick the lights into whose Associated Models groups you want to place it.
From the Render toolbar, choose Get  Primitive Light Associate Light to begin a pick session.
In the viewports, do one of the following:
If you selected a light, left-click any objects that you want to associate with it. The objects are placed in the light's Associated Models group.
If you selected an object, left-click the lights with which you want the object to be associated. The object is placed in each selected light's Associated Models group.
Right-click an empty area of a viewport to end the pick session.
Associating objects with lights using the explorer is a matter of dragging and dropping objects into a light's associated models group. You may find this method to be faster when you want to associate a hierarchy, or a large number of objects, with the same light since you can multi-select them and drag them all at once.
Open an explorer that displays both objects and lights (a Scene scope is useful).
Expand the Light node of the light that you want to associate your object(s) with. The light's last node is the Associated Models group.
Click and drag any of your scene's objects into the light's Associated Models group.
You can disassociate objects from lights using the same tools that you use to associate them; either pick objects and lights in the viewports or using the explorer.
In the viewports, you disassociate objects from lights almost the same way that you associated them in the first place:
From the Render toolbar, choose Get Primitive Light Associate Light to begin a pick session.
In the viewports, do one of the following:
If you selected a light, middle-click any objects that you want to disassociate with from. The objects are removed from the light's Associated Models group.
If you selected an object, middle-click the lights from which you want the object to be disassociated. The object is removed from each selected light's Associated Models group.
Right-click an empty area of a viewport to end the pick session.
 Except where otherwise noted, this work is licensed under a Creative Commons Attribution-NonCommercial-ShareAlike 3.0 Unported License


