


You can generate a light rig from the Get  Primitive Light menu. You are prompted to select a source image before the rig is generated.
From the Render toolbar, choose Get Primitive Light Light Rig from Image to open the Light Rig Builder Options dialog box.
Enter the name and path of the source image in the Image File text box or click the (...) button to open a browser from which you can select the image.
Set the following parameters to configure the light rig:
Number of Layers specifies the number of luminance layers to create. Higher values require more memory and processing time. In most cases, a value of 3 to 5 is sufficient.
Layer Luminance Extraction specifies the amount of luminance required to turn a lit area of a layer into lights in the scene. Higher values create more lights and vice-versa.
Light Distance specifies the distance between rig lights in the scene based on the lit areas in the layer from which the lights are created. Lower values create more lights spaced more closely together and vice-versa.
Click OK to generate the light rig. The Light Control property editor is displayed. You can use the light control options to adjust the rig's lighting (see Controlling Rig Lighting).
Once you create a light rig, it appears in the scene's hierarchy as a null. Each light in the rig is a child of the LightRig null. The LightControl node is also a child of the Light Rig null. Click it to open the Light Control property editor from which you can adjust the lighting for the entire rig.
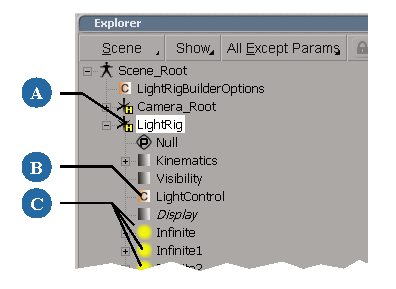
All of the light rig elements are children of the LightRig node.
 Except where otherwise noted, this work is licensed under a Creative Commons Attribution-NonCommercial-ShareAlike 3.0 Unported License