Before you style, you must select the guide hairs. Using the buttons on the Select panel, you can select hair in different ways: strands, tips, or points along the strand. For many of the hair styling tools (such as Comb, Puff, or Scale), it doesn't matter which hair components you have selected. However, using the Transformation tools (Scale, Rotate, and Translate) and the Brush tool, the styling results can be very different depending on what is selected.
|
|
|
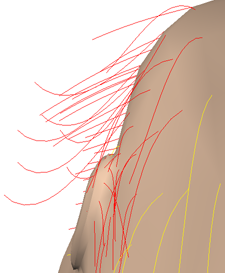
| Guide hairs with strands selected (in red). |
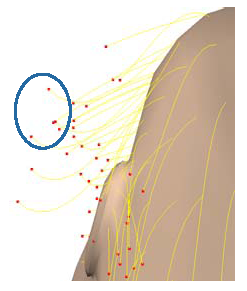
Guide hairs with tips selected. |
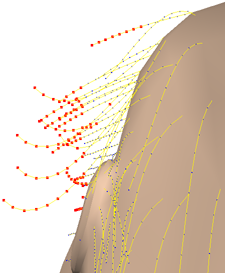
Guide hairs with some points selected (in red). |
With the hair object selected, these options on the Select panel become available for you to use:

Strand — Select the hair strands (all points on the strand) by dragging over any part of the strand. This tool simply selects all the points on the hair strand as a convenience — there is no such thing as a strand "component."
Strand By Root — Is your hair a tangled mess and you want to select a strand without trying to untangle? Select Strand By Root, drag near the surface of the emitter object, and the whole strand is selected.
Tip — Select just the tips of the strands. You can also press the ' (single apostrophe) key to activate this tool. Drag over any part of the hair strand, and only its tip is selected. This tool is simply a convenient way for selecting the end points of the hair: tips are no different than any other point on a hair strand.
Point — Select points on the hair strand as on any other object in Softimage. With this option, you can see the segments on the hair strand (always 15).
When you select points on the hair, the strand and point information is shown in the Selection text box. For example: pnt[(2,3),(2,4)] means that points 3 and 4 on strand 2 are selected.
You can create clusters of different points, tips, or strands of hair like any other geometry component in Softimage. To do so, select the components you want in the cluster and click the Cluster button in the Edit panel. When you create the clusters, they appear in the Clusters folder under the Hair object. For more information on clusters, see Clusters [Scene Elements].
Once you have a cluster, you can use it as you would any other cluster, such as by constraining objects to it using the Object to Cluster constraint (see Object to Cluster Constraints [Animation]).
 Except where otherwise noted, this work is licensed under a Creative Commons Attribution-NonCommercial-ShareAlike 3.0 Unported License


