The fcurve's slope determines the rate of change in the animation. By modifying the slope, you can change the acceleration or deceleration in or out from a key, thus making the animation change rapidly or slowly, or even reversing it. The steeper the slope's orientation, the faster the values change.
You can change the slope of any fcurve that uses spline interpolation by using the two handles (called slope handles or tangents) that extend out from a key. By modifying the handles' length, direction, and orientation, you can define the way the curve moves to and from keys. You can change the length and angle of each handle in unison or individually.
By default, the slope handles are tangent to the curve at their key. This keeps the acceleration and deceleration smooth, but you can also "break" the slope at a certain point to have a sudden animation acceleration or deceleration, or change of direction altogether (see Breaking and Unifying the Slope Handles).
Use the View  Slopes on Unselected Keys command to show or hide the slope handles of all unselected keys on a selected curve. If you choose this command, you can
manipulate handles without having to first select the key. The default, however, is to hide these slope handles, which prevents
you from accidentally manipulating them.
Slopes on Unselected Keys command to show or hide the slope handles of all unselected keys on a selected curve. If you choose this command, you can
manipulate handles without having to first select the key. The default, however, is to hide these slope handles, which prevents
you from accidentally manipulating them.
Many of the slope commands that are available from the Keys menu are also available by Alt+right-clicking on a slope handle's end point.
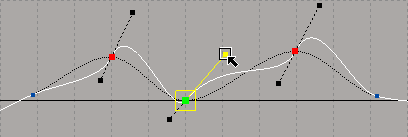
Select one or more keys on an fcurve with spline interpolation — slope handles appear on each selected key.
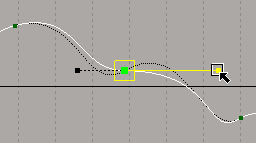
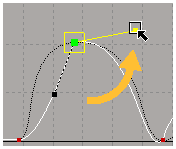
Click anywhere on a slope handle to select it — the handle turns yellow.
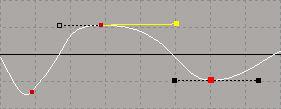
Press Shift or Ctrl to select multiple handles on other selected keys.
If you select a key, its slope handle is deselected, and vice versa. However, if you select a different key, the selected slope handle remains selected; if you select a different slope handle, the selected key remains selected.
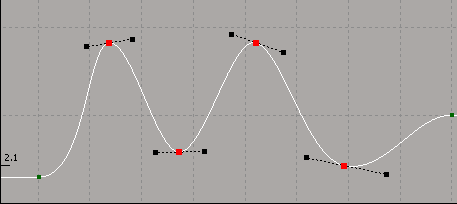
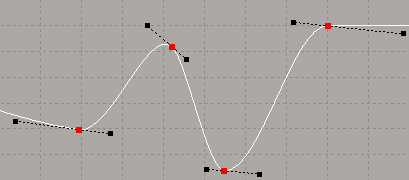
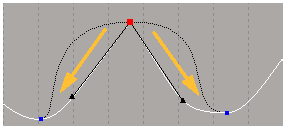
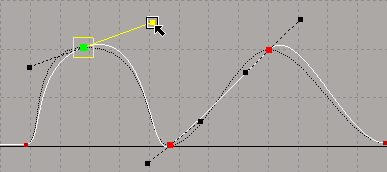
The angle of a slope handle determines the shape of the curve that goes into and comes out of a key point. The steeper the slope, the faster the acceleration; the shallower the slope, the slower the acceleration.
|

|
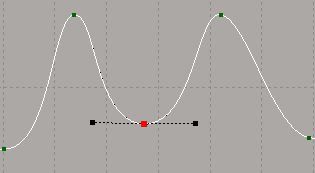
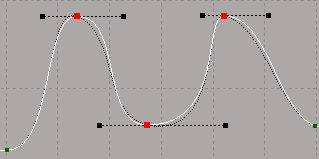
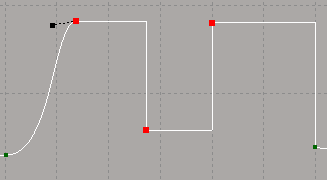
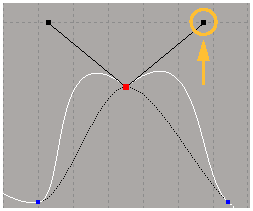
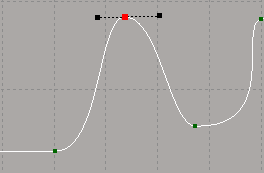
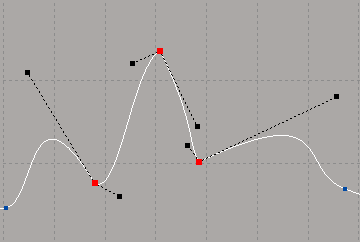
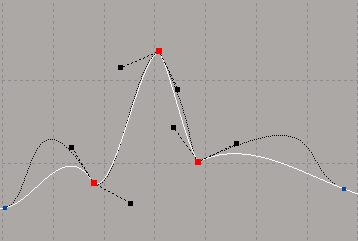
The length of the slope handles determines the weight of the key's influence on the fcurve. The longer the handle, the more the key influences the connecting curve segment. By having control over the handle length, you can also draw more complex curve shapes with fewer keys.

|
|
The same fcurve, with short and long slope handles. Notice how the length of the handle changes the shape of the curve.
As you change the orientation and length of the slope handles, you can also set how the handles move: the left and right handles can be manipulated independently, together, or locked in place.
For more information, see Breaking and Unifying the Slope Handles and Controlling the Length of the Slope Handles.
Select one or more keys on an fcurve with spline interpolation — slope handles appear on each selected key.
You can also select the slope handles themselves, but then you lose the current key selection.
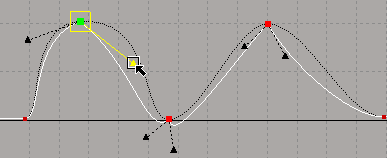
Click anywhere on a slope handle and drag it to a new location to change either its angle (orientation) or length.
The handle that you are manipulating is selected (turns yellow) only for the duration of the movement. When you finish moving the handle, and release the mouse, the handle is deselected and your original key selection is retained.
If there are multiple keys selected, all their handles change accordingly when you drag one of the key's handles.
If the Selection Tools Translate on MMB option in the Animation Editor preferences is on, you don't need to click directly on the handle to move it — you can drag
anywhere in the graph.
If the Selection Tools Prevent Movement on LMB option is also on, you can use the left mouse button only for selection and the middle mouse button only for manipulation.
See Animation Editor Preferences for more information on these options.
To change only the angle of the slope handles interactively:
Select one or more keys on an fcurve with spline interpolation.
You can also select the slope handles themselves, but then you lose the current key selection.
Click anywhere on a slope handle, then press Shift as you drag up or down (or in a direction perpendicular to the handle) to change only the handle angle.
If there are multiple keys selected, their handles all change accordingly when you drag one of the handles.
To change only the length of the slope handles interactively:
Select one or more keys on an fcurve with spline interpolation.
You can also select the slope handles themselves, but then you lose the current key selection.
Click anywhere on a slope handle, then press Shift as you drag to the left or right (or in a direction along the handle's tangent).
If there are multiple keys selected, their handles all change accordingly when you drag one of the handles.
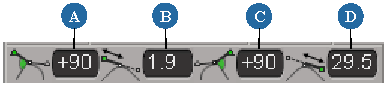
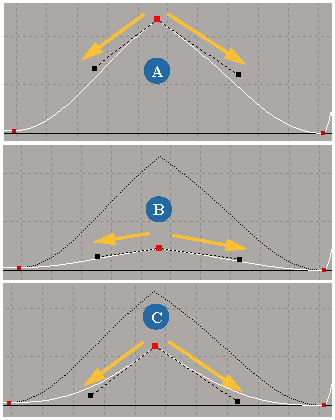
Select one or more slope handles and enter values for the slope handles' length and angle in the slope text boxes in the toolbar.
| A |
Left slope handle angle. |
| B |
Left slope handle length. |
| C |
Right slope handle angle. |
| D |
Right slope handle length. |
The slope handle length is in fcurve graph units, and you can set up to one decimal place for the value (such as 1.2, rounding off the numbers).
The slope handle angle value can be between -90 and 90 degrees, with up to two decimal places (such as 45.23). However, when you select the Express slopes as ratio as in SI|3D option (see below), you can enter any value, not just one between -90 and 90.
When you enter a value in the slope handle angle text boxes, the value is displayed as an angle. However, you can set the display to express the ratio as Y (value) over X (time) values (see below).
To switch the slope angle value display:
You can snap slope handles in two different ways:
Snap the handle's length to a specific number of Softimage units (default is 1), from 0.01 to infinity.
Snap the handle's angle to a particular degree (45 is the default), from between 1 and 90.
To snap the slope handles in length or angle:
The Slope constraint options that control how slope handles are set for selected keys. Select keys whose slopes you want to edit, then choose one of the slope options in the Keys menu as described in this section.
The Automatic Slope command computes the orientation and length of a key's slope based on the interpolation of the fcurve between the previous key and the next key (neighboring keys) in a plateau-type manner. The slopes gradually flatten out as they approach their local maxima/minima.
When moving keys, the ratio of the slope handle to its neighboring keys is preserved: as you move a handle towards or away from its neighboring keys, the handle gradually shortens or lengthens. This keeps the fcurve shape roughly the same and avoids dips or peaks that can occur when a handle gets too close to a neighboring key.
When pasting copied keys, the slope handles are lengthened or shortened in the same way to keep the fcurve shape the same.
To change the slopes of selected keys:
The Spline Slope command computes the orientation and length of a key's slope based on the interpolation of the fcurve between the previous key and the next key (neighboring keys), but with no plateau influence.
With this command selected, you may notice that when you move a handle after breaking the slope, the key's opposite handle jumps slightly and the curve it controls moves a bit. This is because automatic slopes get recomputed, and are affected by the slope orientation being broken. One way to work around this is to deselect Spline Slope before editing the slope.
To change the slopes of selected keys:
The Zero Slope Orientation (Flat Key) command constrains keys to a slope of zero. The slope handles remain horizontal so that only the length can be modified.
This is useful to prevent the automatic interpolations from going above or below your keyframed values as they approach keys, such as keeping the animation from changing when you don't want it to. For example, when a ball reaches its zenith, it hangs in the air for a brief time before starting to fall. You can create the "suspension" effect by using a flat tangent.
To change the slopes of selected keys, do one of the following:
The Zero Slope Length (Break Point) command sets both the left and right handle lengths to zero, effectively creating a break point. When this is selected, you cannot change the handle length or angle since it is locked to zero.
To break the slopes of selected keys:
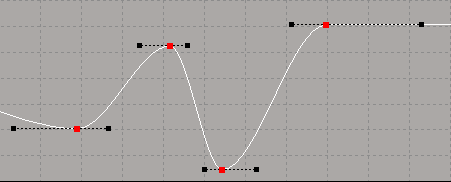
The Plateau Slope command automatically eases curves in and out of their keys like spline slopes, but flattens out the curve segments between neighboring keys that have the same value.
Plateau slopes force the curves to not go beyond the positions of their keys so that their maximum and minimum values ("hills and valleys") do not extend past or overshoot their keys. This flattens the keys in the parts of the curves where hills and valleys occur.
A local minima is a key where both previous and next keys have larger values.
A local maxima is a key where the previous and next keys have smaller values.
The shape of the curve is retained, but a linear segment is used between the two adjacent points with the same value. This allows the curve to hold key values, preventing the automatic interpolation from going above or below keyframed values that define extremes.
Using this type of slope can be useful for keeping objects in one place at keys where they are supposed to be still, and moving smoothly at keys where they're supposed to move. For example, plateau slopes can prevent the backsliding of feet between keyframes in a walk cycle, as happen with spline interpolation, and prevent the jerky movements that would happen with a linear interpolation.
Or, let's say that you animate a ball falling and then rolling on the floor: with a spline slope, the ball falls through the floor and then comes back up to the floor; with a plateau slope, the ball never falls through the floor.
When Plateau Slope is active, it affects all keys on a selected curve.
To change the slopes on the selected curve:
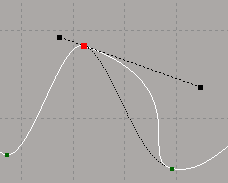
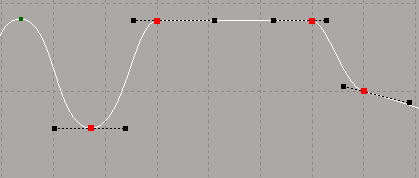
The Point at Neighboring Keys Slope Orientation command constrains the selected keys' handles so that they point at the neighboring (previous and next) keys. This usually creates sharp break points in the slope.
The handles stay pointed at the neighboring keys even when you move the key. If you move the handle itself, the constraint is removed.
Selected key's handles point toward the previous and next key (neighboring keys).
To change the slopes of selected keys, do one of the following:
With stepped tangents (also known as constant), the key's value is repeated until the next key. The movement is characterized by sudden changes at keys and static positions between keys. This type of tangent is useful for blocking out key poses for character animation so that there's no interpolation, or for animating a cut from one camera to another.
To change the slopes of selected keys, do one of the following:
When you're using slope orientation constraints on selected keys, you may want to keep (freeze) the resulting slope handles'
orientation for these keys. Using the Keys Manual Slope commands, you can freeze the current slope handles for these keys, then move the keys as you like without having their slope
handles change orientation.
For example, let's say you select a key and choose the Point at Neighboring Keys Slope Orientation command. When you move that key, its slope handles change their orientation to keeping pointing at the neighboring keys. Now if you choose the Manual Slope command and move the selected key (or the neighboring keys), you'll notice that the slope handles keep their original orientation: they do not try to keep pointing at the neighboring keys.
Select one of the slope orientation constraint types as described in this section (Automatic, Plateau, Point at Neighboring Keys, etc.).
To freeze the slope's shape using this current constraint, choose the Keys Manual Slope command or click the Manual Slope icon in the toolbar.

The slope handles retain their current orientation when you move the selected keys.
You can set the default slope mode for any keys that are inserted on an fcurve. This information is set in the Animation Preferences property editor and is saved in your preferences file so that it's active for more than the current session in Softimage.
In the explorer that appears, select Animation or click its icon to open the Animation Preferences property editor.
Select one of the Slope Computation Constraint options, which are the same as the Keys Automatic Slope and Spline Slope commands.
Select one of the Slope Orientation Constraint options, which are the same as the Keys Plateau Slope and Zero Slope Orientation commands.
When slopes are unified (default), any change you make to one of the slope handles at a key is mirrored on the other one. However, you can "break" a slope at a key so that you can change either slope handle independently.
When the slope handles of selected keys are broken, you can independently control the fcurve segment that is entering or exiting a selected key. You may want to break a slope to create a sudden change in motion at a key, such as an object hitting a wall or a bouncing ball hitting the ground and then bouncing up again. Depending on the slopes you define, the transition in the rate of the parameter's change at the keyframe can be as smooth or as abrupt as you like.
Select keys and do one of the following to break the handles:
Make sure that the Keys Unified Slope Orientation command is off (no checkmark beside it).
In Classic mode, click the Unified Slope Orientation icon in the toolbar so that it is off (not highlighted).

In Suite mode, choose the Keys Break Tangents command or click its icon. Choosing this command automatically turns off both the Unified Slope Orientation and Unified Slope Length commands.

Choose Keys Key Properties to open the Key Properties editor and select Broken as the Slope Orientation option.
When the slope is broken, you can drag either slope handle in any direction without affecting its opposite handle.
You can also middle-click+drag to move only the handle's angle, or right-click+drag to move only the handle's length.
If you adjust one of the slope handles, then turn Unified Slope Orientation on again, or choose Unify Tangents, you can see that the current angle between the slope handles is once again maintained when you drag one of the handles.
|
|
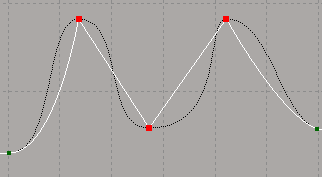
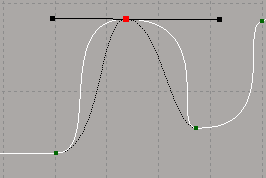
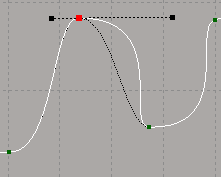
On the left, Unified Slope Orientation is not active, or the Break Tangents command is active: this creates a sharp break in the curve at the key. You can now drag one of the key's slope handles without affecting the other one.
On the right, if you turn Unified Slope Orientation on again or choose Unify Tangents, the current angle between the slope handles is once again maintained when you drag one of the slope handles.
When the slope handles of the selected keys are unified, moving one slope handle affects its opposite handle equally. The handles keep their relative orientation to each other as you move them, keeping a constant angle between them. Unified slopes provide smooth, unbroken fcurve segments, as values ease into and out of keys.
Select keys and do one of the following to unify the handles:
Choose the Keys Unified Slope Orientation command so that it is active.
In Classic mode, click the Unified Slope Orientation icon in the toolbar so that it's highlighted.
In Suite mode, choose the Keys Unify Tangents command or click its icon in the toolbar. Choosing this command automatically activates both the Unified Slope Orientation and Unified Slope Length commands.

Choose Keys Key Properties to open the Key Properties editor and select Unified as the Slope Orientation option.
Unified Slope Orientation or Unify Tangents is active: both slope handles at a key move correspondingly when you manipulate one of them.
When the Unified Slope Orientation or Unify Tangentscommand is active, you can create a mirror constraint between a key's tangent handles. This way, the changes that you make to one key's handle are mirrored to its other handle. This also works well when the Unified Slope Length command is active.
Choose the Keys Mirrored Slope Orientation command or click the icon in the toolbar.

Drag the handle of a selected key whose slope orientation is unified. The movement is mirrored on the other key's handle.
With Mirrored Slope Orientation active, dragging one handle updates the other handle in a mirror-like way.
You can set the length of the slope handles on both sides of the key to be kept relatively equal or not.
When the length of the slope handles on a key are unified, both handles are kept the same length relative to each other as you scale them. This is the case even if the slope orientation is broken.
Select keys and do one of the following:
In Classic mode, click the Unified Slope Length icon in the fcurve editor toolbar.

Choose Keys Key Properties to open the Key Properties editor and select Unified as the Slope Length option.
When the length of the slope handles on a key are not unified, the length of each slope handle is independent, and not kept relative to the length of the other handle as you scale it.
Select keys and do one of the following:
Make sure that the Keys Unified Slope Length command is off (no checkmark beside it).
In Classic mode, click the Unified Slope Length icon in the toolbar so that it is off (not highlighted).
Choose Keys Key Properties to open the Key Properties editor and select Broken as the Slope Length option.
You can determine the default slope handle length for when fcurves are created. This information is set in the Animation Preferences property editor and is saved in your preferences file so that it's active for more than the current session in Softimage.
In the explorer that appears, select Animation or click its icon to open the Animation Preferences property editor.
Select one of the Slope Length Constraint options, which are the same as the Keys Zero Slope Length and Unified Slope Length commands.
By default, a key's slope handles are weighted, meaning that you can change their length. By changing the slope handle length, you can change the weight of the curve segment on either side of a selected key. The longer the handle length, the more influence it has on the shape of the curve segment compared with the handle at the other end of the curve segment.
To use weighted slope handles, choose either of these commands, depending on the mode you're in:
In Classic mode, make sure that the Curves Si3D Curve option is not active.
In Suite mode, choose the Curves Weighted Tangents command.
Slope handles can also have a fixed length so that they are non-weighted, as was the case in SOFTIMAGE|3D. The handle length corresponds approximately to the horizontal length spanning five frames. When the handles are non-weighted, they specify only a direction and can't be scaled.
Choose either of these commands, depending on the mode you're in:
- In Classic mode, choose the Curves Si3D Curve command.
- In Suite mode, choose the Curves Non-Weighted Tangents command.
A warning message appears stating that the curves may be changed by doing this, and prompts you to proceed or not.
If you click Yes to proceed, the handles of the selected curves change to be a fixed length and are locked. The shape of the curves may also change.
The slope length text boxes on the toolbar (see Changing the Angle and Length of Slope Handles) become blank and are inaccessible after you have chosen this command for the selected curve. If several curves are selected and only some of them are using this command, the text boxes are still inaccessible.
If the fcurve uses a spline interpolation, you can freeze a key's speed of transition and influence on the fcurve by locking the orientation and/or length of its slope handles:
On an fcurve, select the keys whose handles you want to lock.
In Classic mode, choose Keys Lock Slope Orientation or press Shift+O to lock the slope handles' orientation. The slope handles turn blue.
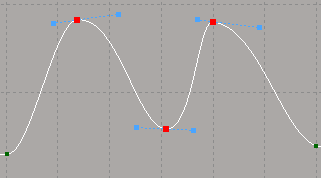
In Suite mode, choose Keys Lock Tangent Orientation to lock the slope handles' orientation. The slope handles turn blue.
In Classic mode, choose Keys Lock Slope Length or press Shift+L to lock the length of each slope handle. The slope handles turn green.
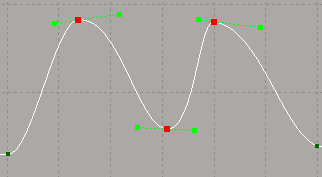
In Suite mode, choose Keys Lock Tangent Weight or click its icon in the toolbar to lock the slope handles' length. The slope handles turn green, and only its angle can
be changed.

You can still manipulate the position of the key itself, unless its position has also been locked (see Locking a Key's Position).
Choose Keys Unlock All Slopes to unlock all slope handles that were previously locked in either length or orientation.
In Classic mode, toggle the same Lock Slope Orientation/Length commands so that they're off.
In Suite mode, choose Keys Free Tangent Orientation, or choose Keys Free Tangent Weight or click its icon. When you move a tangent, its angle and weight can be changed. This allows the weight of a tangent to be
adjusted as well as the angle.

 Except where otherwise noted, this work is licensed under a Creative Commons Attribution-NonCommercial-ShareAlike 3.0 Unported License


