You can use the dopesheet to temporarily deactivate animation or an operator so that it doesn't have an effect on the object. Deactivating the animation or operator doesn't remove it from the object, it simply mutes its effect.
You can deactivate tracks and regions for any type of animation, including function curves, constraints, expressions, and deform operators (including envelopes).
Constraints and expressions have an Active parameter while deform operators have Mute parameters (deformations) that can be on or off (they are considered Boolean). See Deactivating Boolean Parameters for more information on these parameters.
If an IK chain's effector position is animated and you deactivate the animation in the dopesheet, the effector is considered to be "not animated" at those frames and the chain behaves like it's animated with FK. See Animating the Effector [Character Animation] for more information.
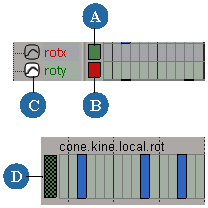
You can activate and deactivate a parameter's animation by clicking the activation box at the left of its track or by choosing a menu command.
To deactivate a track, do one of the following:
Click the green box at the left end of any track so that it turns red.
Select one or more tracks and choose Edit  Deactivate Tracks.
To activate a track, do one of the following:

You can deactivate a region of any track so that the frames in that region don't contribute to the animation. Deactivated regions are displayed in darker gray.
Boolean parameters are parameters that can be either on or off. Constraints and expressions have an Active parameter that is Boolean, while deform operators (deformations) have a Mute parameter that is Boolean. Because the Active and Mute parameters have the opposite meaning, you must be careful to what the state of the tracks and regions mean in each case (see the parameter descriptions in this section for information).
Boolean tracks have different colors and appearance from regular fcurve tracks. When they are inactive, their frames are dark gray and shown on the bottom half of the track; and when they are active, their frames are a light sand color and shown on the upper half of the track.
To see the Active or Mute parameters in the dopesheet:
If the All Nodes filter is not already active in the animation explorer's Explorer menu, make sure that you have the correct filter selected:
To see the Active parameter for constraints, choose Explorer  More
More  Animation Properties.
To see the Mute parameter for Deform operators, choose Explorer  More
More  Modeling Properties.
When an Active parameter is inactive, the constraint or expression operator is also inactive; when an Active parameter is active, so is the operator.
You can deactivate and activate Active parameter tracks as you do for any parameter (see Deactivating Tracks).
When the Active parameter's track is deactivated, so is the operator.
You can deactivate and activate regions for the Active parameter as you do for any parameter (see Deactivating Animation in Regions).
When the Active parameter's region of frames is deactivated, the operator is also deactivated over those frames.

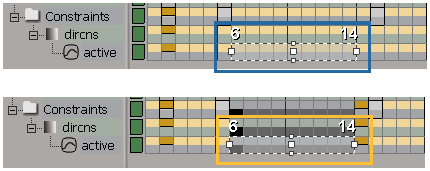
On the top, the Active parameter for a constraint with a region that is active (sand colored). This means that the operator is also active.
On the bottom, the Active parameter is inactive (dark gray), which deactivates the constraint over these frames.
When a Mute parameter for a deform operator is inactive, it means that the deform operator is active; when Mute is active, the operator isn't.
To mute/unmute Mute parameter tracks, deactivate or activate tracks as you do for any parameter (see Deactivating Tracks).
When the Mute parameter track is deactivated, the deform operator is then active. Likewise, when the Mute track is active, the deform operator is not active.
To mute/unmute Mute parameters in a region, create a region of frames and do either of the following:
Click the Mute button on the toolbar to mute (deactivate) the deform operator.
Click the Unmute button to unmute (activate) the deform operator.

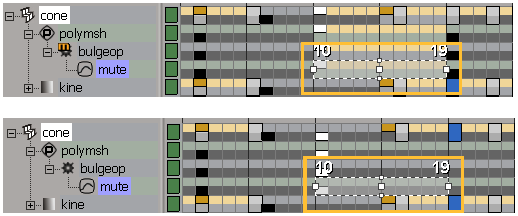
On the top, the Mute parameter for a Bulge operator with a region that is active (sand colored). This means that the operator is muted.
On the bottom, the Mute parameter with a region that is inactive (dark gray), which activates (unmutes) the Bulge operator over these frames.
 Except where otherwise noted, this work is licensed under a Creative Commons Attribution-NonCommercial-ShareAlike 3.0 Unported License