The shrinkwrap deformation projects a wrapper object onto the surface of a target object. You can completely engulf the target, thereby giving the wrapper the same overall shape, or you can apply the wrapper onto the target like a decal.
You are not restricted in the type of objects that you can shrinkwrap. You can shrinkwrap any combination of surfaces, surface meshes, polygon meshes, and curves onto other like objects.
Among many things, the shrinkwrap deformation can be used to:
Create a metamorphosis between two dissimilar objects by shrinkwrapping an object like a sphere onto one of the two objects, saving a shape key, and then repeating for the other object.
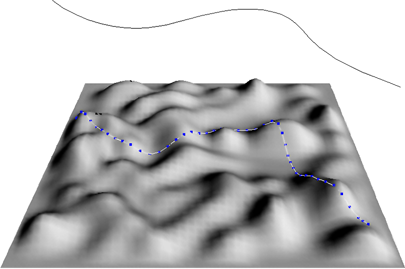
Project a curve onto a surface. For example, you can project a path onto uneven terrain or use a shrinkwrapped curve as a modeling aid.
Shrinkwrap surfaces onto a high-resolution polygon-mesh object to capture detail.
The shrinkwrap deformation maintains a modeling relation. This means that if you transform or deform the target (or the inner object, depending on the type of projection) after you have applied the deformation, the shape of the wrapper is altered accordingly.
You must freeze the shrinkwrapped object before deleting the target or the inner object. Otherwise, the deformation no longer has any effect.
When shrinkwrapping, there are several choices for how each point of the wrapper is projected onto the target:
If any points of the wrapper do not hit the surface of the target using the selected projection type, they are not affected by the shrinkwrap deformation unless you activate Closest surface if no target.
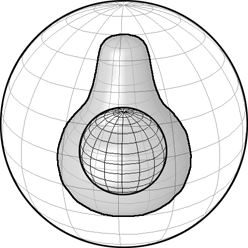
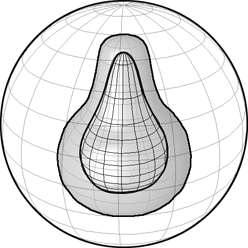
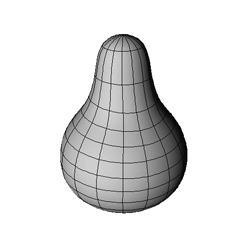
To shrinkwrap toward an inner object, you need three objects:
A wrapper: the object that becomes deformed. Normally it should be outside the target object. If you want, the wrapper can completely surround the target.
An inner object: the object toward which the wrapper is projected until it hits the target. It must have the same number of points as the wrapper — each point on the wrapper is projected toward the corresponding point on the inner object.
The easiest way to create an inner object is to duplicate the wrapper, then scale the duplicate down and move it inside the target. If desired, you can deform the inner object so that there is more geometry near areas where you want high detail.
Once you have created and positioned your three objects, follow these steps.
Choose Deform  Shrinkwrap. This command is available under Modify on the Model and Simulate toolbars, as well as under Deform on the Animate toolbar.
Pick the inner object. The Shrinkwrap property editor opens.
In the property editor, make sure that Toward Inner Object is selected and set the other parameters as desired — for information about other parameters, see Other Shrinkwrap Controls.
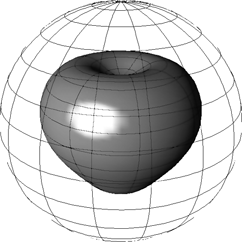
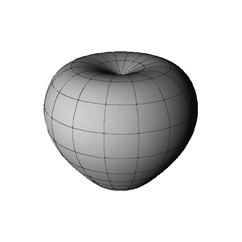
When you shrinkwrap toward the target's center, each point of the wrapper object is projected toward the target's center until it hits the target's surface. In this case, you require two objects:
A wrapper: the object that becomes deformed. Normally, it should be outside the target object. If you want, the wrapper can completely surround the target.
Once you have created and positioned both objects, follow these steps.
Choose Deform Shrinkwrap. This command is available under Modify on the Model and Simulate toolbars, as well as under Deform on the Animate toolbar.
Right-click in a geometry view to end the picking session. (When shrinkwrapping toward the center, you do not need to pick an inner target.)
In the Shrinkwrap property editor that opens, make sure that Toward Center is selected and set the other parameters as desired:
If Bounding Box Center is off, the points of the wrapper are projected toward the center of the target's local coordinate system. You can move the target's center in Center mode and the wrapper's shape is altered accordingly.
If Bounding Box Center is on, the points of the wrapper are projected toward the center of a bounding box containing the target. You can use Center mode to move the center of the target's local coordinate system without affecting the wrapper's deformation.
For information about other parameters, see Other Shrinkwrap Controls.
When you shrinkwrap along an axis, each point of the wrapper object is projected parallel to an axis until it hits the target's surface. As with shrinkwrapping toward the center, you require two objects:
Once you have created and positioned both objects, follow these steps.
Choose Deform Shrinkwrap. This command is available under Modify on the Model and Simulate toolbars, as well as under Deform on the Animate toolbar.
Right-click in a geometry view to end the picking session. (When shrinkwrapping along an axis, you do not need to pick an inner target.)
In the Shrinkwrap property editor that opens, select Parallel to Axis, select a Reference for the coordinate system (Target object, Deformed object, or Global), and then select an axis (Along X, Y, or Z). Set the other parameters as desired — for information about other parameters, see Other Shrinkwrap Controls.
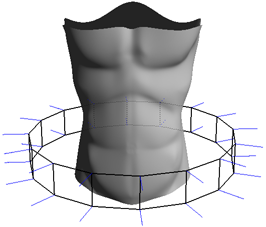
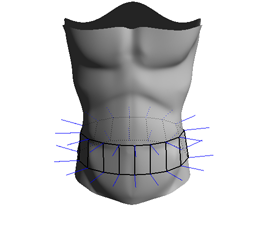
When you shrinkwrap along the normals, each point of the wrapper object is projected along the inverse of its normal direction until it hits the target's surface. This lets you, for example, shrinkwrap a belt onto a character without worrying about where the objects' centers are.
As with shrinkwrapping toward the center or along an axis, you require only two objects:
Once you have created and positioned both objects, follow these steps.
Choose Deform Shrinkwrap. This command is available under Modify on the Model and Simulate toolbars, as well as under Deform on the Animate toolbar.
Right-click in a geometry view to end the picking session. (When shrinkwrapping along the normals, you do not need to pick an inner target.)
In the Shrinkwrap property editor that opens, select Follow Vertex Normals. Set the other parameters as desired — for information about other parameters, see Other Shrinkwrap Controls.
You can shrinkwrap to the nearest vertex on the target object, or to the nearest location on the surface of the target.
Shrinkwrapping towards components involves two or three objects:
An optional reference: the object used to determine the closest component. Having separate target and reference objects is useful when the target is animated. The reference and target must have the same topology. If you do not specify a reference, the target itself is used as the reference.
Once you have created and positioned both objects, follow these steps.
Choose Deform Shrinkwrap. This command is available under Modify on the Model and Simulate toolbars, as well as under Deform on the Animate toolbar.
If desired, pick the reference object.
Otherwise, right-click in a geometry view to end the picking session.
In the Shrinkwrap property editor that opens, select one of the following options:
Closest Vertex snaps each point of the wrapper object to the nearest vertex on the target object.
Closest Surface projects each point of the wrapper onto the nearest location anywhere on the surface of the target.
Closest Surface (Smoothed) is a variation of Closest Surface that avoids collapsing multiple points to the same location, especially near sharp edges.
Set the other parameters as desired — for information about other parameters, see Other Shrinkwrap Controls.
There are several options that apply to all or most types of projection.
The Reverse Projection option in the Shrinkwrap property editor controls the direction in which the points of the wrapper object are projected. When on, points are moved in the opposite direction. For example, you can project the wrapper along an axis in the negative direction instead of the positive direction.
The Bidirectional option in the Shrinkwrap property editor projects the points of the wrapper object both backwards and forwards to see whether they hit the target object. If a point hits the target in both directions, the shortest distance is used.
The Amplitude parameter in the Shrinkwrap property editor controls how far the points of the wrapper object are moved toward the target:
When the Amplitude is 1, the points of the wrapper object are deformed to the surface of the target.
Between 0 and 1, the points are deformed between their original positions and the target.
You can use a parameter map to modulate the amplitude of the shrinkwrap effect across the surface of the wrapper object.
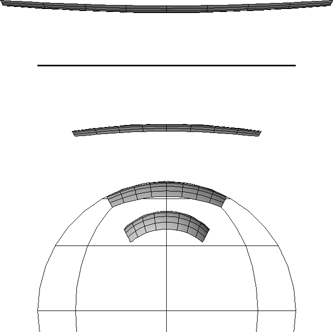
Effect of different Amplitude values on a grid shrinkwrapped to a sphere
 Except where otherwise noted, this work is licensed under a Creative Commons Attribution-NonCommercial-ShareAlike 3.0 Unported License