Ghosting an animation layer lets you see the contribution of each layer's animation on an object, including the base layer, as a ghost image in the viewport. Because you can see the animation from each layer at the same time, ghosting can help you create smooth transitions between the animation in the layers.
Animation layer ghosting works the same way as does clip ghosting in the animation mixer. For more information on this, see Ghosting Clips.
Make sure that Animation Ghosting and Mixer Ghosting are selected in the display menu in one or more viewports (see Ghosting Animated Objects).
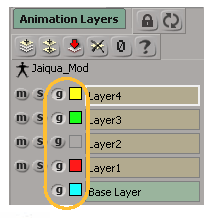
In the Animation Layers panel, click the g button beside each layer you want to ghost, including the Base Layer.
For regular animation layers, you can also click the g button beside each layer clip's track in the animation mixer.
For the Base Layer, you can also choose Mix  Animation Mixer Properties in the animation mixer and select the Ghost option.
The object's animation that has been created on that layer is displayed in the color shown for it. Each layer uses a different color for easy identification.
To change the layer's ghost's color, click the color chip beside the g button and select a color from the color editor that appears.
You can also set the color from the ghost color chips beside the layer clip's track in the animation mixer, or beside the Ghost Color option in the Mixer Properties editor.
The ghost image in the viewport updates immediately with the new color.
 Except where otherwise noted, this work is licensed under a Creative Commons Attribution-NonCommercial-ShareAlike 3.0 Unported License


