Sprites are images or image sequences that you attach to an object to change its appearance. To create sprites on ICE particles, you can use any textured image file or animated image sequence and apply it to the point cloud. When you apply a texture on a point cloud, the projection is applied on each of the particles based on its default UV coordinates.
To see the sprites on the particles, you must create a render region because the lookup is done at render time. Viewing the particles in the Textured display mode won't show the correct sprite images.
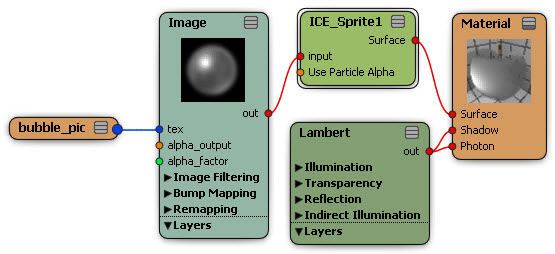
There are two ways in which you can render sprites for particles in the render tree:
The ICE Sprite compound uses the particle's Age attribute to control which image in the animated sequence is displayed based on the percentage of the particle's life span that you've set in the point cloud's ICE tree using the AgeLimit attribute .
In the ICE tree view, open the Emit compound (or Particle Display property editor) and set the Shape of the particles to Rectangles (like a billboard). You can use any shape other than Point, but this gives the best flat background for the image.
Set the particle's AgeLimit attribute in the ICE tree - see Limiting the Particle's Age for more information.
Open a render tree in a viewport and click the Update icon or press F6 to display the render tree for the selected point cloud.

In the render tree, drag the ICE Sprite shader compound from the Particle group in the preset manager on the left, or choose Nodes  Particle ICE Sprite from the toolbar.
Plug the ICE Sprite shader's Surface output into the Surface port of the Material node.
Do either of the following to attach an Image shader and select the image to use as the sprite:
Open the ICE Sprite Compound property editor and click one of the Texture preset buttons to quickly plug an Image shader and a Texture node into this shader.
Get an Image shader from the preset manager or toolbar and plug its output into the input port of the ICE Sprite node. Then open the Image shader's property editor and select an image in it.
Set other options in the ICE Sprite Compound property editor as you like.
Follow steps 1 - 4 as above (step 3 is optional, depending on your setup).
In the render tree, drag the Image shader from the Texture group in the preset manager on the left, or choose Nodes Texture Image from the toolbar.
Plug the Image shader's output into the Surface port of the Material node.
Open the Image shader's property editor and select the image you want to use as the sprite. This creates an Image Clip shader that is automatically plugged into the Tex(ture) port of the Image shader.
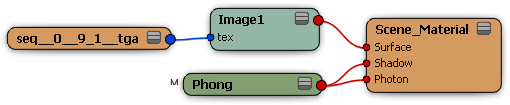
If you're using an animated image sequence, open the Image Clip's property editor and set the Time Source option to what you want to use to control the animation of the image sequence.
By default this is set to the scene's time, but you can change it to the particle's ICE attribute that you want to use control which image in the sequence is displayed. The list includes ICE attributes only from objects used by this image clip (either directly on a particle or indirectly if it's used via shape instancing).
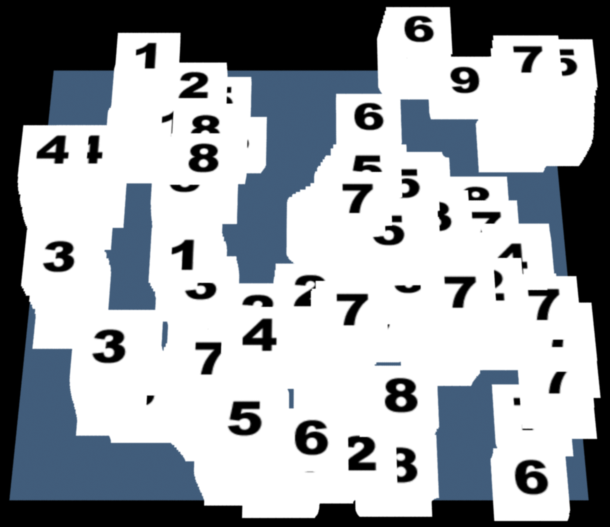
For example, you may want to use the particle AgeLimit attribute to use the images in the sequence based on the particle's life span that you've set. In the example below, an image sequence with the numbers 1 - 9 shows how the images are chosen based on the particle's age limit.
 Except where otherwise noted, this work is licensed under a Creative Commons Attribution-NonCommercial-ShareAlike 3.0 Unported License


