Gravity is the most common type of "force" that you will use, for obvious reasons. Gravity is actually an acceleration that is the same for all objects regardless of their mass: every object falls at the same rate. However, everything changes at the moment there is air resistance/friction or when the simulated object collides with an obstacle - that's where its mass, energy, and momentum play a major role. In ICE, gravity moves simulated objects based on their mass and is directly proportional to an object's mass. The more massive an object, the stronger the gravitational force applied to it.
To have the correct gravitational behavior from the simulated objects, you must consider the size of the objects in the scene. The Syflex ICE nodes are tuned so that 1 Softimage unit is equal to 10 cm. This scale is used because most characters are modeled with a scale of 1 unit equalling 10 cm, including the default Softimage rigs and models.
The default gravity value for the Syflex Gravity compound is set to earth's gravity if you use this scale. However, if you define 1 Softimage unit as 1 meter, you would need to change the gravity value to get objects falling as they should.
You can calculate the gravity value required to use for your simulation with the JavaScript form in the Syflex Cloth (non-ICE) reference documentation that is installed in your Softimage install path/Docs/Syflex folder - open the syflex_units.html file and scroll to the bottom of the page.
Once you set the gravity value for the simulation, you should leave it at that value so that there is a solid base line for all simulation calculations.
The Syflex Gravity compound is built into the Syflex Cloth and Syflex Curve compounds, and is active by default. However, if you're creating your own simulation from scratch, you can use the Syflex Gravity compound independently
Create a simulated ICE tree for the cloth or curve object that you want to deform.
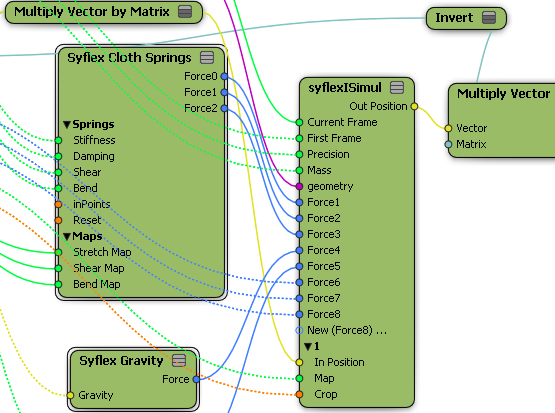
To give you an idea of which nodes you need to use to create your own simulation, edit the Syflex Cloth or Syflex Curve compound to see what's inside.
One of the main nodes that you need is the syflexISimul node, which controls the simulation calculations.
From the Task > Syflex tab in the preset manager in the ICE Tree view, drag the Forces  Syflex Gravity compound into the ICE tree workspace.
Plug its Force output into a Force port on the syflexISimul node.
In the Syflex Gravity property editor, set the gravity strength and direction. Remember to calculate the gravity value based on the Softimage units and frame rate used in your scene.
 Except where otherwise noted, this work is licensed under a Creative Commons Attribution-NonCommercial-ShareAlike 3.0 Unported License


