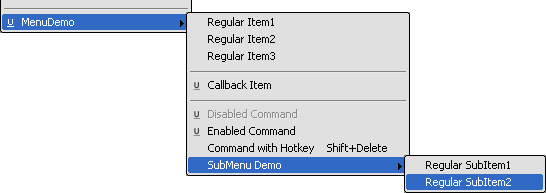
In Softimage, custom menus can only be built as self-installing plug-ins. Self-installing menus contain a definition (what items will appear on the menu, how it will behave and what it will look like) and any extra custom functions (procedures that run when the matching menu item is clicked) you choose to provide.

Before getting into the details of how to build custom menus, this section provides answers to questions about the structure of menu and their components:
Everything appearing on a menu is called a menu item. Depending on the menu item's origin (the location from which the command or callback was installed) one of the following symbols may appear beside the label:
| Symbol |
Origin |
|---|---|
| |
the user location |
| |
the workgroup location |
| (no symbol) |
the factory location —or— a custom location (a location specified by the XSI_PLUGINS environment variable) |
When you define a menu you can add any of the following items:
Commands (regular, instance and template commands)

Launch custom and built-in Softimage commands.
If you add a command item to a menu but the command is not enabled, the entry appears in grey on the menu.
If there is a hotkey assigned to the command it automatically appears next to the label (the text that actually appears in the menu).
Callbacks (to custom functions)

Launch your own custom callback functions. These functions must be defined in the same file as your menu definition.

You can split your menu into logical sections with these horizontal lines. These are purely cosmetic entities.

Sub-menus (sometimes called Secondary or Drop-down menus)

You can organize your menus and menu items by nesting menus. Sub-menus can be identified by the arrow on the right side of the entry label.
There are actually more than 100 different locations you can choose from (see siMenuAnchorPoints for the complete list). These locations are called menu anchor points which you specify during menu registration (see Registering a Custom Menu in Softimage). Anchor points can be used on:
You have the option of creating either static or dynamic menus. Menus are rebuilt every time they are loaded or reloaded in Softimage, but you can also choose to rebuild them every time their parent (the menu on which they are anchored) opens.
For example, you can assign a filter to am item on your menu (using the MenuItem.Filter property) for validating the menu against the target or selected objects before it gets displayed. If the filter criteria is not satisfied then the custom menu item is either greyed out or, if attached to a contextual menu, removed.
Alternatively, you could limit menu items from appearing if certain conditions are not met. For example, your menu Init callback might look like this:
if ( Selection.Count > 0) {
		menu.AddCommandItem( "Add Duck To Water", "AddDuckToWater" );
	} else {
		menu.AddCommandItem( "Drain Tub", "DrainTub" );
	}

	menu.AddCommandItem( "Add More Hot Water", "AddMoreHotWater" );
With this example, if nothing is selected in the current scene when the user opens the menu, only the Drain Tub and Add More Hot Water command entries will appear. If something is selected, the Add Duck to Water and Add More Hot Water command entries appear instead.
By default, menus are dynamic. To make your menu static, you can set the Dynamic parameter to false when you call the RegisterMenu (PluginRegistrar) method inside the XSILoadPlugin registration callback.
Yes. While menus can be scripted or compiled, they cannot be created on the fly (in the Script Editor). You must implement your custom menus as a self-installing plug-in using the correct callbacks. For more information, see Self-Installing Plug-ins.
You can also see the Simple Menu example that shows how to add custom menus in Softimage. This example is located in the examples folder of the Softimage SDK installation directory.
 Except where otherwise noted, this work is licensed under a Creative Commons Attribution-NonCommercial-ShareAlike 3.0 Unported License